
Welcome to the Second Life Forums Archive
These forums are CLOSED. Please visit the new forums HERE
Show Us Your Sculpties! |
|
|
Aminom Marvin
Registered User
Join date: 31 Dec 2006
Posts: 520
|
12-09-2007 00:21
Here's a sculpted space plane thing. It uses 28 prims right now, all of which are sculpts except for 3 for the wheels. It isn't finished; I need to tweak some things and add in some more detail (all of the sculpts aren't used to their maximum potential) and finish/refine the textures. Has detail down to flight yoke, borders of displays and buttons represented with geometry, and four missiles. There's no alpha used here except for the central HUD in the cockpit.
|
|
Blake Sachs
Gasoline, Baby!

Join date: 15 Sep 2005
Posts: 122
|
12-09-2007 09:04
XD It looks like the offspring of a Death Glider and an X-Wing. Good work!
|
|
Cel Edman
Registered User
Join date: 24 May 2007
Posts: 42
|
12-09-2007 13:20
 The geometric pole in the foreground is 1 red/ 1 grey/ 1black sculpty, I only could upload this /and show correct in the new release candidate, where the lossless bug is kinda fixed. 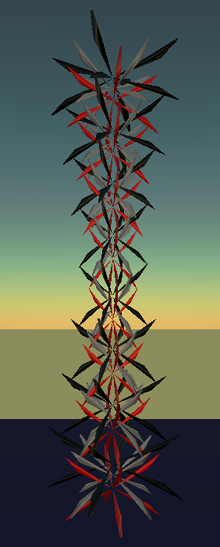 another 3-prim sculpted structure, I created this evening. |
|
Blake Sachs
Gasoline, Baby!
Join date: 15 Sep 2005
Posts: 122
|
12-09-2007 17:10
Yep, lossless uploading seems to be finally working in this RC. When I first tried it, it worked, then after a relog the sculpts were borked again. But now it seems to be stable
 Here's a little project I've been working on for a while, but hesitated to actually bring inworld before lossless compression was fixed. It's a sort of musclecar/sporty coupe... okay, right now it's just the sculpted bodyshell, but interior, wheels etc. will follow shortly. Modeled in Blender btw.   |
|
Gattz Gilman
Banned from RealLife :/

Join date: 29 Feb 2004
Posts: 316
|
12-09-2007 18:38
O.O ....... *wipes drool*
*bows to the master* teach me oh great master... umm..*cough* how many prims is it? _____________________
|
|
Graphicguru Gustav
Accepts head scritchings!

Join date: 5 Oct 2007
Posts: 775
|
Sculptie Pumps
12-10-2007 09:19
These pumps will be available (SOON) at Asri Falcone's (the former owner of La Cadre-high fashions) new store which is also being built and developed.
I was in the right place at the right time, and got lucky...I am being paid top dollar for this kind of work. She is commissioning me to create a complete new line of high fashion shoes, boots and accessories, as well as high end Victorian furniture. Wish me luck! P.S. I am using the Animation Master 3D application, exporting to .3ds, she handles it from there (I am no scripter)... I will be using Maya very soon to create more sculptie marketable wares. _____________________
I am officialy lurking the forums, trying real hard to not be noticed...
Junk & stuff I do... http://tinyurl.com/3549gg |
|
Okiphia Rayna
DemonEye Benefactor

Join date: 22 Sep 2007
Posts: 2,103
|
12-10-2007 09:32
These pumps will be available (SOON) at Asri Falcone's (the former owner of La Cadre-high fashions) new store which is also being built and developed. I was in the right place at the right time, and got lucky...I am being paid top dollar for this kind of work. She is commissioning me to create a complete new line of high fashion shoes, boots and accessories, as well as high end Victorian furniture. Wish me luck! P.S. I am using the Animation Master 3D application, exporting to .3ds, she handles it from there (I am no scripter)... I will be using Maya very soon to create more sculptie marketable wares. very nice ^_^ _____________________
Owner of DemonEye Designs Custom Building and Landscaping
Owner and Blogger, Okiphia's Life http://okiphiablog.blogspot.com/  |
|
Blake Sachs
Gasoline, Baby!
Join date: 15 Sep 2005
Posts: 122
|
12-10-2007 17:39
umm..*cough* how many prims is it? 12 prims so far. I already know could've gotten away with 8 or so, but 12 isn't too bad and allows for more detail, especially keeping things like textures in mind... and some ideas for the future I won't give away yet ;P |
|
Gattz Gilman
Banned from RealLife :/
Join date: 29 Feb 2004
Posts: 316
|
12-10-2007 18:37
12 prims so far. I already know could've gotten away with 8 or so, but 12 isn't too bad and allows for more detail, especially keeping things like textures in mind... and some ideas for the future I won't give away yet ;P How does SL's LOD handle it? Does it still make it look like a car or totally mess it up? _____________________
|
|
Yabusaka Loon
Registered User
Join date: 8 Jun 2007
Posts: 15
|
Sculptie Anime Avatar
12-11-2007 17:48
Full sculpt anime avatar & Tip Jar
made with 28 sculptie all textured Its not bad under LOD too My store: http://slurl.com/secondlife/Spectre/30/81/44 My blog (Japanese): http://yabusaka.slmame.com/ |
|
Gattz Gilman
Banned from RealLife :/
Join date: 29 Feb 2004
Posts: 316
|
12-14-2007 19:18
Still new to sculpties, but i use ZBrush to make the sculpty, then export it to AC3D and use the plugin to export the sculpty map.
My question is, what is a good program to bake shadows onto a texture map? I know ZBrush can do a basic one, which you drop it onto the canvas then pick it back up, but then you get this nasty edge on the texture. So, only works for simple shapes. I know that Blender can bake shadows, but I havent been able to find a good walkthrough on how to set this up. Most people who has used Blender know it has an aweful UI. :/ Here is an example for my first actual modeled sculpty (the comforter). The pillows were a test in Blender that using the sculpt option and the matress was made with Sculpty Paint. You can see that on one side you have the nice lighting and shadowing, but on the other, its very plain. I did just a white color and baked the shadowing, then just did an overlay of another fabric in PSP for the colors/pattern. _____________________
|
|
Okiphia Rayna
DemonEye Benefactor
Join date: 22 Sep 2007
Posts: 2,103
|
Football!
12-14-2007 20:36
I wanted something a bit more complex than my two-color snowman, so I decided to make a football to learn a bit more about texturing the sculpty.. so, here it is!
Sculpted in wings3d from a sphere, it is not quite symmetrical, and its laces are raised (Though as a kinda dragged spike at the moment, not individual laces). Texture done in Photoshop Elements, using Chosen Few's texture alignment pattern. _____________________
Owner of DemonEye Designs Custom Building and Landscaping
Owner and Blogger, Okiphia's Life http://okiphiablog.blogspot.com/ |
|
Domino Marama
Domino Designs
Join date: 22 Sep 2006
Posts: 1,126
|
12-15-2007 00:14
My question is, what is a good program to bake shadows onto a texture map? I know ZBrush can do a basic one, which you drop it onto the canvas then pick it back up, but then you get this nasty edge on the texture. So, only works for simple shapes. I know that Blender can bake shadows, but I havent been able to find a good walkthrough on how to set this up. It sounds like you are most of the way there, you just need to work on the lighting in the scene as the default light setup in Blender isn't ideal for texture baking. A dome light setup is great for texture baking. I use this method but delete an extra ring of vertices around the horizon to leave a little more overhead for the Second Life shaders to work with. Adding an AO layer as an overlay layer in The Gimp at about 50% strength to the texture baked with dome lights can help give good results too. http://www.geneome.net/index.php/?s=lighting |
|
Blake Sachs
Gasoline, Baby!
Join date: 15 Sep 2005
Posts: 122
|
12-15-2007 00:51
How does SL's LOD handle it? Does it still make it look like a car or totally mess it up? I honestly haven't tested that in-depth. But I've started from a fairly low-vertex shape and worked my way up to full 32x32 detail... at 16x16 there shouldn't be too much difference, beyond that... the lower LODs look OK at a distance, no idea how it looks up close. +1 on Domino's comment about using AO in Blender. The baking process is the same as with the sculpt texture, if you know how to get a sculpt texture from it (there's a bunch of tutorials for that) you can bake Ambient Occlusion too. Just do it at a reasonably high resolution. Take texture into *insert graphics software of choice* as a separate layer set to "overlay", add some gaussian blur for soft shading and there you are. |
|
Gattz Gilman
Banned from RealLife :/
Join date: 29 Feb 2004
Posts: 316
|
12-15-2007 01:02
It sounds like you are most of the way there, you just need to work on the lighting in the scene as the default light setup in Blender isn't ideal for texture baking. A dome light setup is great for texture baking. I use this method but delete an extra ring of vertices around the horizon to leave a little more overhead for the Second Life shaders to work with. Adding an AO layer as an overlay layer in The Gimp at about 50% strength to the texture baked with dome lights can help give good results too. http://www.geneome.net/index.php/?s=lighting That was actually done using ZBrush, then used PSP to fix the nasty edges. Was playing with Blender, but cant figure out how to make the model material to be something smooth. its always shiny... Watching some of the video tutorials on that site now. Hopefully one of them helps fix my problem. _____________________
|
|
Trimzi Hedges
Mutated at Mutant Lives

Join date: 14 Jun 2004
Posts: 56
|
12-17-2007 09:15
Here is a reindeer, Rudolph and a Snowman all animated and sculpted, made with Zbrush and Wings3d. I've been doing sculpies for my avatars, but this was simply for fun. They can be seen in the Gamma Quadrant, by the Ice Rink in person. There is a flying one jumping over the rink.
Adult Reindeer, 9 prims Rudolph 11 prims with glowing, on off nose Snow man is 17 prims _____________________
Please visit Main Store, Mutant Life, Kojin, 100,56,28. Dore, 212,211,32, Seongsil,126,206,28, Starfleet Sector 001, 115,243,25 all items at XStreet SL http://www.freewebs.com/mutantlives/MUTANTLIVESCLEARBACKGROUND.png
|
|
Sylvia Trilling
Flying Tribe

Join date: 2 Oct 2006
Posts: 1,117
|
12-17-2007 12:05
Still new to sculpties, but i use ZBrush to make the sculpty, then export it to AC3D and use the plugin to export the sculpty map. My question is, what is a good program to bake shadows onto a texture map? I know ZBrush can do a basic one, which you drop it onto the canvas then pick it back up, but then you get this nasty edge on the texture. So, only works for simple shapes. See my tutorial for how to fix that nasty edge by taking it into photoshop. http://www.throughlinedesign.com/ZbrushBakeTut/page1.html |
|
Gattz Gilman
Banned from RealLife :/
Join date: 29 Feb 2004
Posts: 316
|
12-17-2007 22:20
See my tutorial for how to fix that nasty edge by taking it into photoshop. http://www.throughlinedesign.com/ZbrushBakeTut/page1.html Which I did, but the issue is how ZBrush's baking only does the real shading on the side you see. _____________________
|
|
Sylvia Trilling
Flying Tribe
Join date: 2 Oct 2006
Posts: 1,117
|
12-18-2007 18:18
Which I did, but the issue is how ZBrush's baking only does the real shading on the side you see. See my tutorial. I explain how to do both sides. |
|
whyroc Slade
Sculpted and Blended

Join date: 23 Feb 2007
Posts: 315
|
12-19-2007 07:51
Haven't used Zbrush as much as Blender...
Are you missing a light in the back? The other way is to turn the object 180 each time you drop an pickup. -w _____________________
Sculpt Maps Galore - 100's of full perm sculpt maps. Top quality sculpts - low prices.
http://slurl.com/secondlife/Poecila/50/54/92 |
|
FD Spark
Prim & Texture Doodler

Join date: 30 Oct 2006
Posts: 4,697
|
12-19-2007 14:52
Great Sculpties all.
Bumping. _____________________
Look for my alt Dagon Xanith on Youtube.com
Newest video is Loneliness by Duo Zikr DX's Alts & SL Art Death of Avatar |
|
Timmi Allen
Registered User
Join date: 15 Feb 2007
Posts: 22
|
12-19-2007 15:26
Hi Rimzi,
You had the same idea. A reindeer and snowmen. The reindeer has 9 Prims, including shadow. @ Gattz, Blender go to the "Edit Mode" and then select "Set Smoot." There is a general problem. SL reads the Sculpties with 33 x 33 points. The top row is summarized in one point, and so the bottom line. The other 31 lines times 33 points are correctly interpreted. This gives a total of 1025 points for the Sculptie. SL allows images, but only in the resolutions 32x32, 128x128, 256x256, 512x512 and 1024x1024. The conversion of the resolution in 33x33 must therefore always be inaccurate. Timmi |
|
Gattz Gilman
Banned from RealLife :/
Join date: 29 Feb 2004
Posts: 316
|
12-20-2007 18:28
Well, i figured the lighting part, and preparing it for baking. But now i have a new issue. I posted the problem in the texturing forum:
/109/bc/230995/1.html So atleast this thread can get back on topic. A trick i heard for added security from someone stealing your sculpt map. Make it a 32bit tga with a white alpha layer. So that the texture looks transparent. The Sculpty engine does not read the alpha layer when rendering the sculpt, and all you will see in the thumbnail for the sculpt texture is that grey and white checkered grid. Stop anyone from taking a screen shot of it and crop out the sculpt map. You cold even get creative with the alpha layer and put in your sl name or store name. _____________________
|
|
Timmi Allen
Registered User
Join date: 15 Feb 2007
Posts: 22
|
Sculpty Experiment
12-29-2007 15:11
I have experimented again. Here are the results as a movie.
http://de.youtube.com/watch?v=Jd-LUxSPIl0 greetings Timmi |
|
Seifert Surface
Mathematician

Join date: 14 Jun 2005
Posts: 912
|
12-29-2007 21:54
Very cool Timmi
") _____________________
-Seifert Surface
2G!tGLf 2nLt9cG |