Blender Sculptie Importer - Attached
|
|
Domino Marama
Domino Designs
Join date: 22 Sep 2006
Posts: 1,126
|
08-27-2007 10:10
I'm going to assume the cylinder is just an example, as you'd really be better using a cylinder unwrap for that ") The sculptie bake looks like you have unchecked "Faces", without this the fill routine has a lot of ground to cover. Unless you have a really good (ie pixel perfect & edge to edge) map you get a sculptie image like the one you show. Basically some pixels get stretched to the edges. Fill is really there to cover cases where you have holes in the uv map. Both Faces and Fill are checked by default and that'll usually give the best result. Just to clarify, fill on it's own needs a pixel at the beginning and end of each image row that has a vert on. Any row with a single pixel will end up as a single color band across the image. It's there as a time saver and as a last resort for putting something resembling a correct value on any pixels that weren't baked with the Faces fill. This was just to avoid a bunch of verts ending up at 0,0,0 (black), by giving them an interpolated value they should be nearer to their proper position. Turning both Faces and Fill off lets you see how the verts are baked to each pixel. This can be handy for aligning the UV map. With Faces checked you can see how the triangle fill routines look. With a full UV map, that's all you need. If there are holes in the map ( eg at corners due to subdividing the model ) then you can turn Fill on and it'll interpolate or stretch at the edges to fill the gaps. If the gaps are too big then the fill will do the stripey thing your bake shows. |
|
Randolph Peccable
Registered User
Join date: 12 Jul 2007
Posts: 20
|
08-27-2007 16:20
From: Domino Marama I'm going to assume the cylinder is just an example, as you'd really be better using a cylinder unwrap for that The sculptie bake looks like you have unchecked "Faces", That's correct. Chalk it up to me being unable to tell whether Blender buttons are off or on. Turning "Faces" back on fixes the banding issue in the sculpty map. Thank you. I'm still not able to produce a working sculpty map no matter what unwrapping technique I use. After squaring the UV map and moving points around to eliminate overlaps, I end up with so much distortion that the resulting sculpty doesn't look anything like the original model. The process of tweaking the UVs for the sculpty map seems to me to be as difficult and time-consuming as building the model in the first place. Witness this attempt at a cylinder map. The map on the left is the adjusted UV map along with a baked sculpty map, while on the right we see the resulting sculpty: 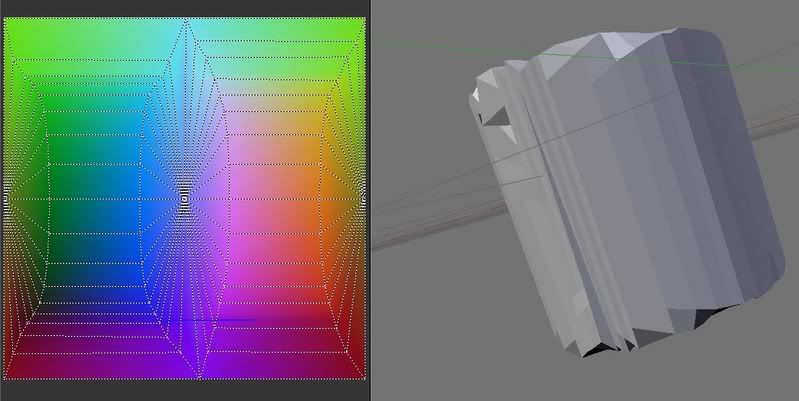 I think I'm just out of my depth. The Suzanne example you did leaves me in complete awe. If I can't get a cylinder to work, I'm probably better off going back to building stuff out of prims. Thanks again for all the help. I appreciate your time. |
|
whyroc Slade
Sculpted and Blended

Join date: 23 Feb 2007
Posts: 315
|
08-27-2007 16:42
Randolph, having a quick look at your model and the UV's I notice it doesn't seem to be subdivided enough. You should try to tighten it up, especially in the vertical direction.
I think having a minimum 1024 total vertices in the UV map will help in the unwrapping and baking for SL.
-whyroc
_____________________
Sculpt Maps Galore - 100's of full perm sculpt maps. Top quality sculpts - low prices.
http://slurl.com/secondlife/Poecila/50/54/92
|
|
Domino Marama
Domino Designs
Join date: 22 Sep 2006
Posts: 1,126
|
08-27-2007 16:59
The first video was really just to demo the scripts. The planar wrap in particular is generally going to be your last option to choose when creating sculpties, it's the hardest to do of them all. All the later videos show much easier methods that will get better results. Remember the map changes when you import a sculptie, to lots of little squares. triangles in particular don't convert to squares very well and a good amount of your cylinder unwrap is taken up with these. Try starting with a 4 vertice cylinder with no end caps. just do a cylinder unwrap from the front view. the uv map for that should end up as 4 vertical bars. you can do a loopcut of 3 horizontally to get a grid of 4 x 4 squares, then use multires or smooth subdivide a few times to get to the 32 x 32 grid. scale the top and bottom loops to 0, move them in so they are level with the next row, and you have a perfectly unwrapped cylinder. Edit: just in case you really still want to pursue manual unwrapping, I've attached a texturing grid. This only has 16 squares rather than 32, but I find it handy to load into the UV window when pushing those verts around. If you put the verts at the corner of a square you'll get better results. You can imagine each square as cut into 4 and use all the "corners" or maybe make a better template. If you are baking larger than 32 x 32 then it is the bottom left pixel of each square that is significant. So on a 64 x 64 it's best to put verts in the bottom left of each 2 x 2 group of pixels. Edit: Better grid available: http://dominodesigns.info/images/sculptie_grid.png |
|
Domino Marama
Domino Designs
Join date: 22 Sep 2006
Posts: 1,126
|
08-27-2007 17:09
From: whyroc Slade Randolph, having a quick look at your model and the UV's I notice it doesn't seem to be subdivided enough. You should try to tighten it up, especially in the vertical direction.
I think having a minimum 1024 total vertices in the UV map will help in the unwrapping and baking for SL.
-whyroc Having more vertices can help the unwrappers, but isn't essential for the baking. If you are baking a low vert model with a full square UV and the sculptie isn't coming out essentially the same, it may be a bug with my scripts. Make sure you are on latest baker before reporting, I just fixed some of those issues yesterday |
|
TomHa Zymurgy
Registered User
Join date: 15 May 2007
Posts: 7
|
Thank you =D
08-28-2007 06:35
Thanks a lot Domino for your last script! the new options are just what was waiting for for so long... Bravo! (i ll try to modify it for few more... like hard coded uv map... and no interpolation fill.. ready to import to the point sculpted texture ) |
|
Rohan Fermi
Registered User
Join date: 16 Aug 2006
Posts: 2
|
os module
08-28-2007 07:37
From: Domino Marama Hmm, I'd not realised that by using the os module I'd made the scripts dependent on a full Python install rather than just the cut down Blender one. I only use the os module for converting the filename to the base name for the sculptie object in a platform independent way. I like that feature but not sure whether it warrants a full Python install. I'll make it optional in a future release. Edit: now patched in 0.09 import. You can download the scripts again instead of Python ") Hi there, great bunch of scripts. I'm new to sculpting, but what I've seen so far looks great. When trying to bake, I get that same error becaus of the reference to the os module is in the bake script as well. Hope there is a way to get that removed there as well like in import. Tnx |
|
Domino Marama
Domino Designs
Join date: 22 Sep 2006
Posts: 1,126
|
08-28-2007 08:19
From: Rohan Fermi Hi there,
great bunch of scripts. I'm new to sculpting, but what I've seen so far looks great.
When trying to bake, I get that same error becaus of the reference to the os module
is in the bake script as well. Hope there is a way to get that removed there as well like in import.
Tnx Not sure how that got left in. It's not even used in the baker. You can edit the script with any text editor and just delete the line that says: import os and all will be fine. |
|
Domino Marama
Domino Designs
Join date: 22 Sep 2006
Posts: 1,126
|
Blender Scripts Updated
08-29-2007 09:31
New scripts up. All three updated. This is the first step towards supporting other prim types. The scripts now maintain information about sculpties in the Blender objects properties. You can see this used with the bake script by checking the console afterwards. Yes, that's LSL ready to copy and paste into a script to recreate the sculptie in SL you can see..
The bake script will prompt for the sculptie prim type if not already set. You can manually change the type in the logic panel in Blender. LL_PRIM_TYPE is 7 for a sculptie and LL_SCULPT_TYPE is 0 to 3 as per the importer.
All scripts have the os import removed now, so should work fine without a full Python install.
|
|
Randolph Peccable
Registered User
Join date: 12 Jul 2007
Posts: 20
|
08-29-2007 12:22
I'm sorry to be so dense, but I'm still having absolutely zero success with getting usable sculpties out of Blender. I followed and copied the Suzanne example with reasonable success, so I'm baffled as to why I can't get any other model to unwrap and bake the same way.
Could some kind soul do a very quick explanation of how one would unwrap a few different shapes (e.g. an hourglass, a gingerbread man) and tweak the maps? I'd be willing to pay you for your time in Lindens.
Thanks.
|
|
Domino Marama
Domino Designs
Join date: 22 Sep 2006
Posts: 1,126
|
08-29-2007 15:09
From: Randolph Peccable I'm sorry to be so dense, but I'm still having absolutely zero success with getting usable sculpties out of Blender. I followed and copied the Suzanne example with reasonable success, so I'm baffled as to why I can't get any other model to unwrap and bake the same way.
Could some kind soul do a very quick explanation of how one would unwrap a few different shapes (e.g. an hourglass, a gingerbread man) and tweak the maps? I'd be willing to pay you for your time in Lindens.
Thanks. I doubt I'd try to unwrap a gingerbread man. It'd be quicker to model it from a base sculptie such as a cylinder or sphere. There's no automatic unwrap that will come close on this, any other method is likely to need hours of manual unwrapping. Unwrapping with "Cylinder from View" should come pretty close for an hour glass, though again I'd be tempted to just make one starting with the multires cylinder base sculptie I described a few posts back. |
|
CoyoteAngel Dimsum
Registered User
Join date: 26 Mar 2006
Posts: 124
|
Inside out?
08-30-2007 12:12
I've been using the unwrapping feature and am pretty happy with it, especially the most recent version.
But...once uploaded and applied, my sculpted prims look "inside out". I don't know how else to describe it. This just started happening, but I don't know if it's me or a bug.
_____________________
-CoyoteAngel Dimsum/Lynne Wu
|
|
Yrrek Gran
Crackpot Inventor
Join date: 20 Oct 2006
Posts: 209
|
08-30-2007 12:42
CoyoteAngel, That sounds like the map is flipped left to right. An old problem that has pretty much disappeared. If that is the case, just edit the sculpty map in a paint program, and "Flip" it horizontally. Upload it and test it. |
|
Domino Marama
Domino Designs
Join date: 22 Sep 2006
Posts: 1,126
|
08-30-2007 12:48
From: CoyoteAngel Dimsum I've been using the unwrapping feature and am pretty happy with it, especially the most recent version.
But...once uploaded and applied, my sculpted prims look "inside out". I don't know how else to describe it. This just started happening, but I don't know if it's me or a bug. Is this just with the EAC unwrapper? If so let me know what axis you used so I can try and duplicate the issue. A quick fix would be to do m1 (for mirror x) on the uv map, but if it's doing it every time then it could be a bug. |
|
CoyoteAngel Dimsum
Registered User
Join date: 26 Mar 2006
Posts: 124
|
08-30-2007 13:08
I'll check, thanks.
While I'm at it, though, is there a way to scroll (X or Y) in the UV/Image map editing pane in Blender? I can zoom in and out until the cows come home, but haven't found a way to scroll vertically or horizontally, which makes tweaking it very difficult.
_____________________
-CoyoteAngel Dimsum/Lynne Wu
|
|
Domino Marama
Domino Designs
Join date: 22 Sep 2006
Posts: 1,126
|
08-30-2007 13:14
Yes, you can drag it around by holding middle mouse button.
|
|
CoyoteAngel Dimsum
Registered User
Join date: 26 Mar 2006
Posts: 124
|
08-30-2007 18:22
From: Domino Marama Is this just with the EAC unwrapper? If so let me know what axis you used so I can try and duplicate the issue.
A quick fix would be to do m1 (for mirror x) on the uv map, but if it's doing it every time then it could be a bug. Must have been something I was doing. I started from scratch and was ok. I did find a situation with bilaterally symmetric structures (imagine a bird's skull) in normal position (pos: 0,0,0 rot: 0,0,0) being unwrapped (Z axis). Along the leftmost Y-axis in the UV image, a few points incorrectly (?) end up there, leaving a small gap in the right-most Y-axis. If I rotate the mesh any amount around the Z-axis, the points split (left and right) correctly. My apologies for the painful wording, but 3D is new to me. Looks like it's the sort of thing that happens as a resulting of rounding/truncation. I'll try to reproduce and get screen shots.
_____________________
-CoyoteAngel Dimsum/Lynne Wu
|
|
Domino Marama
Domino Designs
Join date: 22 Sep 2006
Posts: 1,126
|
08-31-2007 02:10
I think I know what you mean. Say the entire unwrap was two rectangles side by side, on the right rectangle, the edge that should be furthest right is ending up at the left? This is a limit of the way the EAC unwrap is coded. It's a simple mathematical projection. There's code in there to detect and correct obvious "side errors" but there still can be faces that end up wrong. If I ever think or learn of a way to detect these then I'll add automatic correction, but until then the slight rotation (good thinking!) or a subdivide will generally help the unwrap get it right, or you can correct them manually. I never expected this unwrap to be so popular, I prefer to model my sculpties from scratch. You get a lot more control that way |
|
Bobby Dayton
Test Pilot for Airfix
Join date: 15 Nov 2003
Posts: 206
|
Embarrasing admission.
08-31-2007 02:47
I have been trying to follow this thread for a while and I think I know why I am having problems. I dont understand the basics of 3d modelling yet. I keep seeing baking and unwrapping and I still dont understand what that means. I have tried the Blender handbook and its till like a foreign language. I went to one of Whyroc's classes a week ago. It was great but I still had the same problem. I could follow the steps he had shown but I hadnt a clue why we did each step. Can someone explain the fundemental steps or point me to an idiots guide somewhere. I have read the wiki on sculpting, but I dont see mention of unwrapping and baking.
|
|
Domino Marama
Domino Designs
Join date: 22 Sep 2006
Posts: 1,126
|
08-31-2007 04:00
Hi Bobby,
No need to be embarrassed. This is basically an early adopters program until the scripts are mature enough to do in depth website tutorials. So comments that highlight what I need to cover in more detail are particularly welcomed. It's me that should be embarassed for not realising I hadn't explained a lot of the basic concepts behind what I'm doing.
UV mapping / unwrapping is the process of taking a 3D model and doing a 2D representation of it. The earliest forms of this are world maps. There the 3D sphere of the world is drawn as a 2D map. With sculpties, the unwrap can be thought of as a square of stretchy fabric vaccum wrapped around the model.
So when we unwrap a model to make a sculptie, we are just defining which part of the "fabric" is at each point in the 3D space.
The way the edges of the "fabric" are handled determines the type of sculptie:
sphere: left and right edges stitched together. top drawn together to a point (aka pole) and bottom drawn together to a point
torus: left and right edges stitched together, top and bottom stitched together
cylinder: left and right edges stitched together
plane: no stitching
With 3D models, it's possible to use a whole range of techniques for texturing them, however these can be slow to render. Much like pottery and glazes are baked in an oven to set their final form, materials on a 3D model can be baked to an image. This is where the UV map is used to say which parts of the image relate to which parts of the model. Then instead of using the materials on the model, the baked texture image can be used instead.
With sculptie maps, when we talk about baking, it's not the material we want to bake, but the position in 3D space. This is done by converting X to red, Y to green and Z to blue to give a color representation of a point in space. This is then baked to the sculptie image map.
Any clearer?
|
|
Bobby Dayton
Test Pilot for Airfix
Join date: 15 Nov 2003
Posts: 206
|
08-31-2007 04:39
Lots & lots clearer. All the writups I had read so far seemed to assume a certain background knowlege, which I was lacking. So, as far as I can gather with an SL "sculptie" you are limited to the number of points used to bake your texture, I think its 1024. So does that mean, in Blender, the object I unwrap ready to re-model and subsequently bake must be designed for SL with the exact right number of points (vertices?) in the first place. I read somewhere you cant have an object with something like a hole in it. But I am hoping there are some ready made starting points like the prims in SL to unwrap and start with. I suppose what I am trying to understand is at what point in Blender does a 3d object get to conform to SL's Sculptie rules. Is it when an object is imported. Or does it matter the number of points before baking as the baking process will smooth things out to give the right number for the map/texture? The mud is getting clearer, honest |
|
Domino Marama
Domino Designs
Join date: 22 Sep 2006
Posts: 1,126
|
08-31-2007 06:03
The sculptie UV map that Second Life uses is fixed (when you import without removing doubles, the map generated is the same as the SL one). It is possible to use a different amount of verts in blender to do the bake, but it will be seen as a 32 x 32 face grid when SL reads it. That's why I have the texture grid for manual unwraps. By loading this into the UV layout window you can see how well your uv points and edges match the grid.
Blender doesn't really need to conform to the sculptie rules, BUT the baked sculptie map does. In practice this means get to a square UV map ASAP and don't break it with any further modelling you do. This is why starting with an already unwrapped sphere is a popular approach.
The baker script is designed to draw a straight line between points, so making sure the lines on the uv map match the lines on the sculptie grid will give better results. You want the folds on your model to match the folds available on the sculptie grid.
It's personal preference whether to clean up the UV on a model or just bake a rough sculptie and clean up the import. Building a sculptie compatible model is the best approach. This is why I did 4 steps and not 3 or 5 in the stairs video (in another thread) - the UV lines from the edge of the steps match the sculptie grid automatically. It's why in the wheels of time video I chose 32 for the spin value and why I subdivide by 3 ( to get a 4 x 4 grid) in the multires video.
Each of the videos I've done show a different way to get to a "starter sculptie" in Blender. There's really only 3 basic ones to consider. Plane, cylinder (doubles as sphere) and torus. The EAC unwrap is an alternative way to get to a sphere style sculptie.
Plane isn't worth having a starter sculptie for, this is shown in the multires example and it's as quick to make a new one as navigating and loading a file.
Cylinder is perhaps worth saving as a starter sculptie just before the adding multires step. This way you can load the starter and use either catmull clark or simple subdivide as the multires type depending on if you want a smooth or edged model.
Torus I've not covered yet in a video, it's a little more complex to unwrap but does allow a hole in the model.
|
|
Domino Marama
Domino Designs
Join date: 22 Sep 2006
Posts: 1,126
|
09-06-2007 01:50
One more tip for anyone experimenting with the EAC Unwrap, in the edit panel hit the "Centre New" button before unwrapping. This will move the centre of the object to the centre of the verts. This is generally the best place for it for the EAC Unwrap. You can see the difference with the avatar meshes as these have the centre at 0,0,0 after import so EAC fails miserably to get usable results unless you do the "Centre New" first.
|
|
Jathiros Lassard
Registered User
Join date: 10 Apr 2006
Posts: 1
|
09-07-2007 11:47
I'm pretty much new to the whole sculpting and unwrapping. Actually i'm curious where the "Planar Unwrap" option is hiding, i can't find it anywhere in Blender. And I'd really prefer to try that instead of the EAC Unwrap.
|
|
Domino Marama
Domino Designs
Join date: 22 Sep 2006
Posts: 1,126
|
EAC Unwrap is Planar Unwrap
09-07-2007 12:45
EAC Unwrap with Axis set to Y does exactly the same as the Planar Unwrap script did.
Once I found out that I'd "rediscovered" equal area cylinder projections I renamed Planar Unwrap to EAC Unwrap to fit the Blender naming conventions for unwrappers. At the same time I added the support for the the X and Z axis.
So v0.01 was called Planar Unwrap and v0.02 plus future updates are called EAC Unwrap
|