Ok, I have just tried it again. I am at work so different ISP/Computer etc. I get zip invalid or corrupt. I am using XP with Internet Explorer. However the same file which I finally got with that download client recommended is on my website.
www.boblister.co.uk/blender_scripts.zip
I can download that from here no problems. Hope that helps.
Welcome to the Second Life Forums Archive
These forums are CLOSED. Please visit the new forums HERE
Blender Sculptie Importer - Attached |
|
|
Bobby Dayton
Test Pilot for Airfix
Join date: 15 Nov 2003
Posts: 206
|
08-24-2007 01:54
|
|
Domino Marama
Domino Designs
Join date: 22 Sep 2006
Posts: 1,126
|
08-24-2007 02:35
Well, it might have helped a lot. I was starting to see a XP, IE trend so concentrated on that. It seems there are known problems in IE6 and IE7 on XP sp2 with it incorrectly handling gz compressed http streams. So I've turned off gz compression on the downloads folder. Just need someone to confirm whether that's fixed it or not
") |
|
Abraham Attenborough
Registered User

Join date: 4 Feb 2007
Posts: 96
|
08-24-2007 03:29
IE7/XP download tested, file corrupt
|
|
Domino Marama
Domino Designs
Join date: 22 Sep 2006
Posts: 1,126
|
08-24-2007 04:02
IE7/XP download tested, file corrupt /me hopes you forgot to clear cache first.. If not could you confirm if I'm on the right path? If it is the problem with gzip compression not being removed by ie then adding .gz to the filename should let 7zip winzip etc open it correctly. |
|
Bobby Dayton
Test Pilot for Airfix
Join date: 15 Nov 2003
Posts: 206
|
08-24-2007 04:48
Just tested. Still the same with me, showing corrupt.
|
|
Domino Marama
Domino Designs
Join date: 22 Sep 2006
Posts: 1,126
|
08-24-2007 06:40
OK, I'm at a loss on the download issues. If anyone has any ideas they can PM me, other than that all I can suggest is using Firefox or a download manager if you have problems with IE on XP.
Back on topic, well side topic -> another good use for plane sculpties is one sided effects such as water. Not sure if Vlad uses Blender or planes, but it's one way to do this sort of thing: /53/fd/182727/11.html#post1649013 |
|
Domino Marama
Domino Designs
Join date: 22 Sep 2006
Posts: 1,126
|
How to make a sculptie with LOD control
08-24-2007 08:07
I'm not making anything specific in this one. Just a quick demonstation of how I make a sculptie with full control over how it looks at different LOD levels
http://dominodesigns.info/downloads/tutorials/blender/using_multires.swf |
|
Abraham Attenborough
Registered User
Join date: 4 Feb 2007
Posts: 96
|
08-24-2007 11:15
really nice man, never tried multires b4 cz i never needed, or better said:never knew i need it. thx
*edit: LOL, i gave the download another try and it seems to work now also with ie7. did u made any further changes? |
|
Domino Marama
Domino Designs
Join date: 22 Sep 2006
Posts: 1,126
|
08-24-2007 13:24
really nice man, never tried multires b4 cz i never needed, or better said:never knew i need it. thx *edit: LOL, i gave the download another try and it seems to work now also with ie7. did u made any further changes? Thanks. You can do the same trick with a cylinder. I make a 4 vert cylinder with no end caps, then rotate 45 degrees to align the verts with an axis. Select the edge on -ve X and mark as seam, then do the unwrap. Once UV map is square, select the 4 edges do a subdivide multi with 3. This should give you a 4 x 4 grid on the UV map like that step on the plane. It's the same as the plane from there but you have a mesh more suited for sphere and cylinder sculpties. And yes I did make another change. I rezipped with Vista's built in zip folder thing and reuploaded. I didn't really expect it to make a difference though. The new zip is slightly larger so I'm guessing 7zip uses a compression routine that XP + IE doesn't like. Seems odd that it would corrupt it though, I'd expect a browser to just pass a zip file through, not try to do anything with it.. |
|
whyroc Slade
Sculpted and Blended

Join date: 23 Feb 2007
Posts: 315
|
08-24-2007 13:49
I'm not making anything specific in this one. Just a quick demonstation of how I make a sculptie with full control over how it looks at different LOD levels http://dominodesigns.info/downloads/tutorials/blender/using_multires.swf nice demo, in one step you are flattening the top of the 'bump' you created on the plane.. Is this just scaling on the z axis? -whyroc _____________________
Sculpt Maps Galore - 100's of full perm sculpt maps. Top quality sculpts - low prices.
http://slurl.com/secondlife/Poecila/50/54/92 |
|
Domino Marama
Domino Designs
Join date: 22 Sep 2006
Posts: 1,126
|
08-24-2007 14:15
nice demo, in one step you are flattening the top of the 'bump' you created on the plane.. Is this just scaling on the z axis? Yes. After hitting "s" to scale I hit "z" to constrain to that axis then "numpad0" to flatten and "enter" to accept. After a "g" to grab or "s" to scale you can use "x", "y" and "z" to constrain to one axis or "shift" + "x", "y" or "z" to exclude an axis. |
|
Black Dix
Registered User
Join date: 19 Dec 2006
Posts: 2
|
08-25-2007 16:43
Great script Domino.
Seem to be getting an error when trying to back a sculpt map through Render though. |
|
Zen Zeddmore
3dprinter Enthusiast

Join date: 31 Jul 2006
Posts: 604
|
08-25-2007 18:05
thank you! thank you! thank you!!!!
I'd lost all my .blend files and my sculpty tga's of early builds when my computer required reformating. Do you have any idea what it means to get those back after having beleived the irretrevably lost? I do a lot of sculpty animations, and trying to recreate by hand had proved too daunting and inaccurate to interpose new sculpts with old. so i repeat... thank you! thank you! thank you!!!! a truely happy user. _____________________
A kilogram of programmable nanobots can lower the certainty of both death AND taxes.
|
|
Domino Marama
Domino Designs
Join date: 22 Sep 2006
Posts: 1,126
|
08-26-2007 01:26
Great script Domino. Seem to be getting an error when trying to back a sculpt map through Render though. Only time I've got an error is when I forgot to create an image before baking. Other than that I'll need to know the error report from the console window to help identify the problem. Oh and if you are using multires, the Pin setting under render is the multires layer you need to set the UV map image on. If Blender seems to keep forgetting your image (and thus causing a bake error), a mismatch here is the likely cause. |
|
whyroc Slade
Sculpted and Blended
Join date: 23 Feb 2007
Posts: 315
|
08-26-2007 03:28
then "numpad0" to flatten and "enter" to accept. thanks! great tip.. I missed that somewhere along the way. -whyroc _____________________
Sculpt Maps Galore - 100's of full perm sculpt maps. Top quality sculpts - low prices.
http://slurl.com/secondlife/Poecila/50/54/92 |
|
Domino Marama
Domino Designs
Join date: 22 Sep 2006
Posts: 1,126
|
08-26-2007 03:39
thanks! great tip.. I missed that somewhere along the way. -whyroc You can do the same with other commands like rotate.. I find r90<enter> and r45<enter> to be particularly useful |
|
Black Dix
Registered User
Join date: 19 Dec 2006
Posts: 2
|
08-26-2007 04:25
Only time I've got an error is when I forgot to create an image before baking. Other than that I'll need to know the error report from the console window to help identify the problem. Oh and if you are using multires, the Pin setting under render is the multires layer you need to set the UV map image on. If Blender seems to keep forgetting your image (and thus causing a bake error), a mismatch here is the likely cause. Managed to find out what it was, and lo and behold, Python bugging up Appreciate it Domino (Now only to find out how to bake this 1000 vert model correctly, lol) |
|
Domino Marama
Domino Designs
Join date: 22 Sep 2006
Posts: 1,126
|
08-26-2007 15:52
Both import and baker scripts have been updated. See first post for links!
The baker now lets you turn face rendering and the gap filling routines on and off. The triangle fill had a bug which was leading to bumpy faces as one section was rendering a pixel too low. This has been fixed. |
|
Enktan Gully
Registered User
Join date: 6 May 2006
Posts: 27
|
08-26-2007 16:07
Hello,
I'm new to using Blender and I'm trying to import this Second Life Sculptie but I don't see how I can choose the sculptie map to import. I know this is probably a stupid noob question but can someone tell me how/where I can find it? Thank you |
|
Randolph Peccable
Registered User
Join date: 12 Jul 2007
Posts: 20
|
08-26-2007 19:37
Sorry to be dense, but I just can't understand the Planar Unwrap plug-in's behavior.
Where does it divide the model? (Along a seam, along a given axis...?) I watched the Suzanne tutorial, but I'm unable to get the plug-in to give me comparable results. The Suzanne model in the video seems to split along the back of her head; is this right? If so, why? My models always split in some unpredictable way and I can't work out how to correct it. For example, I whipped together a little gingerbread man model out of extruded cube faces. He faces outward along the Y axis (facing me when I choose view 1 from the keypad) in a standard T-pose. When I use Planar Unwrap on him, the resulting map is so chaotic I can't see where he's been split. His arms appear to be smashed together in the center of the map, and what I take to be his legs are on the sides. I can't begin to sort out the points. Can someone give me a simple rundown on how the plug-in chooses to split the model? Thank you, and thanks to DM for all these amazing tools. |
|
Domino Marama
Domino Designs
Join date: 22 Sep 2006
Posts: 1,126
|
08-27-2007 01:16
Sorry to be dense, but I just can't understand the Planar Unwrap plug-in's behavior. Where does it divide the model? (Along a seam, along a given axis...?) It does an equal area cylinder mapping. The poles are on the Y axis with a seam on -ve Z. It really has limited application due to the way it works. think of rays projected from the centre of the sphere. All detail that the same ray passes through ends up at the same point on the unwrap. So we get position on a sphere, but very little in the way of depth of features on that sphere. Particularly if you are making your own models, then modelling with a square UV map in mind is a far better solution than the unwrap scripts. This is what I do in the later videos such as the steps one, wheel one and the multires one. Getting a square UV map as early as possible and then not breaking it is the theme in all these videos. That's the key to sculpties, it doesn't matter what you do as long as you have a square uv map when it's time to bake. I do plan on updated the "planar" unwrap to support choice of axis, but that'll only make it easier to do unwraps where the model is suitable without having to rotate it to match the cut first. Sometimes your only option is to do a manual UV mapping. When I was preparing for the steps tutorial I was overly ambitious in my first test model. I've attached a work in progress picture. I've spent at least four times more time editing the UV map than I did creating the model and it's still not finished. Every UV point in the top 4 and bottom left segments has been positioned by hand, though in this model I do have a rather odd edge to the plane which confuses all the unwrap scripts. |
|
whyroc Slade
Sculpted and Blended
Join date: 23 Feb 2007
Posts: 315
|
08-27-2007 03:25
Randolph,
This is where SL sculpt maps are limited... I've spent at least four times more time editing the UV map than I did creating the model and it's still not finished. The best option for me is to start with one of the template objects and map it before any editing of the mesh happens. There was also a tutorial out there showing how to use nurbs to start the model, nurbs models will be easier to unwrap because there is no mesh until you convert it to a mesh. Blender will have a better chance of mapping and unwrapping it more evenly for you meaning less manual tweaking of the UVs. I don't know if you have seen the SL clothing UV templates, these are more typical examples of how UVs are normally used..they don't have to fill the square to the edges, multiple elements of a complex model use the same UV map. For making UV maps that are not intended for SL the main consideration is that you want to spread the UVs evenly to provide a good 'surface' for texturing. -whyroc _____________________
Sculpt Maps Galore - 100's of full perm sculpt maps. Top quality sculpts - low prices.
http://slurl.com/secondlife/Poecila/50/54/92 |
|
Domino Marama
Domino Designs
Join date: 22 Sep 2006
Posts: 1,126
|
08-27-2007 04:36
Hi whyroc,
Yep, nurbs surfaces are essentially a deformed plane, so they are very easy to UV map. Sculpties are limiting in the sense they demand perfection in the UV map. A sculptie has square faces that fill the entire UV map and that's actually the ideal layout to have. As you note, it's more common to have wasted space on a UV map. So on the bright note, we are learning skills in excess of what is commonly needed for commercial games. How's it feel to be on the leading edge? |
|
Randolph Peccable
Registered User
Join date: 12 Jul 2007
Posts: 20
|
08-27-2007 07:52
It does an equal area cylinder mapping. The poles are on the Y axis with a seam on -ve Z. Ohhhhhhhhhhhh. (slaps forehead) A little knowledge is a dangerous thing. I've been making sculpties in Wings3D. whose sculpty exporter expects models to be deformed from spheres of a particular geometry. It uses spherical mapping (obviously) to accomplish the same goal as your Planar Unwrap plug-in. I was being informed by my (limited) experience in making UV textures, and wasn't really thinking about the constraints of a sculpty map. On the plus side, I'm already accustomed to making square UV textures, so adapting to square sculpty maps shouldn't be so hard. Again, thanks for the amazing tools. I hope to be able to produce something worthy of them. EDIT: GHAH! After going back and trying to apply what I (thought) I've learned, I'm still not getting it. I tried Planar Unwrapping a cylinder, baking it to a sculpty and reimporting it, and ended up with a vaguely cylindrical blob with a giant valley running along its length. I'm missing something here. Clearly there's more involved than just squaring the map; it matters *how* I square it, but I don't see how. Could some kind person post a picture of a working cylinder unwrapping? Thanks again. |
|
Randolph Peccable
Registered User
Join date: 12 Jul 2007
Posts: 20
|
08-27-2007 09:24
Let me try to show where my failure of comprehension is occurring:
I create a cylinder in Blender. I orient it so its poles are along the Y axis. I select it and go into UV Face Select mode. I split the window and set the new pane to UV Image editor. I make sure all the faces of the cylinder are selected, hit U and choose Planar Unwrap. The result: 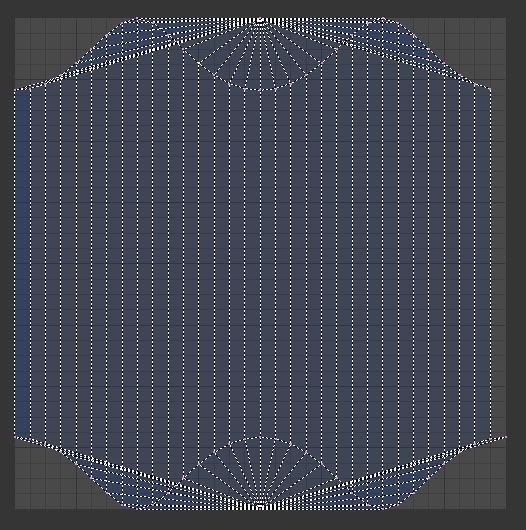 OK. I tweak it in the UV Image editor to make it square and to eliminate overlaps: 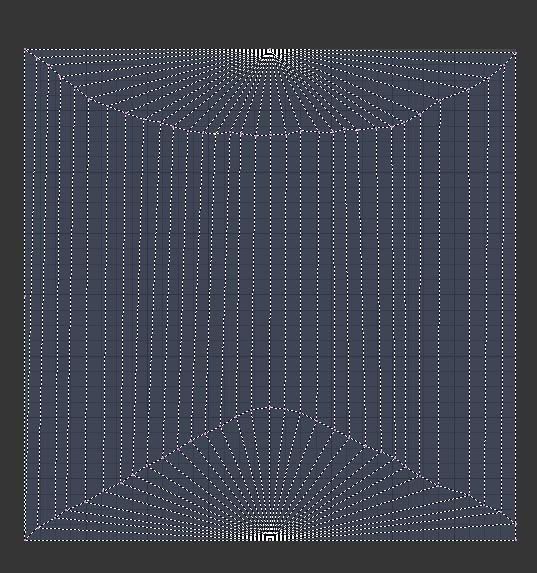 Now I create a new image in the UV Image Editor and choose Bake Second Life Sculpties from Render. I get this:  ... which is wronger than a football bat. The sculpty that results from this map looks like the aftermath of Joan Crawford beating a TV dinner tray with a wire clothes hanger. To wit: 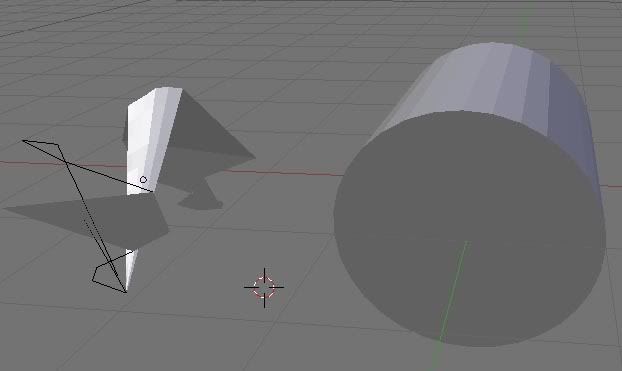 What am I doing wrong here? |