Sharp Sculpties - Not deformed balloons
|
|
Piggie Paule
Registered User
Join date: 22 Jul 2008
Posts: 675
|
10-02-2009 05:07
Note: I'm reposting this here as I posted it earlier and due to some odd shift in the time space continueum or possible a phase variance in the Hysenberg compensators (or more lightly I screwed up!) It found it's way into the "texture thread" So, I'm reporting it here where I "thought" I posted it earlier. My understanding at the moment (please correct me if I'm wrong) In the beginning (good start for a book!) LL created the sculptie and it was supposed to be (rough phrase here) a close approximation of an organic shape. Apple, Orange, Banana (classics) but generally a sphere that's been pulled and pushed about a bit to give a general (not too precise) approximation of the original shape. Cool, can handle that ") Then I read that, soon after, due to some pressure/requests the sculptie (I'll use the work code even thought it's probably the wrong term) was tweaked to allow for the creation/display of more sharp/hard edged subjects. Now, most (if not all) Sculptie guides pretty much cover the "let's push and pull a balloon about" method, which is great. But as soon as you mention "Sharp" / "Crisp" / "Straight" The sky darkens, mysterious odd shaped clouds move in, and you think oh shit, I never should have spoken those words, I have made the gods angry !!!!! I never get the feeling that someone asked how and you get a flood of answers back saying "yeah, sure, no problem, here's how you do it" It all seems to be more. Voodoo Dolls, Naked Virgins and Goat Sacrifices than a normal simple answer. Not sure why. Either A: It's bloody hard to do or B: those who know how don't want to tell others, or C: Something else. So, I'll ask (and duck under the sofa to avoid the wrath of satan for asking again the question) How do you make a sharp sculptie. Say using Maya as this seems to be a very preferred choice for such things. A Box A Steel Girder (simple extruded shape) A set of steps More advance: A Chair with say 4 legs, a seat and a back I know they can be all done as I've seen them. Together with window frames with many straight cross beams in the frame and much much more. |
|
Cheree Bury
ChereeMotion Owner
Join date: 6 Jun 2007
Posts: 666
|
10-02-2009 05:10
I replied to it in the Texturing Tips forum.
_____________________
Visit ChereeMotion - Life's Best Pinup Poses
http://slurl.com/secondlife/Wild%20Rice/38/230/51
|
|
Piggie Paule
Registered User
Join date: 22 Jul 2008
Posts: 675
|
10-02-2009 05:32
From: Cheree Bury I replied to it in the Texturing Tips forum. Yup I saw and replied and took a very quick peek at your 1 prim stools. My initial reaction is, how is something like this even possible? In a normal 3rd party program the moment you do anything to your shape/mesh the whole thing seems to fall apart (re uploading into a recognisable shape) in SL. I can't begin to fathom how you can have so many individual vertical and horizontal bars within one sculpt uv map |
|
Chosen Few
Alpha Channel Slave
Join date: 16 Jan 2004
Posts: 7,496
|
10-02-2009 06:13
Love the creative writing, Piggie! I'll try to address all of your points/questions. From: Piggle Paule My understanding at the moment (please correct me if I'm wrong)
In the beginning (good start for a book!) LL created the sculptie and it was supposed to be (rough phrase here) a close approximation of an organic shape.
Apple, Orange, Banana (classics) but generally a sphere that's been pulled and pushed about a bit to give a general (not too precise) approximation of the original shape.
Cool, can handle that That was the purpose that was originally in mind, yes. But I think the phrase "not too precise" can be a bit misleading. It was never the case that a sculpty couldn't be made to have sharp edges. Well, actually it was, before lossless upload of the maps was implemented, but that's sort of separate issue. There was never any reason the sculpty mesh itself couldn't be crisp, as long as the map data that was feeding it was clean. Where "not too precise" comes in is simply the fact that we're dealing with a polygonal representation of a NURBS source model. It can't be an exact copy simply because SL can't do NURBS. But that never meant a sufficiently well made source model couldn't be replicated to the level of apparent precision that nobody would ever notice it's not technically the same. Most of the early "imprecise" sculpties were just the result of everyone being at the beginning of the learning curve at the same time. Like any other new medium, we all had to discover the particular tricks and quirks of the sculpty before we could make it work really well. From: Piggle Paule Then I read that, soon after, due to some pressure/requests the sculptie (I'll use the work code even thought it's probably the wrong term) was tweaked to allow for the creation/display of more sharp/hard edged subjects. As far as I know, beside the aforementioned lossless upload, and some feature improvements such as the ability to use oblong aspect ratios, in-world mirroring, etc., there haven't been any fundamental changes to the way sculpties work. The advent of hard-edged sculpties came about in two ways: 1. As I said, people simply got better at what they were doing, artistically. 2. Clever residents created polygon-based, instead of NURBS-based, exporters, to allow for direct control over every vertex in the sculpty mesh. The Maya exporter is still meant for NURBS, just as it always was (although it can be forced to handly polys pretty well, with a little hoop-jumping on the part of the artist), but the ones for Blender, Wings, etc., work directly with polygons. From: Piggle Paule Now, most (if not all) Sculptie guides pretty much cover the "let's push and pull a balloon about" method, which is great.
But as soon as you mention "Sharp" / "Crisp" / "Straight" The sky darkens, mysterious odd shaped clouds move in, and you think oh shit, I never should have spoken those words, I have made the gods angry !!!!!
I never get the feeling that someone asked how and you get a flood of answers back saying "yeah, sure, no problem, here's how you do it"
It all seems to be more. Voodoo Dolls, Naked Virgins and Goat Sacrifices than a normal simple answer.
Not sure why.
Either A: It's bloody hard to do or B: those who know how don't want to tell others, or C: Something else. I'd say all three are partially true, although I wouldn't have worded them quite that way. I'll phrase my responses from a Maya user perspeective, since that's what you go on to say you using. Regarding A, it's not that it's actually hard, but it does take a degree of experience and comfort with NURBS modeling, which is something the majority of amateur modelers (and even some professionals) simply don't have. It's somewhat ironic, because "I want NURBS in SL" used to be a fairly common request. But as soon as we got a fairly NURBS-like medium that we could use in it, people got all kinds of confused. To rephrase your wording a little, I'd say not so much that it's hard to do, but more that it's hard to explain how to do. There's a lot more to cover than just, "cut this cube to the following numbers, dimple this sphere like that, and now you've got a nuclear reactor," like you'd find in most prim building tutorials. Some experience with Maya, and with NURBS modeling, on the part of the reader, does have to be assumed. As for B, all I can say is not everyone's a teacher. While there may be some people out there who aren't willing to share, I do think most people, if asked, would be happy to pass on what they know, at least in as far as is convenient for them at the time. But nobody's under any obligation to volunteer. Some of us do enjoy it, and make a point of doing it, but it's perfectly understandable that most people wouldn't. And for C, well, you name it. There are a million other reasons we could come up with. I think my response to A covers the vast majority of it, though. From: Piggle Paule So, I'll ask (and duck under the sofa to avoid the wrath of satan for asking again the question)
How do you make a sharp sculptie.
Say using Maya as this seems to be a very preferred choice for such things.
A Box
A Steel Girder (simple extruded shape)
A set of steps
More advance: A Chair with say 4 legs, a seat and a back
I know they can be all done as I've seen them.
Together with window frames with many straight cross beams in the frame and much much more. As soon as I have time, I'll be happy to come back, and post tutorials for each of the objects you specifically asked about. In the mean time, here's where it all starts. I've posted this a few times before: From: Chosen Few In most cases, the shape to start with is a sphere. NURBS spheres work better for sculpties in Maya than polygonal spheres, since they don't require UV mapping, and since the exporter scripts are optimized for dealing with NURBS surfaces. 16 sections and 16 spans is usually the best way to go. You can deform the sphere into any shape you want; just don't tear the surface or break the poles. Alternatively, you can start with a plane, a cylinder (sans end caps), or a torus, to make other kinds of shapes. Just be sure to set the stitching type accordingly in SL, to match that of your Maya source model. Most of the time, you'll find that spherical topology is the way to go. In case you need a little help getting started, here's a screenshot from Maya, showing some stages of evolution of a NURBS sphere into a cylinder and then into a cuboid.  Note that each object is topologically just a sphere. But by moving and scaling rows of vertices, you can deform that sphere into all kinds of shapes. The sphere becomes a pill shape when its three latitudinal hulls above and below the equator are scaled to be the same size as the equator. The more hulls you scale to that size, the more cylindrical the sphere becomes. The cylinder in the middle has had all but two of its latitudinal hulls scaled the same size. The very top and bottom ones are just a hair smaller to give some definition to the top and bottom corners. and they've been snapped into vertical alignment with the poles, to ensure that the top and bottom of the cylinder are flat. From there, the rounded cube is made simply by grabbing vertical columns of vertices, and snapping them to the grid. The sharper cube on the right is made by moving side columns closer to the corners. Each corner is comprised of three columns, and in each instance, the closer the columns are to each other, the sharper the corner will be. As you're probably starting to see, for a large percentage of sculpties, spheres are all you need. It's not hard to imagine how easy it would be to turn the cube into a pyramid, the pill into an hourglass, the cylinder into a serpentine pipe, etc. For most whatever you need, the sphere is your friend. So you know, never try to start with a NURBS cube. Those don't actually exist. They're just six planes in a group, not actually a singular surface. Next, here's a tutorial I posted not too long ago on making a simple one-prim sword. Pay attention to the techniques demonstrated. The exact same methods are applicable to all of the objects you asked about. From: Chosen Few in thread [url=/8/ea/335344/1.html /8/ea/335344/1.html took me about 25 minutes, from start to finish, just now:    And here it is in SL:  If I were making this for a real project, I'd give it a lot more detail in the texturing, and I'd model more carefully to avoid any 8-bit rounding errors. But hopefully there's enough there for you to get the idea. [/url] Take a good look at the objects in the pictures, and then practice making them. Once you've done that, you'll very likely be in a better frame of mind to start to see how the same techniques can be employed to create just about any shape you can think of, whether organic or inorganic, hard edged or soft. Again, it all comes down to getting a feel for the medium, and that can only come from practice. Stay tuned over the next few days, as I WILL come back with tutorials for your steel girder and 4-legged chair. I think those will make for some really great objects for people to learn from. You might also want to consider taking Xenius Revere's class. I sat in on it a few weeks ago. It's well worth the investment of time, and at the equivalent of just about US$60 for three sessions, the value is a steal. See xeniversity.com for details. (Shameless plug: I'll was impressed enough with Xeniversity's operation that I'm joining the faculty to teach Photoshop, and likely Paintshop Pro as well, starting in a few weeks. I'd like to teach Maya also, but Xenius has that well enough covered for now.)
_____________________
.
Land now available for rent in Indigo. Low rates. Quiet, low-lag mainland sim with good neighbors. IM me in-world if you're interested.
|
|
Gaia Clary
mesh weaver

Join date: 30 May 2007
Posts: 884
|
10-02-2009 08:32
From: Piggie Paule Now, most (if not all) Sculptie guides pretty much cover the "let's push and pull a balloon about" method, which is great.
But as soon as you mention "Sharp" / "Crisp" / "Straight" The sky darkens, mysterious odd shaped clouds move in, and you think oh shit, I never should have spoken those words, I have made the gods angry !!!!! I was just a little curious about what we have to say about sharp and crisp edges. So if you wanted an answer, you might find something here: Non blender specific videos: http://blog.machinimatrix.org/2008/06/04/precision_sculpties_lod/http://blog.machinimatrix.org/2008/06/16/the-arch-example/blender specific videos: http://blog.machinimatrix.org/2009/09/23/from-plane-to-cube-with-no-effort/http://blog.machinimatrix.org/2009/09/07/892/ (I-Beam) http://blog.machinimatrix.org/2009/04/28/cylinders/ (Cylinder) http://blog.machinimatrix.org/2009/04/25/cubes/ (Cube) If Maya where not so expensive i'd give it a try and make a comparison  |
|
Piggie Paule
Registered User
Join date: 22 Jul 2008
Posts: 675
|
10-02-2009 09:31
Thanks "Chosen" for that excellent and detailed post.
I will have to take some time studying all that you have posted and try and recreate some of the basic shapes.
Just 1 question. You show a sphere, then show it in various stages of deformation into a cube.
And explain you are simply changing the size/shape of the hulls (not a term I have heard before)
Are you using a command/tool to do this, or physically doing this 1 by 1 by hand?
|
|
Piggie Paule
Registered User
Join date: 22 Jul 2008
Posts: 675
|
10-02-2009 09:31
Thank you Gaia, I will take a look |
|
Chosen Few
Alpha Channel Slave
Join date: 16 Jan 2004
Posts: 7,496
|
10-02-2009 12:22
From: Piggie Paule Thanks "Chosen" for that excellent and detailed post.
I will have to take some time studying all that you have posted and try and recreate some of the basic shapes.
Just 1 question. You show a sphere, then show it in various stages of deformation into a cube.
And explain you are simply changing the size/shape of the hulls (not a term I have heard before)
Are you using a command/tool to do this, or physically doing this 1 by 1 by hand? Good questions. Hulls are lines that connect control vertices together. When you select a hull, all the CV's it connects get selected along with it. They've very handy for keeping track of what connects to what, for forming quick selections, and for just generally keeping track of where your CV's are. To display hulls, first select a NURBS object, and then go into component mode (f . In the status line (the bar with all the buttons at the top of the screen), toward the center, you'll see a section for all the various selection mask toggles. The one for hulls looks kind of like an archer's bow, with some little squares all along it. Click on that, and you'll see what looks like a lattice appear around your model. Alternatively, you can also just right-click on the model and hold, then drag over to where it says Hulls, and release. This is a great way to move between selection masks very quckly. As for changing their size/shape of the hulls, you can move, rotate, and scale them, just as you would any other selection. To turn a sphere into a cylindroid, you'd scale all the horizontal hulls to be the same size. You can either scale each by hand, or if you want absolute precision, snap the actual CV's into vertical alignment with each other.
_____________________
.
Land now available for rent in Indigo. Low rates. Quiet, low-lag mainland sim with good neighbors. IM me in-world if you're interested.
|
|
Piggie Paule
Registered User
Join date: 22 Jul 2008
Posts: 675
|
10-04-2009 09:58
This is the kind of thing that puzzles me: 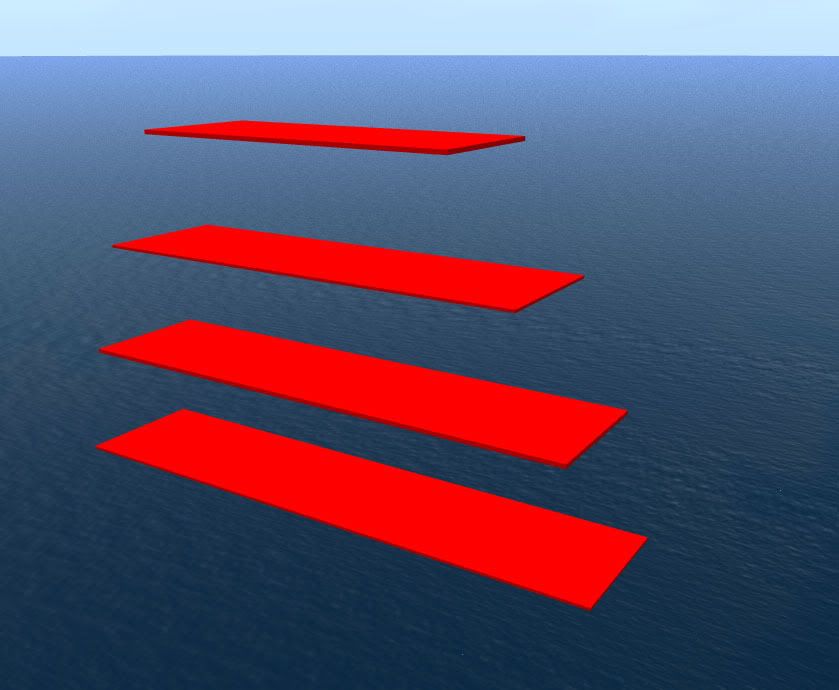 You can't have holes and gaps in your sculptie mesh, and all has to be one piece, and yet somehow this is 1 sculptie. Seems to defy the rules to me. |
|
Kit Namanari
Let's pretend...

Join date: 14 Oct 2006
Posts: 126
|
10-04-2009 10:03
From: Piggie Paule This is the kind of thing that puzzles me:
...
You can't have holes and gaps in your sculptie mesh, and all has to be one piece, and yet somehow this is 1 sculptie.
Seems to defy the rules to me. Take a look here: http://robynhuffaker.com/sculptblend/tutorials/tut_fractionalprims.htmlKitsy ^.^
_____________________
我 看见 我 忘记。我 听见 我 记住。我 做 我 了解。
|
|
Piggie Paule
Registered User
Join date: 22 Jul 2008
Posts: 675
|
10-04-2009 10:29
Thanks for that. My 1st VERY quick attempt: 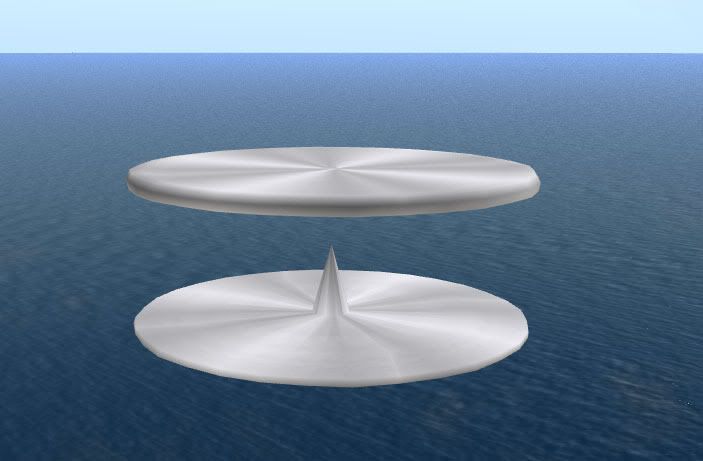 It's like pulling hens teeth (as they call it in the UK) finding out this stuff..... Thanks again for the link. Ever little bit is another piece of the jigsaw |
|
Kit Namanari
Let's pretend...
Join date: 14 Oct 2006
Posts: 126
|
10-04-2009 11:51
You're welcome ^.^ You might also want to take a look at this: http://www.youtube.com/user/BlenderSLShe has a video on creating a single prim sculptie chair AND one on how to texture the beastie. Kitsy ^.^
_____________________
我 看见 我 忘记。我 听见 我 记住。我 做 我 了解。
|
|
Carbon Philter
Registered User
Join date: 4 Apr 2008
Posts: 165
|
10-04-2009 14:02
Also, Domino has a sample blend file on his site. http://dominodesigns.info/node/89A word of caution, though. Apparently bugs in SL's lossless upload can leave you with less than ideal results. I tried and couldn't get a clean sharp result in any of the viewers I tested it with. If you crack it please post - I'm gonna keep working at it. |
|
Gaia Clary
mesh weaver
Join date: 30 May 2007
Posts: 884
|
10-04-2009 14:40
From: Carbon Philter If you crack it please post - I'm gonna keep working at it. Use sculptmaps with 1024 faces. Anything with less faces will suffer from an SL bug which leads to unprecise meshes. This bug is known since beginning of this year, often complained about, never fixed. But my sculptmaps with 1024 faces (any x/y ration) look in world exactly like i have created them in my favorite 3D tool. Every time i ended with a scrambled sculptie in world, i could proof that the errors have been introduced by myself (or by the baker tool) and not by the upload process ( i always use the RC viewer and nothing else, so maybe it is different with other viewers). |
|
Piggie Paule
Registered User
Join date: 22 Jul 2008
Posts: 675
|
10-04-2009 15:38
Thanks.... Well after a evening of bashing my head against the wall, (And there are still many issues I need to resolve) I do have something to show for my 1 prim 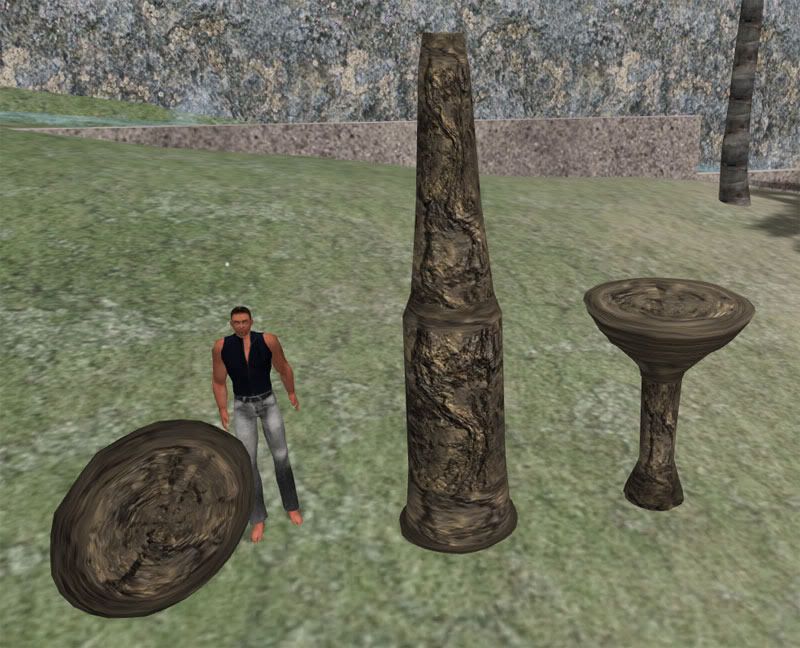 |
|
Kyrah Abattoir
cruelty delight

Join date: 4 Jun 2004
Posts: 2,786
|
10-04-2009 15:40
From: Piggie Paule This is the kind of thing that puzzles me: You can't have holes and gaps in your sculptie mesh, and all has to be one piece, and yet somehow this is 1 sculptie. Seems to defy the rules to me. Only if you don't know much at 3D.
_____________________
 tired of XStreetSL? try those! apez http://tinyurl.com/yfm9d5b metalife http://tinyurl.com/yzm3yvw metaverse exchange http://tinyurl.com/yzh7j4a slapt http://tinyurl.com/yfqah9u
|
|
Piggie Paule
Registered User
Join date: 22 Jul 2008
Posts: 675
|
10-04-2009 17:18
From: Kyrah Abattoir Only if you don't know much at 3D. Well, I'm trying to learn. |
|
Piggie Paule
Registered User
Join date: 22 Jul 2008
Posts: 675
|
10-04-2009 17:24
From: Gaia Clary Use sculptmaps with 1024 faces. Anything with less faces will suffer from an SL bug which leads to unprecise meshes. This bug is known since beginning of this year, often complained about, never fixed.
But my sculptmaps with 1024 faces (any x/y ration) look in world exactly like i have created them in my favorite 3D tool. Every time i ended with a scrambled sculptie in world, i could proof that the errors have been introduced by myself (or by the baker tool) and not by the upload process ( i always use the RC viewer and nothing else, so maybe it is different with other viewers). You are basically saying start with a 32x32 sphere? |
|
Gaia Clary
mesh weaver
Join date: 30 May 2007
Posts: 884
|
10-05-2009 00:11
From: Piggie Paule You are basically saying start with a 32x32 sphere? a 32*32 sphere is the most used starting point ") But you can also start with a cylinder, a plane or a torus. Just ensure that your final image has the size n*m=4*1024 (twice the facecount in each dimension): 32*32 faces --> 64*64 pixel 16*64 faces --> 32*128 pixel 8*64 faces --> 16*256 pixel 4*128 faces --> 8*512 pixel These are the rations which work best (for me) Odd ratios for faces seem to be supported, but i do not know exactly, how they map to the images. And although supported in theory, smaller sculptmaps just don't give good results due to the mentioned bug in SL. About the pixel count: SL derives the mesh size from the pixel size as follows: n*m images lead to n/2 * m/2 faces If you use bigger sculptmaps (pixels count > 4096), they will be scaled down and tend to produce more inacurate results. I am not sure, why sometimes people report that 128*128 sculptmaps work better than 64*64 maps. I tested it several times and never found any enhancements, but often found inprecisions when i used them. |
|
Drongle McMahon
Older than he looks
Join date: 22 Jun 2007
Posts: 494
|
10-05-2009 01:06
From: Gaia Clary I am not sure, why sometimes people report that 128*128 sculptmaps work better than 64*64 maps. Perhaps they forgot to check the lossless box? |
|
Carbon Philter
Registered User
Join date: 4 Apr 2008
Posts: 165
|
10-05-2009 02:00
From: Gaia Clary Use sculptmaps with 1024 faces. Anything with less faces will suffer from an SL bug which leads to unprecise meshes. This bug is known since beginning of this year, often complained about, never fixed.
But my sculptmaps with 1024 faces (any x/y ration) look in world exactly like i have created them in my favorite 3D tool. Every time i ended with a scrambled sculptie in world, i could proof that the errors have been introduced by myself (or by the baker tool) and not by the upload process ( i always use the RC viewer and nothing else, so maybe it is different with other viewers). Gaia, If it's not too much trouble could you possibly take a look at the sample file on Domino's website that I referred to earlier - blocks.blend at http://dominodesigns.info/node/89#comment-265?If you could confirm you can achieve precise result on Domino's disjointed example when importing to SL I'd be happy to have a definite objective to aim at. Currently I can get sharp results based on 1024 faces but not with disjointed elements. Thanks. |
|
Gaia Clary
mesh weaver
Join date: 30 May 2007
Posts: 884
|
10-05-2009 04:26
It is EXACTLY as i stated before The sculptmap Domino creates in his blend file is of size 8*256 = 2048 pixels. This is half the size of a standard sculptmap. And that triggers the import bug in SL. So if you upload the sculpty, all you get is a massively borked result. So do this: - Open the blend file - go to edit mode (IMPORTANT!) - in the UV editor create a new image of size 16*256 - bake, import lossless, apply, be happy Oh and then read http://blog.machinimatrix.org/sidenode-on-vertex-lighting-in-sl/ cheers, Gaia |
|
Piggie Paule
Registered User
Join date: 22 Jul 2008
Posts: 675
|
10-05-2009 05:05
I was thinking of opening a shop that sells deformed sculptie mess's at a discount I'd make a fortune as I can make em all day without any difficulty..... |
|
Piggie Paule
Registered User
Join date: 22 Jul 2008
Posts: 675
|
10-05-2009 05:13
Anyone looking in that uses Maya I have a basic yet puzzling question. The snap tool, just does not seem to work for me often or in the way I expect. Can you for example Snap to grid (or snap to anything) whilst you are scaling, as I can't. Looking at my keyboard shortcuts for Maya it says "J" or "SHIFT J" for: Move, Rotate, Scale tool snapping or Move, Rotate, Scale relative snapping. Well, I don't know about you, but I can press J or SHIFT J and use the scale function to scale a collection of points about a polygon sphere and there is no snapping for me. In SL, I find now the snapping is so useful I can't live without it when I make almost anything. But I can't seem to get Maya to snap to anything when I scale or other things. the only thing that seems to snap if the actual move tool. Perhaps I'm missing some other option to enable snapping? Also, whilst on the scaling front: I can't work out how to manually enter numbers in rather than drag the coloured blocks. I have entered numbers in the empty top 3 box's at the top of the screen, but the amount I type in, and the movement of the scale seems a bit puzzling. Perhaps someone could clear this up also? Say I select a ring of points around a polygon sphere and wish to scale it down "numerically" to a given size/percentage? Thanks |
|
Gaia Clary
mesh weaver
Join date: 30 May 2007
Posts: 884
|
10-05-2009 06:27
From: Piggie Paule I was thinking of opening a shop that sells deformed sculptie mess's at a discount I'd make a fortune as I can make em all day without any difficulty..... Just a curious question from an absolute Maya-ingnorant: It looks like you can not preview the result of the Sculpty-exporter within Maya ? Maybe reimporting the generated Sculptmap to Maya is possible and could help ? |