Any Zbrush3 users for sculpties?
|
|
2k Suisei
Registered User
Join date: 9 Nov 2006
Posts: 2,150
|
11-30-2007 20:09
Okay, I've uploaded two sculpty convertors. One is for Zbrush 2 and the other is for Zbrush 3. I made them quite some time ago and no longer use them myself. I prefer Maya's convertor. Note:- The spheres you create in Zbrush should be of the 32x33 format, or my convertors may taunt you. If after uploading your sculpty you find that it's inside out, you should go back into Zbrush and change the FlipX settings in Preferences/ImportExport The convertors aren't great, but they're better than nowt! ") and now you can use Zbrush's cubes and stuff! Woohoo!! |
|
Violaine Villota
Registered User
Join date: 18 Apr 2007
Posts: 77
|
Ty!
12-01-2007 00:59
Wow! thank you so much for that!!! I"m going to try it out |
|
Violaine Villota
Registered User
Join date: 18 Apr 2007
Posts: 77
|
How to use the converters?
12-01-2007 01:39
Do I just run them or do I need to do something else with them - they are not plugins are they?
|
|
2k Suisei
Registered User
Join date: 9 Nov 2006
Posts: 2,150
|
12-01-2007 02:04
From: Violaine Villota Do I just run them or do I need to do something else with them - they are not plugins are they? Just run the relevant version and then hit the 'Object' and 'Sculpty' buttons to specify the source and destination file names. |
|
Violaine Villota
Registered User
Join date: 18 Apr 2007
Posts: 77
|
Too many or too little vertices when using converter
12-01-2007 11:59
2K Susei,
I tried to export a cube, but for one it will only let me choose an odd number of vertices, so the exporter will either say "too many vertices" or 'lack of vertices'
And I cannot change the vertices number in the exporter.
Any work around for this? Or is a cube just not possible to export?
(by the way I am mostly a Mac user and only use Windows XP on Parallels because it's the only way to get Zbrush 3.1 to work - so maybe there is a basic Windows thing I'm missing?)
|
|
Violaine Villota
Registered User
Join date: 18 Apr 2007
Posts: 77
|
Never mind 12-01-2007 13:49
I think I figured it out I hadn't clicked on "make polymesh 3D". I had to make sure and start w/ the completely new default tool each time. And some tools had different numbers - the cube needed to be 32x32, but the cone needed to be 32x33. Yay!!! Thanks again so much for this converter, now I don't have to always go to wings to do the exporting! |
|
Cherise Benavente
Registered User
Join date: 1 Oct 2005
Posts: 48
|
Wow Its like trying to read a foreign language  12-03-2007 22:15
Hi everyone , Good to see this thread is still going . Its so cool to see others using zbrush too . Well Im yet to really try any sculpties as I have been pretty busy with rl and getting my store set up. For some reason I am having a issue being able to sculp the sphere once I put it in . It doesnt allow me to do anything but make duplicates and edit is gray'd out. Am I doing something wrong. One second it worked next I cant get anything to go
|
|
Violaine Villota
Registered User
Join date: 18 Apr 2007
Posts: 77
|
Edit mode
12-04-2007 08:23
ah yes, I had this problem in the beginning - all you need to do is remember to hit the 'edit' button immediately after drawing the object on the screen. After that, just don't ever click it again or it will turn your object into a 2.5D picture.
|
|
Cherise Benavente
Registered User
Join date: 1 Oct 2005
Posts: 48
|
Thank you Violaine
12-05-2007 08:54
Thank you for letting me know. I couldn't figure out why it was doing that.
|
|
Sae Luan
Hardcore 4the Headstrong

Join date: 6 Feb 2006
Posts: 841
|
12-05-2007 21:07
I haven't gotten into a whole whole lot of complicated sculpting in Zbrush, but I've learned the program well enough to get anyone up and running. Anyone is welcome to contact me personally in world for a bit of one on one help with Zbrush 3, though I can normally only answer your basic questions and some more complicated things. I've been thinking of releasing a lil tutorial as well, but my process is just like alot of other peoples that have already posted here. I don't bake the lighting the way has been said here. I use the masking feature to find the shadows. I can describe this process as well, though it doesn't yeild perfectly usable results either. Personally I'm a bit too lazy to redo the shading that well, but it's definately doable. You don't get the horrible line down the side of your sculpt, but it's going to take a bit of work in photoshop to make it look really nice. One thing that helped me figure out alot of things is this: When hovering over various parts of the program with the mouse, you can press the ctrl button and it will pop up a lil information window on what you are hovering over! It was fairly crucial to me teaching myself the tools and features in Zbrush, so I highly suggest checking it out.
_____________________
Rave Nation Owner
saeluan.blogspot.com
I accept most custom work. IM in world for details.
-
|
|
Violaine Villota
Registered User
Join date: 18 Apr 2007
Posts: 77
|
masking for shadows?
12-06-2007 13:00
Sae, could you explain how you use the masking to bake the shadows? I'm sure I"m not the only one who would love to hear how you do it |
|
Sae Luan
Hardcore 4the Headstrong
Join date: 6 Feb 2006
Posts: 841
|
12-07-2007 15:21
No problem.
In zbrush, when you get done texturing, take a look at the right side of your screen at all that stuff under the Tool menu.
Find mask.
Hit mask by cavity.
Blur your mask a couple of times if you want.
Then go to the Color dropdown at the top of your screen and fill with the color of your choice.
Turn off view mask and you will see the darkened areas.
Beware, it takes alot of tinkering with this to get it to look nice without some work in photoshop.
Personally, I save my texture before doing that mask, then throw the texture back on using the texture to color button. Alternatively, you can also use this on a white or grey sphere to get a grey colormap of the darkened areas if you don't want to do it on the actual texture. I know everyone has a ton of ways of getting their shading in so...it's kinda up to you what you do here.
Before you turn off the view mask when you are done, it's going to look inverted..don't worry. It won't be inverted when you are done.
Sorry if this isn't clear enough, I have a ton of things going on right now lol.
_____________________
Rave Nation Owner
saeluan.blogspot.com
I accept most custom work. IM in world for details.
-
|
|
Infiniview Merit
The 100 Trillionth Cell
Join date: 27 Apr 2006
Posts: 845
|
12-08-2007 08:14
Just some recent Z thoughts Scanning through the tutorials yesterday I saw one of interest (to me anyway) which is using masking to define an area of mesh extraction to create a new mesh or sub tool. I have often in other programs realized too late that I should have kept some parts separate. Without going through all the posts I think I remember someone asking about how to create a displacement map. I finally did my first one the other day the step I kept missing in prior attempts was to activate the "Mode" button. You also need to make sure that there is some uv on the object in the first place, for example if you have imported the object. I have noticed that I did not need to worry much about the quality of the uv map your bringing in to Z as I would then just replace it with one from Z which has superior tools for them imho anyway, compared to wings that is. There may be a way to uv map an imported object in Z that does not have a pre-existing uv map on it, but I have not found that yet. This link is for Zbrush Central which has mass tutes on it. http://www.zbrushcentral.com/zbc/index.php This gateway here is to the more basic answers. http://www.zbrush.info/docs/index.php/TOC Which can also be accessed from inside Z by choosing help and 'online documentation'. |
|
Infiniview Merit
The 100 Trillionth Cell
Join date: 27 Apr 2006
Posts: 845
|
12-08-2007 13:16
I tried out playing with the cavity masking option.  The large shape in the image I did before the cavity mask the very small detail is the effect I created after the mask was applied by in this case just using the move tool to raise unmasked areas. The object in this render has over 2 million polys. Of course there are many many different ways that you can use this option. The documentation claims that it would be impossible to make this sort of selection by hand. 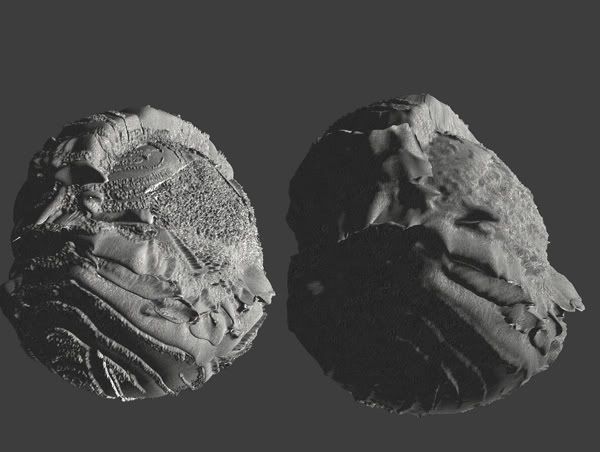 The image above shows the comparison between the same model with the one on the left at 535k polys and the one on the right at 8k polys. The idea of the displacement map is to achieve the appearance of the high poly model on the low poly model without all those extra megabytes. |
|
Vlad Bjornson
Virtual Gardener

Join date: 11 Nov 2005
Posts: 650
|
02-07-2008 22:57
Thanks for those great Zbrush Object converters 2k Susei! I've used your converters successfully to export objects that started with the zBrush created sphere rather than importing the premade ones uploaded by Hypatia. I like this workflow, no mucking about in Wings3D. I'm having a bit of trouble with the UV and texturing though. I dont seem to be able to get the UV maps correct when using the techniques I had learned for texturing that imported sphere. I can paint onto the zbrush-native object, but when I go to convert from colored object to a texture, the mapping is all screwy. Anyone have an idea what I am doing wrong? I made a quick little video to demonstrate since I'm not sure if I am describing my problem correctly. http://shiny-life.com/zbrush/zbrushexample.html
_____________________
I heart shiny ! http://www.shiny-life.com
|
|
2k Suisei
Registered User
Join date: 9 Nov 2006
Posts: 2,150
|
02-08-2008 00:15
From: Vlad Bjornson Thanks for those great Zbrush Object converters 2k Susei! I've used your converters successfully to export objects that started with the zBrush created sphere rather than importing the premade ones uploaded by Hypatia. I like this workflow, no mucking about in Wings3D. I'm having a bit of trouble with the UV and texturing though. I dont seem to be able to get the UV maps correct when using the techniques I had learned for texturing that imported sphere. I can paint onto the zbrush-native object, but when I go to convert from colored object to a texture, the mapping is all screwy. Anyone have an idea what I am doing wrong? I made a quick little video to demonstrate since I'm not sure if I am describing my problem correctly. http://shiny-life.com/zbrush/zbrushexample.htmlHi Vlad!, I don't use ZBrush for texturing, so Im afraid I might not be able to help. I usually take my models into Cinema 4D for painting and baking. Looking at your video I was a little puzzled. I'm wondering if you're using the "poly painting" method. I've never tried that method and I'm pretty sure that it was designed for the folks that are working on models with billions of polys. This is because when a model doesn't have any UV data then it's much easier for ZBrush to deal with. But you probably know this anyway. If I were to texture in ZBrush then I wouldn't bother with 'poly painting' or that texture panel on the right hand side. I would simply create a new texture using the Texture menu at the top of the screen and then simply paint away. I did once try this approach many moons ago and I didn't have any problems at all. You also mentioned something about creating a spherical UV map. This also suggests that you're doing something unusual early on. I personally would simply create a sphere, sculpt it, add a texture and paint on it. At no stage would I need to create a UV map as one is already present when you first create a sphere. Anyway, let me know if that helps. If not, I'll have a go myself at creating a texture to see what happens. |
|
Vlad Bjornson
Virtual Gardener
Join date: 11 Nov 2005
Posts: 650
|
02-08-2008 00:34
Thanks for your quick reply, 2k. Yes, I am painting on the polys of the model - on a highly subdivided version of the 32x33 sphere object. It's the only way I know how to paint textures in Zbrush.  What I don't know about zbrush could fill a book! But your suggestions have sparked an idea and I will do a bit of research. If I can paint images right on the texture instead of on the actual geometry that would be great. Time for a bit of Googling on zbrush textures. Thanks.
_____________________
I heart shiny ! http://www.shiny-life.com
|
|
2k Suisei
Registered User
Join date: 9 Nov 2006
Posts: 2,150
|
02-08-2008 01:26
From: Vlad Bjornson Thanks for your quick reply, 2k. Yes, I am painting on the polys of the model - on a highly subdivided version of the 32x33 sphere object. It's the only way I know how to paint textures in Zbrush. What I don't know about zbrush could fill a book! But your suggestions have sparked an idea and I will do a bit of research. If I can paint images right on the texture instead of on the actual geometry that would be great. Time for a bit of Googling on zbrush textures. Thanks. Rough guide: 1. Create a Sphere 2. Convert to PolyMesh3D 3. Create a texture by selecting 'New' in the Texture menu on the title bar. 4. Whack the 'Projection Master' button and select 'Drop Now' to switch to the 2.5D mode. 5. Paint away using the fancy 2.5D tools. 6. Whack the 'Projection Master' button and 'Pickup Now' to switch back to 3D You'll then need to spin your object around to paint on the other side. Oh, and if you use a 2.5D tool that changes the geometry of your model then you may want to tick the 'Deformation' box in the Projection Master to pick up the changes. ps - If I ever decide to do some 'poly painting' then I'm gonna come to you for some help. You owe me! |
|
Vlad Bjornson
Virtual Gardener
Join date: 11 Nov 2005
Posts: 650
|
02-08-2008 01:49
I do own you one, 2k. I have successfully textured an object using a native Zbrush sphere now. I'll attach a pic. Found this tutorial showing how to use the '3D Copy' function to transfer a texture from the canvas to the texture on the model. http://www.3dlinks.com/oldsite/tutorials_Ztexturing.cfmThanks for the tips on the Projection Master, too. I need to explore that aspect more, for sure. The whole 2.5D thing throws me for a loop. I am mostly interested in transferring photo reference (or other prepared) images to my models. This 3D Copy technique works pretty well for that. now if I can find a method that more closely simulates Photoshop's Clone Stamp tool I will be a happy camper. That's why I was drawn to the polypaint method - the tutorial I initially found was like using Clone Stamp on the 3d model. I'm off to hunt for more relevant tutorials...
_____________________
I heart shiny ! http://www.shiny-life.com
|
|
Sae Luan
Hardcore 4the Headstrong
Join date: 6 Feb 2006
Posts: 841
|
02-08-2008 15:58
Users may also be interested in this link for learning to texture from a photo referrence in Zbrush. This method works just liek a clone brush :: http://www.youtube.com/watch?v=vTh0wSjF71U
_____________________
Rave Nation Owner
saeluan.blogspot.com
I accept most custom work. IM in world for details.
-
|
|
Vlad Bjornson
Virtual Gardener
Join date: 11 Nov 2005
Posts: 650
|
02-10-2008 02:16
Thanks for that Link, Sae. That is the exact same tutorial that I mentioned a few posts up, but I couldn't find it again. Initially I was having trouble using this ZProject technique to texture a Zbrush native object, instead of the ones prepared for use with the Wings exporter. After a bit more experimentation I have fixed the problem that I demonstrated in the short video above. yay! Actually fixed is the wrong word. I went back and tried again and it worked as expected.  I even tried some experiments to reproduce the error and failed. At least I've got it down now.
_____________________
I heart shiny ! http://www.shiny-life.com
|
|
Usagi Musashi
UM ™®
Join date: 24 Oct 2004
Posts: 6,083
|
02-10-2008 03:27
Thank you very very much! This is indeed a worth of resources! I have 3.1 z brush i was geiven a key to from my work. NowI can use it for dual purpose work and SL...... Thanks again you wonderful people |
|
Ricky Shaftoe
Owner, "Rickymations"
Join date: 27 May 2005
Posts: 366
|
05-14-2008 22:49
Hey Vlad, I'm coming to this thread late, but I want to thank you for your excellent video tutorial. Thanks also to 2K for that converter!
I've been playing with ZBrush for a year now and thought I'd give sculpties a try. My question is: in your video, Vlad, you mentioned that one doesn't necessarily have to start with a Sphere3D object. What if one is making something angular like a chair or table; could one use one of the zBrush cube objects? If so, what initialize numbers would I use? Or is it best practice always to begin with a Sphere3D?
For that matter, could you create a sculptie beginning with zSpheres? Just add zSpheres until you get to the target number of faces? zSpheres are actually a quite nifty way to model.
Anyone have thoughts on these questions?
|
|
Vlad Bjornson
Virtual Gardener
Join date: 11 Nov 2005
Posts: 650
|
05-14-2008 23:59
Hi Ricky. Most of the ztool primitives will work well with 2ks converter. I have had good success with the cube, cylinder, spherinder, heliz, plane, spiral, and even the sweep object. As long as you keep the initialize variables for hdivide and vdivide at 32 and 33 they should convert well to sculpties. I have noticed some weirdness with the torus based shapes, where the sculptmap comes out at a 45 degree slant. The resulting sculpty is twisted around the z axis. I've been able to fix this with the Shear filter in photoshop - basically straightening out the diagonal layout of the sculptmap image and re-saving. I don't think that the zSpheres will work for this workflow, tho. I suppose there is a chance that the shape would convert if you could get the exact number of faces, but I doubt it. One reason that the other primitives work so well is that the UV maps that are created with the shapes is perfect for sculpties. I have very little experience with zSpheres, but they do look pretty spiffy. I do have another zBrush tutorial that shows how to convert an object to a sculpted prim using zProject and Subtools. Might be able to start your shape with zSpheres then convert it to a sculpty-friendly mesh. It's not an exact science but can come in quite handy. You can view it here: http://www.shiny-life.com/2008/05/08/convert-objects-to-sculpted-prims-with-zbrush/I'm actually planning a short tutorial on using these zbrush primitives, which should be on my Shiny Life site in the next couple of days. There are a lot of shapes available by tweaking the parameters of the various zbrush primtives.
_____________________
I heart shiny ! http://www.shiny-life.com
|
|
Ricky Shaftoe
Owner, "Rickymations"
Join date: 27 May 2005
Posts: 366
|
05-15-2008 07:13
Thanks, Vlad. If the other ZBrush primitives will work, then I don't really need to use zSpheres. zSpheres are just kinda fun. I've gotten in the habit of using them for modeling.
I look forward to your new tutorials! The three you already posted were terrific. Nice 'shroom!
|