Welcome to the Second Life Forums Archive
These forums are CLOSED. Please visit the new forums HERE
Blender Sculptie Importer - Attached |
|
|
Renee Roundfield
Registered User
Join date: 10 Mar 2006
Posts: 278
|
03-12-2008 09:41
This has been so fun and productive to play with. Thanks.
|
|
Domino Marama
Domino Designs
Join date: 22 Sep 2006
Posts: 1,126
|
Importer 0.24 Baker 0.12 new versions
03-12-2008 09:45
http://www.dominodesigns.info/downloads/second_life/import_sculptie_svn.zip
With this update, the sculptie maps no longer need to be assigned to the models faces. This lets you bake sculpties or textures without having to switch things around. There's also a few behind the scenes changes to prepare the way for linkset import and export. The Second Life side of that is written and being tested, so stay tuned for further updates ") |
|
Zeenith Paulse
Registered User
Join date: 18 Feb 2008
Posts: 97
|
03-12-2008 13:16
THANKS!!! It worked.... sorta.
I was able to get an image, but sadly, it didn't do it qute right. Here are two pictures. Well it made an image out of it, but is it supposed to be all one color like that? I exported it andpulled it in SL and got this. http://i229.photobucket.com/albums/ee136/Dreamcube017/Help%20folder/Wrong.jpg It looks like a potato chip.  What I doing wrong? I told it to pull it into a cilander form. Am I suppose to make a UV map first? I suppose I could've tested it by pulling it back into blender to see what happened... but if anyone can help, I'd greatly appreciate it. Thanks. -Zee- EDIT: I just tried Plane and got the same thing. _____________________
My second life photos.
http://s229.photobucket.com/albums/ee136/Dreamcube017/Second%20Life/?action=view¤t=78111448.pbw Please comment. ") |
|
Domino Marama
Domino Designs
Join date: 22 Sep 2006
Posts: 1,126
|
03-12-2008 14:41
It looks like a potato chip. What I doing wrong? I told it to pull it into a cilander form. Am I suppose to make a UV map first? I suppose I could've tested it by pulling it back into blender to see what happened... but if anyone can help, I'd greatly appreciate it. Thanks. How did you create the initial model? Did you start with Add - Mesh - Sculpt Mesh? If you did, then those are already correctly UV mapped, so should just work unless you alter the mesh by extruding or something like that. If you are starting with something else, then yes, you need to unwrap the UV to a perfect square grid. |
|
Zeenith Paulse
Registered User
Join date: 18 Feb 2008
Posts: 97
|
03-12-2008 15:13
Oh yeah, I actually imported that object from another program and then did some face devision, subsurfing, and a bit of extruding. .
So Should I make the UV map first, THEN run the script? I know how to pull the UV map into a square. _____________________
My second life photos.
http://s229.photobucket.com/albums/ee136/Dreamcube017/Second%20Life/?action=view¤t=78111448.pbw Please comment. |
|
Domino Marama
Domino Designs
Join date: 22 Sep 2006
Posts: 1,126
|
03-12-2008 15:29
Oh yeah, I actually imported that object from another program and then did some face devision, subsurfing, and a bit of extruding. . So Should I make the UV map first, THEN run the script? I know how to pull the UV map into a square. Yes. Getting a perfect square from an arbitrary model to look good as a sculptie is the hardest thing to do in sculptie creation. So good luck To give you an idea, my first demo of the scripts was a quick conversion of Suzanne, the monkey mesh in Blender. I must have unwrapped that monkey about 20 different ways since before I finally got one I was happy with. When I suggest people remodel from one of the base sculpties that Mesh - Add - Sculpt Mesh gives, and not to do anything other than move vertice or loop cut, or adding extra multires levels.. basically things that leave the UV map intact.. I really do mean that's the best option 99.99% of the time.. It's very easy to spend longer trying to fix up a UV map than you did doing the model in the first place. |
|
Zeenith Paulse
Registered User
Join date: 18 Feb 2008
Posts: 97
|
03-12-2008 17:07
Well the crystal is basically ca cube with the top face pulled into a point and the four sidews squeezed together at the bottom. Then I just subsurf it to make it a bit more ... well... better looking. So I can just do it over in Blender and I shouldn't have the UV problem, should I?
_____________________
My second life photos.
http://s229.photobucket.com/albums/ee136/Dreamcube017/Second%20Life/?action=view¤t=78111448.pbw Please comment. |
|
Huns Valen
Don't PM me here.

Join date: 3 May 2003
Posts: 2,749
|
03-12-2008 21:42
Is dominodesigns.info down? I can't seem to connect.
Edit: nm, seems to be working now. Thanks _____________________
|
|
Domino Marama
Domino Designs
Join date: 22 Sep 2006
Posts: 1,126
|
03-13-2008 01:50
Well the crystal is basically ca cube with the top face pulled into a point and the four sidews squeezed together at the bottom. Then I just subsurf it to make it a bit more ... well... better looking. So I can just do it over in Blender and I shouldn't have the UV problem, should I? Cube's are bad for uvmapping for sculpties. If I was doing this I'd probably do something like Add - Mesh - Sculpt Mesh, pick a cylinder with x = 8, y = 4, multires = 0. Scale top and bottom loops to 0, scale 2nd loop to 0.8 Scale top and second loop together to 0 on Z axis. move 3rd and 4th loops on Z and scale to define the shape. Open a UV Image Editor and do the Render - Bake Second Life Sculpties. Save Should have a nice gemstone shape in about a minute Edit: Ok so in about 3 minutes http://dominodesigns.info/downloads/tutorials/blender/gem.avi http://dominodesigns.info/downloads/tutorials/blender/gem.tga Only thing I did different from the text description was adding a couple of levels of Multires with Simple Subdivision before doing the sculptie bake. |
|
Zeenith Paulse
Registered User
Join date: 18 Feb 2008
Posts: 97
|
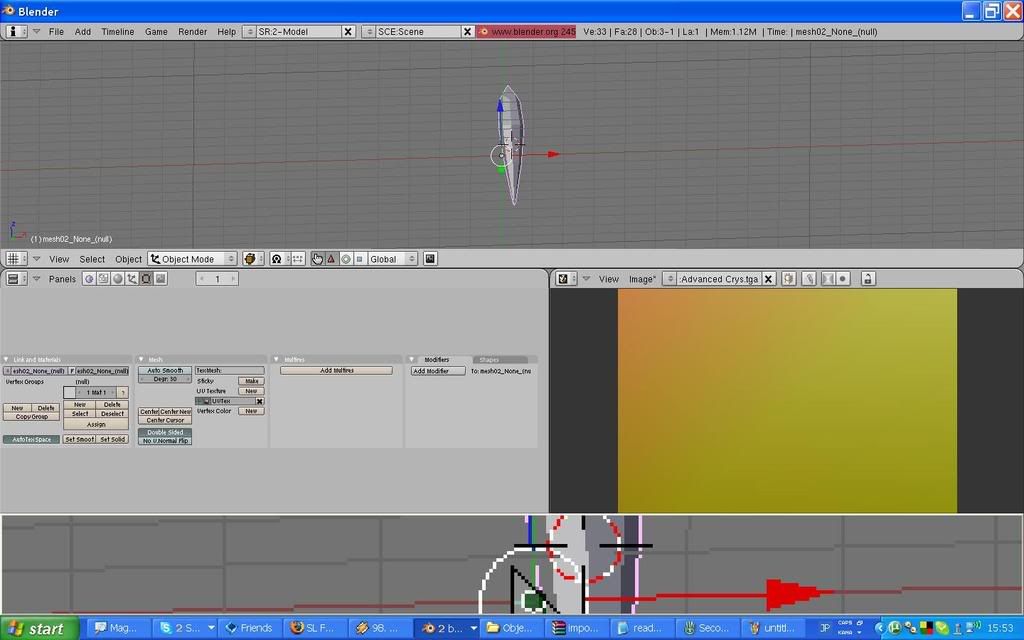
03-13-2008 16:40
Thanks a lot for your help!! It works.... a bit more but not quite.
Take a look at this. http://i229.photobucket.com/albums/ee136/Dreamcube017/Help%20folder/Blenderhelp.jpg This is what I got when I told it to Fill Holes before Rendering. I pulled it back in and it gave me this unbrella shape. Ilike it totally unfolded the bottom part of my crystal. I tried it WITHOUT the fill holes option and it gave me the crystal, but it was all lpsided and a few pieces were missing. A lot of the UV map was black as well... I don't get what I'm doing wrong. I didn't add any faces or anything. I didn't subsurf either. All I did was pull and stretch existing lines and faces. I can give you the .blend file if needed. Please help. Thanks. -Zee- _____________________
My second life photos.
http://s229.photobucket.com/albums/ee136/Dreamcube017/Second%20Life/?action=view¤t=78111448.pbw Please comment. |
|
Domino Marama
Domino Designs
Join date: 22 Sep 2006
Posts: 1,126
|
03-13-2008 17:19
I tried it WITHOUT the fill holes option and it gave me the crystal, but it was all lpsided and a few pieces were missing. A lot of the UV map was black as well... I don't get what I'm doing wrong. I didn't add any faces or anything. I didn't subsurf either. All I did was pull and stretch existing lines and faces. I can give you the .blend file if needed. Please help. Thanks. The fill holes is there purely for advanced sculptie making where part of the UV map is missing. If you need to use this it means your UV map is incomplete. Try following the gem video above and compare the UV map that gives to yours. Or post a picture of your UV map. |
|
Filipo Lopez
Registered User
Join date: 20 Aug 2007
Posts: 3
|
Problems
03-22-2008 14:30
Hey Domino,
I have some troubles which I can't fix it and I'm breaking my head about that. When I make a cube starting from a plane and then bake it, after importing that secondlife sculpted map, I get some very little distortions. I work with loops and it's based on your first tutorial steps. thx |
|
Domino Marama
Domino Designs
Join date: 22 Sep 2006
Posts: 1,126
|
03-22-2008 15:22
Hey Domino, I have some troubles which I can't fix it and I'm breaking my head about that. When I make a cube starting from a plane and then bake it, after importing that secondlife sculpted map, I get some very little distortions. I work with loops and it's based on your first tutorial steps. thx There's two possible causes. If you bake a low polygon model, then you won't get smooth subdivision of the faces (due to triangle based fill). Just use a subdivide (simple) or add some multires levels to give the fill routine more to work with. The other possible cause is aliasing due to the 256 distinct vertice positions available on each axis. The only way around this one is in the modelling process. If you scale your model to 2.55 and zoom the view in to see the 0.01 grid. select all vertice and snap to grid, that will show the same distortion as aliasing would. If you tidy up the model while snapping to that grid, then what you see will be what you get. You can see this effect in the gem tutorial where I didn't tidy up. Oh, there's one other possibility, Second Life use triangles, not quads, so if you are using diagonals across faces as edges on the model it's best to triangulate the mesh. You'll need to apply multires before doing this and just work on the highest LOD. That way you can see any edges you are trying to bend the wrong way |
|
WarKirby Magojiro
Registered User
Join date: 24 Oct 2006
Posts: 49
|
03-31-2008 07:53
My girl is having problems with this. I've used it fine with no problems (windows XP) but she can't get the sculpt export to work under Vista
I gave her step by step instructions through everything, but nothing happens when she tries to bake. I've had her send me the .blend files for inspection, and the bake worked fine for me without changing anything. Is there any known issue with it in windows vista? |
|
Domino Marama
Domino Designs
Join date: 22 Sep 2006
Posts: 1,126
|
03-31-2008 08:05
Is there any known issue with it in windows vista? There are no platform specific issues I'm aware of. I develop under Linux and test with Vista as well. Ask her to see what is reported on the console. Also check whether she is baking from edit mode or object mode. It might be as simple as being in edit mode. Blender automatically changes back to the UV mapped image then, so it will look as though nothing happened, but she should be able to go to object mode and select the sculptie map in the UV/Image Editor. If she does the bake in object mode. then the last baked sculptie should stay displayed. |
|
Domino Marama
Domino Designs
Join date: 22 Sep 2006
Posts: 1,126
|
Updated Blender Sculptie Bake Script
04-05-2008 02:52
Just uploaded a new script package with version 0.13 of the baker
This one will please the people working on animated sculpties and opens up quite a few new working methods. The script now works post modifier stack, so it takes into account armatures, curve & subsurf modifiers etc. Now you don't need to apply modifers for them to affect your final sculptie http://dominodesigns.info/downloads/second_life/import_sculptie_svn.zip |
|
Raz Welles
Registered User
Join date: 18 Jun 2007
Posts: 49
|
04-05-2008 04:31
o_o
There are are no words for this. Only rays of awesome emanating from that link. |
|
Rubina Stanwell
Queen of Sheeba
Join date: 14 Jun 2006
Posts: 128
|
04-05-2008 05:07
Hmm. I can't seem to find a script folder for my version of Blender (2.44, Mac). I have looked in both my Library and inside the .app package for the appropriate folders... is there a Mac equivalent for this folder? And if so, do you know where it is? I was able to access the folder from within blender I'm really bad at explaining things but here goes: beside the help menu there's a drop down menu, click it and select "5-Scripting" a new window will open up, it will be blank, go down to the bottom left hand corner of this new screen and select File >> Open (Ctrl-O) find the folder where you have downloaded said scripts select the first file ending with a ".py" blender should put a little red box beside the viable scripts you can open go to the top right hand corner of the script window and click the "Open Text File" once you see the code in the window go back down to the File button, select save as find the blender application, it will be expandable in this save as menu the direct file path, copy and paste from my screen is : Applications/blender-2.45-OSX-10.3-py2.3-powerpc/blender.app/Contents/MacOS/.blender/scripts Click Save as text file, do not edit the name repeat the steps for the remaining two scripts I closed blender and restarted and it worked as described _____________________
Stealing hearts and panties since the eighties...
---------------------------  http://adimusl.wordpress.com | Afrocentric Hairstyles for Men & Women in SecondLife |
|
Domino Marama
Domino Designs
Join date: 22 Sep 2006
Posts: 1,126
|
04-05-2008 07:10
o_o There are are no words for this. Only rays of awesome emanating from that link. No words? How about a video then? This shows how to use a subsurf modifier instead of multires to get a LOD resistant sculptie. Coming in at 9 mins 17 seconds it's my longest over the shoulder session yet. It might actually help make something useful rather than my usual "wierd" sculpties just to demo the technique Tip: if you aren't used to watching someone else using Blender, watching the status bar that appears in place of the menus under the 3d view will help you see what's happening during modelling. Tip2: if you aren't used to watching me using Blender, there's usually a few not-so-deliberate mistakes. If you see me doing multiple box selects before doing anything or bits of the mesh jump back to a prior position when I hit undo, that's not part of the normal process. I blame the lag caused by recording as I work So here's the hip flask session so we can all have a drink and celebrate this feature jump in the scripts. http://dominodesigns.info/downloads/tutorials/blender/flask.avi |
|
Raz Welles
Registered User
Join date: 18 Jun 2007
Posts: 49
|
04-05-2008 08:22
 ~~ .. omg thanks for posting this, I also learned things I didn't know I could do with blender as well (the median crease xD ). ~~ .. omg thanks for posting this, I also learned things I didn't know I could do with blender as well (the median crease xD ).Being able to use the modifiers is an -amazing- breakthrough, we have more control now than we ever did, the modifiers give us so much more control over our meshes o_o so omg thank you thank you thank you! This update.. has made me get up, put some music on, and dance around my desk. xD *happily gets drunk off of flask* Alright I'll stop embarassing myself xD; Thank you so much for your work on Blender! Please keep up the amazing work! -- Raz |
|
Domino Marama
Domino Designs
Join date: 22 Sep 2006
Posts: 1,126
|
04-05-2008 08:23
Two videos in one day!
This one is back to wierdness It's a quick demo of how to use the mirror modifier on your sculptie. http://dominodesigns.info/downloads/tutorials/blender/head.avi Tip: the view you use when deleting the vertice is important. You can tell the view from the compass in the bottom left corner of the 3D view. It's the side view (Numpad 3). |
|
Liderc Dagger
..:: Mistress Of Lag ::..
Join date: 28 May 2007
Posts: 7
|
04-05-2008 08:49
Hmm. I can't seem to find a script folder for my version of Blender (2.44, Mac). I have looked in both my Library and inside the .app package for the appropriate folders... is there a Mac equivalent for this folder? And if so, do you know where it is? The folder is inside the app but it's invisible, anything that starts with a . is invisible in OS X. To get around this easily, download a free automator script that toggles invisible files... http://www.versiontracker.com/dyn/moreinfo/macosx/32246 _____________________
"I say what I like and I like what I bloody well say"
|
|
Raz Welles
Registered User
Join date: 18 Jun 2007
Posts: 49
|
04-05-2008 08:53
xD .. I'm gonna be walking around all day with a grin on my face. These are things I could only dream of when I did my first sculptie!
Quick question, if I decide to mirror across the X axis, I change to view Numkey 1, hit the X mirror option in the modifier, and keep the UV mirror to U, correct? (I'm a creature of habit haha)*drools* 2 videos in one day, xD .. so beautiful.. |
|
Domino Marama
Domino Designs
Join date: 22 Sep 2006
Posts: 1,126
|
04-05-2008 09:08
xD .. I'm gonna be walking around all day with a grin on my face. These are things I could only dream of when I did my first sculptie! Quick question, if I decide to mirror across the X axis, I change to view Numkey 1, hit the X mirror option in the modifier, and keep the UV mirror to U, correct? (I'm a creature of habit haha)*drools* 2 videos in one day, xD .. so beautiful.. You'd go as shown up to adding the mirror. That ensures you delete the half that will mirror on the UV map. Then rotate all vertice 90 degrees on Z. Then you should be able to use a X mirror. I setup the sculpties to match Second Life's forward direction (X), it's a pain when you're used to Blender but I thought it made sense for the import / export to match SL. I might revisit that as it slows me down too |
|
Raz Welles
Registered User
Join date: 18 Jun 2007
Posts: 49
|
04-05-2008 09:19
Oahh I see! That's a very good point, I understand the why of it now
 Thanks for the additional advice, ^^ now I can work in X mirror! Thanks for the additional advice, ^^ now I can work in X mirror!Thanks again DDD!! |