first of all if this has already bin posted im srry.i did read some lod posts but they havent answered my questions
anyway my problem is when i work in blender im starting at lod lvl 1 once i have made what i want to make and switch to 2 it adds vertices but when i switch back to 1 it get more deformed and then i switch back to 2 and it get more deformed .am i only suppose to start in lod 1 and work my way to 3 cause its kinda difficult to go to the next and know what i know to adjust for the next lod lvls i hope this makes sence for someone to reply thanks rico if not then ill try to answer any questions as best as i can
Welcome to the Second Life Forums Archive
These forums are CLOSED. Please visit the new forums HERE
blende Lod issues |
|
|
Rico Kappler
Registered User
Join date: 17 Apr 2007
Posts: 20
|
03-16-2009 17:44
|
|
Keira Wells
Blender Sculptor
Join date: 16 Mar 2008
Posts: 2,371
|
03-16-2009 17:49
I'm not sure what you're saying... your use of 'leetspeak' or whatever you call it makes it hard to understand you. Anyhow, here's a rundown of Multires effects (LOD) for Blender.
If you edit things in level 1, and then go to a higher level using the Catmul-Clark subdivision method (Default for sculpties), then the mesh will 'smooth', causing it to be a more organic shape, rather than geometrically accurate to the lower detail levels. If you change to a lower level, then the mesh will show an approximation of the higher detail levels. If you move a lower level edge, then a large section of higher detail levels will change. If you move a higher level edge, lower levels may not necessarily show the change how you expect, and it may not be visible at all, depending on how large a change it was. If you use 'Simple Subdivision' for your multires, and are adding your own levels, then it will be more geometrically perfect, and give none of the (more organic) smoothing that catmul-clark does. _____________________
Tutorials for Sculpties using Blender!
Http://www.youtube.com/user/BlenderSL |
|
Rico Kappler
Registered User
Join date: 17 Apr 2007
Posts: 20
|
03-16-2009 18:11
is there any possible way to see the other levels of detail when working in a level of detail so that maybe you know what its going to do when u pull out on the cam in sl ?
|
|
Keira Wells
Blender Sculptor
Join date: 16 Mar 2008
Posts: 2,371
|
03-16-2009 18:17
is there any possible way to see the other levels of detail when working in a level of detail so that maybe you know what its going to do when u pull out on the cam in sl ? Just change the level of multires. You won't lose any detail by doing so, and the mesh won't change unless you change it. You can switch back and forth between levels as often as you want. There is no way, currently, to see all levels of detail at once, unfortunately. _____________________
Tutorials for Sculpties using Blender!
Http://www.youtube.com/user/BlenderSL |
|
Rico Kappler
Registered User
Join date: 17 Apr 2007
Posts: 20
|
03-16-2009 18:54
ok well thanks for the replys and srry for my ghetto leet talk
|
|
Gaia Clary
mesh weaver

Join date: 30 May 2007
Posts: 884
|
03-16-2009 19:45
Just change the level of multires. You won't lose any detail by doing so, and the mesh won't change unless you change it. You can switch back and forth between levels as often as you want. 1.) create a sphere with 3 LOD levels (standard settings in domino's scripts) 2.) switch to LOD 1 3.) go to front view, then select the right most vertex of the sphere and move it significantly to the right, so that a long spark gets produced. 4.) switch to the next higher LOD level 5.) Immediately switch back to the previous LOD level. You will see, that although you did only switch the LOD levels, the vertices have been moved compared to how the shape looked alike before you switched the LOD levels. the good news is that fr0m now on you can jump between the LOD levels without seeing significant changes until you make your next mesh modification... This effect has driven me crazy in the past and i often thought this is a bug in blender, but on the other hand the net effect is that the LOD switching tends to make the object become less "LOD-jumpy" Anyways... There is another much more convenient way to go: "subsurf" and here is how i would do it: - create a sculptie with 8*8 faces, no multires level (0) - then add a subsurf modifier and add 3 levels of subsurf. Note that you can switch between Catmul-clark and simple interpolation on the fly back and forth... - Then use the control mesh to modify you sculptie. Use Crease (SHIFT-E ) in order to get sharp edges. And the best thing is that with this technique, LOD problems seem to be neglectible. Well, somehow the possibilities are endless ") Did i mention, that i love blender for this ?happy sculpting, Gaia |
|
Keira Wells
Blender Sculptor
Join date: 16 Mar 2008
Posts: 2,371
|
03-16-2009 20:03
But this is not entirely true as far as i can tell... If you switch back and forth between 2 LOD levels, your mesh will get affected. make this experiment: Gaia Thank you for this... I admit, I was being lazy and didn't actually check for once XD Anywho, yeah, I love Blender's modifiers, especially subsurf with creasing. It's amazing =D It should be added, though, that if you're working with spherical sculpties, and using subsurf rather than multires, it's much harder to get a 'perfect' sphere, as it actually causes a lemon shape. If you use Multires, you can use a cast modifier to get past this(And creating a sculpt mesh with the multires already there avoids this anyway), but this is not true with subsurf, as placing it with a priority above the subsurf won't help, and applying it before editing won't either. If you try to use a spherical cast to change the base mesh after making your own specific changes, you risk destroying those changes. So, instead, you have to either manually edit the mesh in a manner that allows subsurf to handle it better, or just work with the lemon shape. If there is a workaround to this, though, please bring it up! _____________________
Tutorials for Sculpties using Blender!
Http://www.youtube.com/user/BlenderSL |
|
Rico Kappler
Registered User
Join date: 17 Apr 2007
Posts: 20
|
03-16-2009 21:26
wow thanks Gaia Clary i really appreciate the info i will mess with it more ,i just get so frustrated sometimes at this LoD thing.im sure you would agree after hours of working on a project only to upload and zoom out to see it turn into different shapes.but i will keep at it and keep practicing
thanks again |
|
Keira Wells
Blender Sculptor
Join date: 16 Mar 2008
Posts: 2,371
|
03-16-2009 21:36
Also, if your computer is relatively good, and can handle a number of sculpts at highest LOD, then you can prevent them from changing levels of detail, and remain permanently at the highest level.
To do this: 1, Make sure the Advanced menu is available in the top toolbar. If not, press CTRL+ALT+D. 2, Click Advanced, then select Debug Settings, near the bottom. 3, Type in 'RenderVolumeLODFactor' 4, The value, by default, is 2. Change this to either 4 or 8, depending on the info below. 5, Log out of SL properly. This ensures that the setting saves, as if you crash or exit SL improperly (Such as using Windows' task manager), the setting will probably not save, and you'll have to redo all of this next time you log into SL. A setting of 4 will allow the sculpt to change to the lowest level of detail, at a relatively large distance. This will cause a little more lag than the default setting, but most computers sold today can handle this. The change is generally only noticeable if you're paying attention or looking for it, but can hurt art exhibits and such under some conditions. A setting of 8 will cause the sculpt to never lower in detail (Or, if it does lower, then it's far enough out that it's impossible to see). This will cause the most graphics lag, but unless you're in a sculpt-heavy area, most computers today can still handle this setting. _____________________
Tutorials for Sculpties using Blender!
Http://www.youtube.com/user/BlenderSL |
|
Gaia Clary
mesh weaver
Join date: 30 May 2007
Posts: 884
|
03-17-2009 02:15
It should be added, though, that if you're working with spherical sculpties, and using subsurf rather than multires, it's much harder to get a 'perfect' sphere, as it actually causes a lemon shape. - go to edit mode - select all - s SHIFT z 1.125 The last command scales x and y axes only. When you use Domino's scripts, this correction has already been done for you. If you use Domino's rc scripts, you also have the option to create a corrected subsurf-enabled sculptie. You will find the newest maintained version of the rc candidate at http://www.machinimatrix.org/svn/sl/trunk/blender/dominodesign/rc/ or the packed version at: http://www.machinimatrix.org/svn/sl/distrib/ (current version has release number 0.32) And you will find the reason for the existence of this maintained version of dominos scripts here: /8/e4/311390/1.html  have fun |
|
Keira Wells
Blender Sculptor
Join date: 16 Mar 2008
Posts: 2,371
|
03-17-2009 09:02
After you have created a fresh object and applied subsurf or multires manually, you can get rid of the lemon shape and make an almost perfect sphere out of the object as follows: - go to edit mode - select all - s SHIFT z 1.125 While this does fix the proportions, it doesn't really help what I was referring to as the lemon shape, which is still in all three sculpts of yours. What I mean is the 'pointy' poles, which don't occur using Domino's sculpts. Shown on the left is the subsurfed (with constrained scaling)0-level sculpt mesh. On the right is a default 2-level multires sculpty (The same as applying a cast modifier to the manually multiresed version). You can see the difference easily, the subsurfed example has points at each pole. 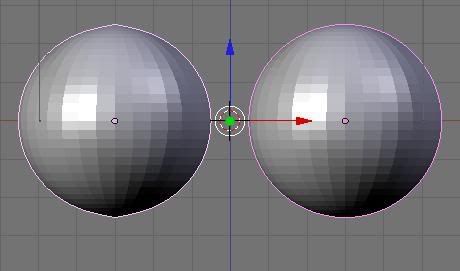 This is avoidable with multires, by using a cast modifier, but as I said before, this becomes almost impossible while trying to use subsurf like multires. If you apply a cast modifier with a higher priority than the subsurf, no change. If you apply it below the subsurf, again no change, though it will show a change before applying. To get the cast modifier to work properly, you have to apply the subsurf before applying the cast, which negates the usefulness of subsurf when viewing different LOD's. If you want to avoid those pointy poles, and still be able to view the three different LOD's, then the only way that I can tell to do it is to use Multires, and not subsurf. _____________________
Tutorials for Sculpties using Blender!
Http://www.youtube.com/user/BlenderSL |
|
Gaia Clary
mesh weaver
Join date: 30 May 2007
Posts: 884
|
03-17-2009 13:01
While this does fix the proportions, it doesn't really help what I was referring to as the lemon shape, which is still in all three sculpts of yours. What I mean is the 'pointy' poles, which don't occur using Domino's sculpts. something to think about. The mesh creation routine has been changed massively in the rc scripts. And i can not see, where exactly the release scripts do correct the multires distortion... I guess if we find out where the release scripts make multires work on a perfect sphere, we would know how to correct the subsurf distortion too... ok, another challenge to work on I will keep looking on this. But if anybody knows what exactly happens in the rc scripts... please tell it |