I've been using Sculptie-o-Matic in SL as a relatively pain free way of making a single sculptie of apparently disjointed components, the only drawback being the size of the resultant bounding box - 10m cubed, I believe.
When the object faces are parallel to the 3 axes my school maths has held up for proportionately enlarging the objects up to 10 x 10 x 10 so that the resultant sculptie conversion fills its bounding box and I can subsequently scale it back down in SL and not have a 'no-go' zone around it. However, I've got ambitious and wanted to try it with prims, some of which are on an angle and not aligned with the major axes, but find my math isn't up to calculating the required dimensions with all the angles involved.
Would any Blender experts out there be able to tell me whether it would be feasible to import the sculpt map back into Blender and, by changing the scale or some other relatively simple process and rebaking, achieve the same objective so that I could import it into SL and avoid the large bounding box problem?
Hope this makes sense!
Thanks
Welcome to the Second Life Forums Archive
These forums are CLOSED. Please visit the new forums HERE
Blender modification on existing sculptie |
|
|
Carbon Philter
Registered User
Join date: 4 Apr 2008
Posts: 165
|
07-27-2009 07:54
|
|
Domino Marama
Domino Designs
Join date: 22 Sep 2006
Posts: 1,126
|
07-27-2009 14:32
Would any Blender experts out there be able to tell me whether it would be feasible to import the sculpt map back into Blender and, by changing the scale or some other relatively simple process and rebaking, achieve the same objective so that I could import it into SL and avoid the large bounding box problem? Have you tried just importing and then baking? With Keep Scale and Keep Center off, my scripts should automatically calculate the optimal bounding box. |
|
Carbon Philter
Registered User
Join date: 4 Apr 2008
Posts: 165
|
07-27-2009 14:56
Hi Domino.
Thx for reply. Here was me thinking that it would be harder - it no doubt would be if you hadn't covered all the bases with your amazing work on Blender. I'll go try. |
|
xidoraven Migpalion
Registered User
Join date: 22 Mar 2009
Posts: 4
|
07-28-2009 23:36
Boy oh boy, you have just got all this stuff covered, don't you, Domino?
 I am so glad to see other people out there who are just as avid and adventurous in design as I am with this new media in my own repertoire. Looks like you are doing an amazing job not only making applicable contributions to the software use/methods, but also by being such a dedicated educator for others who are now walking this same path with similar intentions. I am so glad to see other people out there who are just as avid and adventurous in design as I am with this new media in my own repertoire. Looks like you are doing an amazing job not only making applicable contributions to the software use/methods, but also by being such a dedicated educator for others who are now walking this same path with similar intentions.Please buddy list me? ") I am in this for the long haul, so I might as well make myself at home here talking with you about these things. I am not giving up on the blender projects anytime soon, so it looks like it will continue to be an educational experience for all. I am in this for the long haul, so I might as well make myself at home here talking with you about these things. I am not giving up on the blender projects anytime soon, so it looks like it will continue to be an educational experience for all.Are all megaprims which are usable by us member/clients only available in-world or does building offline help in beating part of this obstacle? And, your scripts set the most appropriate prim size, bounding box, or both? Many thanks, Domino. XD -will |
|
Domino Marama
Domino Designs
Join date: 22 Sep 2006
Posts: 1,126
|
07-29-2009 02:42
Please buddy list me? I am in this for the long haul, so I might as well make myself at home here talking with you about these things. I am not giving up on the blender projects anytime soon, so it looks like it will continue to be an educational experience for all.Are all megaprims which are usable by us member/clients only available in-world or does building offline help in beating part of this obstacle? And, your scripts set the most appropriate prim size, bounding box, or both? Many thanks, Domino. XD -will Well as I mentioned in the other thread, the main discussions for my scripts will be moving to http://dominodesigns.info/index.php so it's likely I'll be a lot less active around here. That's the best place to be for the long haul. Megaprims are only available inworld, they are oversized prims created during occasional glitches that allowed their creation. The glitches were closed so only existing megaprims can be used. They are on my todo list to support, but are low priority due to the technical issues involved in not being able to create them. |
|
xidoraven Migpalion
Registered User
Join date: 22 Mar 2009
Posts: 4
|
Support Group
07-30-2009 19:01
I have been watching the Machinamatrix video tutorials to learn what I can lately, and I am going to state very clearly that if you need help with something that I can help with, or if you need a sounding board, I will be there for your needs. I think this is an amazingly large, complex, and courageous project to make a community-led/supported set of tools for in-world content development.
As I said before elsewhere, I am a designer and program-user and not a programmer. I am proficient with Adobe CS3 products and others, and still amateur to blender (but learning very quickly with my text on character animation by the Blender Foundation and online resources), but I am willing to give any input, suggestions, considerations or other help I can give including bug-watching and beta-testing... or whatever. But I want you to know that I am on your side in anything you need, and I will be your cheerleader while the project moves forward. I think there are many more of us than some of us might be aware... I will sign up for your blog page soon. -will |
|
Drifter Dreamscape
Registered User
Join date: 30 Mar 2008
Posts: 182
|
08-01-2009 08:50
Hi Domino, Gaia, and other experts,
Couple of questions if you don't mind too much. Can you clarify the Blender process for me re. importing a sculptie for modification, please? I have a sculptie map created using Sculptie-o-Matic - trailer2.bmp - which is 4 x 256 grid. I uploaded into Blender and rebaked as you suggested to reduce the bounding box in SL. I then saved the map via the image tab in the UV/Image Editor window as 'trailer4' and when I looked in the directory it had saved it as trailer4.bmp. I then used the file menu to export as Second Life LSL. When I checked in the target directory it had saved the map as trailer4.bmp.tga but the lsl file was titled trailer2.lsl although in the script it referred to trailer4.bmp. I had to edit/delete the tga. extension for the map to upload into SL and have the lsl script run correctly. Is there something I need to do to correct the process? - I would have expected the map created through the export process to have the same file type as the lsl script refers to, whether it be bmp or tga, and I would also have expected the lsl file name to match that of the new sculptie map, not the original map I first imported. Also, is there any way, and for that matter any benefit, in changing the 4 x 256 sculpt map to a 32 x 32 grid or any other closer to square grid? Thanks. Drifter |
|
Domino Marama
Domino Designs
Join date: 22 Sep 2006
Posts: 1,126
|
08-01-2009 10:18
I would have expected the map created through the export process to have the same file type as the lsl script refers to, whether it be bmp or tga, and I would also have expected the lsl file name to match that of the new sculptie map, not the original map I first imported. The scripts are designed to exclusively use .tga files so don't save as bmp. When you save an image from Blender, you can set the file type in the toolbar of the save dialog (targa is the one to use). The LSL script is named after the object name, not the sculpt map. So unless you rename the object after import, it will keep the name of the imported sculpt map from when the object was created. This is to allow cases like a car, where all four wheels might use the same wheel.tga file, but be separate objects - by using the object name it guarantees a unique name for each exported object where the image name might not. Also, is there any way, and for that matter any benefit, in changing the 4 x 256 sculpt map to a 32 x 32 grid or any other closer to square grid? Probably not. If the original sculptie was designed that way, it's unlikely changing the map size will improve it. /8/e9/332831/1.html has details on changing the map size if you want to test it out. |
|
Drifter Dreamscape
Registered User
Join date: 30 Mar 2008
Posts: 182
|
08-01-2009 11:10
Thanks, Domino - still my hero!
Drifter Just re-read your first part. The SoM sculptie I loaded into Blender was a bmp. Are you saying I should convert that to tga before I import into Blender? |
|
Domino Marama
Domino Designs
Join date: 22 Sep 2006
Posts: 1,126
|
08-01-2009 13:05
Just re-read your first part. The SoM sculptie I loaded into Blender was a bmp. Are you saying I should convert that to tga before I import into Blender? Blender has it's own internal image format, so it doesn't matter what the import image type is. Because one of the Blender conventions is using things like foot.l and foot.r I can't just strip all extensions from the names. So as long as you make sure any images have any file name related extensions stripped off, it'll work fine. My scripts do this automatically on an import, and for .tga files on export, so unless you save from Blender's UV Image Editor with the wrong filetype, it shouldn't be a problem. |
|
Drifter Dreamscape
Registered User
Join date: 30 Mar 2008
Posts: 182
|
08-08-2009 08:26
Hi Domino, Gaia, and other experts,
Still plodding away with Blender and got to a stage where I need some more clarification.  I've been following through the Machinimatrix tutorial on multiple image texturing and think I've got the hang of it when I've modelled the sculpty using one of the preprepared sculpt meshes, but I'm trying to texture one of the sculpts I made with Sculpt-o-Matic which, as I mentioned in a previous post, generates a map as a 4 x 256 grid. I've taken the advice re. not needing to change the sculpt map proportions, so now when I'm applying a texture (or trying to, rather), do I have to use those same proportions of UV map and does it have to be the same density of grid or can I somehow subdivide the mesh faces to change it to a grid with more squares to make the texturing process easier and more accurate? If I can use a more detailed grid does the process of baking the texture only from the 'projection map' set it automatically to the sculpt map co-ordinates? Thanks in anticipation. Drifter |
|
Domino Marama
Domino Designs
Join date: 22 Sep 2006
Posts: 1,126
|
08-08-2009 13:17
Hi Domino, Gaia, and other experts, Still plodding away with Blender and got to a stage where I need some more clarification. I've been following through the Machinimatrix tutorial on multiple image texturing and think I've got the hang of it when I've modelled the sculpty using one of the preprepared sculpt meshes, but I'm trying to texture one of the sculpts I made with Sculpt-o-Matic which, as I mentioned in a previous post, generates a map as a 4 x 256 grid. I've taken the advice re. not needing to change the sculpt map proportions, so now when I'm applying a texture (or trying to, rather), do I have to use those same proportions of UV map and does it have to be the same density of grid or can I somehow subdivide the mesh faces to change it to a grid with more squares to make the texturing process easier and more accurate? If I can use a more detailed grid does the process of baking the texture only from the 'projection map' set it automatically to the sculpt map co-ordinates? Thanks in anticipation. Drifter Here's what I'd do. 1) Import the sculptie 2) Go to object mode and add a UV Layer (leave it as UVTex). By going to object mode it will copy the sculptie UV Layer rather than creating a new one. 3) Create an image for your texture in the UV Image Editor, 16 x 1024. (or anything - textures size isn't linked to the ratio. This size gives a 4x4 pixel chunk per quad face at LOD3). Now you have two UV Layers, one with the sculpt map, one with the texture. Add materials, lights etc for the bake. When baking make sure the UVTex layer is set as the render layer. Now if you wanted to source part of the texture from an existing image, you can add it as a texture layer to the material. Set the map type to object, and create an empty to act as the mapping object. This is best for "Logos" with an alpha layer - you can move, scale, rotate the empty to adjust how the image appears on the model. Alternatively, say you have a repeating wood texture, you could add another UV Layer and unwrap how you like on this one (best to rename from UVTex1 to something that reflects it's purpose). In this case, just do a "reset" to map each full quad to the full texture. Then look for scaling issues on the model and adjust those faces manually. You'd still add the image to your material, but this time you set the mapping to UV and choose this new layer. |
|
Drifter Dreamscape
Registered User
Join date: 30 Mar 2008
Posts: 182
|
08-09-2009 04:58
Thx again, Dom.
Protracted conversation on this issue. ") I'm trying to understand your comments - it'll come good in time, I trust, but if you'll bear with me I'll ask for further simplification. The sculpty is a hut where the wall is made up of one face in the sculpt map. I want to apply a texture comprising a wall material from one image but with a door taken from a different image in the middle of the elevation. If the wall was made up of more faces and had vertices where the door corners were located I could just select that particular part, unwrap to view, and apply the image, but as the whole wall is just one face I don't know how to do the combination in Blender. I guess I could make up the composite image using Painshop Pro (my economy alternative to Photoshop) but would love to know if what I'm after can be done in a straightforward way within Blender. Is it a case of mergng different texture UV layers? |
|
Domino Marama
Domino Designs
Join date: 22 Sep 2006
Posts: 1,126
|
08-09-2009 07:34
The sculpty is a hut where the wall is made up of one face in the sculpt map. I want to apply a texture comprising a wall material from one image but with a door taken from a different image in the middle of the elevation. If the wall was made up of more faces and had vertices where the door corners were located I could just select that particular part, unwrap to view, and apply the image, but as the whole wall is just one face I don't know how to do the combination in Blender. I'd go the empty route. Makes fine adjustment a lot easier. You might want to remodel that shack though.. One sculptie face for an entire wall isn't going to stand much texturing. http://blendernewbies.blogspot.com/2007/08/video-basic-decaling-in-blender.html just imagine the tshirt is the wall and the door the logo |
|
Drifter Dreamscape
Registered User
Join date: 30 Mar 2008
Posts: 182
|
08-09-2009 09:40
Thanks Dom.
Lots to absorb in the tutorials! Maybe some day I'll be proficient. The reason for the one face per wall is because I used Sculptie-o-Matic to create a group of beach huts using only one prim. Partly 'cos I can manipulate prims in SL easier than mesh modelling in Blender, and partly 'cos it lets me link apparently separate objects while saving on my SL prim limit. If I could get my head round it in Blender I'd probably use that app. Anyway, there's not going to be much texturing, just timber boarding a door, and maybe a small window. Just to let you see what the untextured thing looks like here's a link to a screen grab I did: 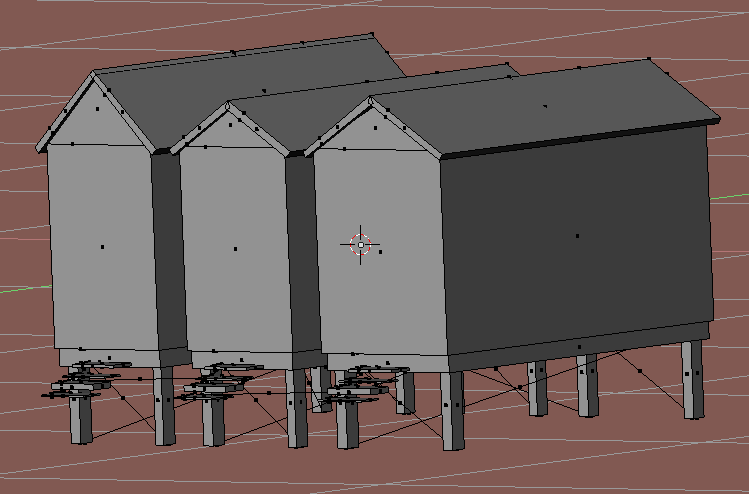 |
|
Domino Marama
Domino Designs
Join date: 22 Sep 2006
Posts: 1,126
|
08-09-2009 10:51
Perhaps make one step a ramp, freeing 3 to act as a doorframe?
Having seen the picture, I'd create a wood texture, and use a second uv layer to map each face to the wood. So some would map to one plank, could rotate the side wall ones etc. Lot of work manually adjusting the mapping for each face, but worth it here I think. |
|
Drifter Dreamscape
Registered User
Join date: 30 Mar 2008
Posts: 182
|
08-13-2009 16:22
Hi Dom, and Gaia - me again.
Still working on the texturing. I've been following Gaia's tutorial step for step but have hit a problem, the cause of which I can't understand. I made the new texture layer, did all the face texturing to get it looking fairly presentable when I displayed it in texture view, generated a consolidated image, created a new material/texture and mapped it to the UV layer all in accordance with the tutorial. From then on things went downhill. I created a new image 1024 x 1024 then did the bake render mesh only and the texture turned all blurry. Have I missed something or is it due to the difference in sculpt map proportions that it doesn't come out as sharp as it displays in teture view when the texture map layer is the active one? A picture is worth a thousand words - especially when I ramble - so I did a before and after picture to show you what happens. Before:  After:  Any help to inch me along the learning curve would be appreciated. Thanks |
|
Domino Marama
Domino Designs
Join date: 22 Sep 2006
Posts: 1,126
|
08-14-2009 01:34
Any help to inch me along the learning curve would be appreciated. You are missing a UV Layer, there should be "sculptie" with the sculpt map assigned to it. "UVTex" which should have the little picture icon next to it enabled to set it as the "Render Target", this is where the final texture image should be assigned. The projection map one should be where your unwrap to use source images for the bake goes. |
|
Drifter Dreamscape
Registered User
Join date: 30 Mar 2008
Posts: 182
|
08-14-2009 05:45
Dom - for sake of continuity I'll run with this query here rather than your blog.
I don't understand where the third layer comes in. The machinimatrix video only has two that I can see. I created the UVTex one, activated it, and renamed it to projection map as directed in the tutorial before doing all the texturing. It doesn't say anything about a separate third layer, just that I go back to the sculpt layer, make that active, make a new image in the UV/Image window, then bake 'texture only'. Lower lip's quivering! I want to cry. |
|
Domino Marama
Domino Designs
Join date: 22 Sep 2006
Posts: 1,126
|
08-14-2009 06:46
Dom - for sake of continuity I'll run with this query here rather than your blog. No problem, my forums would be the right place for future questions, unless of course I blog about something that raises them I don't understand where the third layer comes in. The machinimatrix video only has two that I can see. In Blender, my scripts support two named UV Layers: 'sculptie' which has the sculpt map image assigned 'UVTex' which has the texture image assigned By using these two named layers, when you do 'File - Export - Second Life LSL' it will include texturing information as well as sculptie prim information for recreating the object in SL. So the 'projection layer' for creating the texture image should be the 3rd layer. Hopefully Gaia is reading and will add updating this to her tutorial todo list I created the UVTex one, activated it, and renamed it to projection map as directed in the tutorial before doing all the texturing. It doesn't say anything about a separate third layer, just that I go back to the sculpt layer, make that active, make a new image in the UV/Image window, then bake 'texture only'. Highlight the little grid button next to the sculptie layer to make it active. Go to object mode and add a new layer. You'll now have a "UVTex" layer as the active layer. Go to edit mode, move the mouse over the UV Editor window and press "a" to highlight all. Now pick the texture image from the dropdown box in the UV editor toolbar. Now you can set the active UV Layer to "projection map" and the render target to the "UVTex" you just added. You shouldn't need to change them again, baking the textures or the sculpt map should just work, and you can tweak the "projection layer" as it's the active one for editing. Lower lip's quivering! I want to cry. Hopefully it'll click in time, but if not letting it out will leave room for happiness when it does click _____________________
Visit http://dominodesigns.info for the latest Primstar info
|
|
Gaia Clary
mesh weaver

Join date: 30 May 2007
Posts: 884
|
08-14-2009 08:20
So the 'projection layer' for creating the texture image should be the 3rd layer. Hopefully Gaia is reading and will add updating this to her tutorial todo list Big sister is watching all the time I added this to the todo list. Thanks for the pointer! |
|
Domino Marama
Domino Designs
Join date: 22 Sep 2006
Posts: 1,126
|
08-15-2009 02:24
You shouldn't need to change them again, baking the textures or the sculpt map should just work, and you can tweak the "projection layer" as it's the active one for editing. Oops. You will need to change these just before baking. Got them back to front, the render uv layer is the default source for baking, the active one the one that will receive the bake. I use named UV Layers in the materials UV mapping so the render one doesn't matter, but make sure the layer you want to bake to is the active one. Sorry if I added to the confusion! _____________________
Visit http://dominodesigns.info for the latest Primstar info
|