Does anyone know if it's possible to copy and paste directly onto a 3D object in PS CS4? Whenever I attempt to do this it creates a new layer with the image, but doesn't apply it on the 3D object.
Thanks in advance for any responses.
Welcome to the Second Life Forums Archive
These forums are CLOSED. Please visit the new forums HERE
Question about Photoshop CS4 Extended |
|
|
Beowulf Axelbrad
Registered User
Join date: 8 Apr 2008
Posts: 3
|
11-09-2008 21:44
|
|
Annyka Bekkers
Registered User

Join date: 25 Jun 2007
Posts: 98
|
11-10-2008 10:36
Yes, you can just merge that layer down and it will merge it into the active layer of the PSB file underneath. If you want to keep it on its own layer, just make a new layer in the PSB and make it active . This works across seams and separate body parts
_____________________
www.lickdontbite.blogspot.com
|
|
Beowulf Axelbrad
Registered User
Join date: 8 Apr 2008
Posts: 3
|
11-10-2008 23:08
Thank you so much for the reply. I spent an embarrassing amount of time trying to figure that out on my own.
|
|
CherryBerry Lane
Registered User
Join date: 28 Jul 2007
Posts: 11
|
02-17-2009 12:37
Thanks for this, was helpful
but I still have a question I get how to paint across seams, do fills...but is there a way to fill an ENTIRE 3D object? I know I can open the template and fill there, but I want a seamless pattern across the seams. Also, when i do a pattern fill then merge down, it only fills the areas your camera is facing. 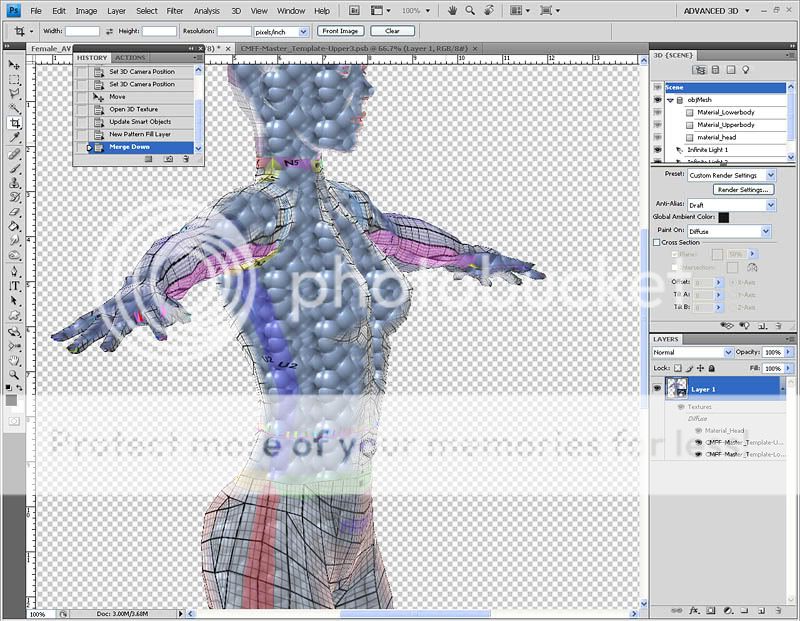 |
|
CherryBerry Lane
Registered User
Join date: 28 Jul 2007
Posts: 11
|
03-24-2009 15:58
I really don't want to bump, buuuuuut
bump I have looked alllllllll over the interwebs, and I still don't have an answer. =0( plz....help? =0( |
|
Chosen Few
Alpha Channel Slave
Join date: 16 Jan 2004
Posts: 7,496
|
03-24-2009 19:09
I get how to paint across seams, do fills...but is there a way to fill an ENTIRE 3D object? I know I can open the template and fill there, but I want a seamless pattern across the seams. Open all three material files, and create a new layer on each. Make sure the new empty layer is active in each one (highlighted in the layer stack). Then grab the Paint Bucket, set it to Pattern mode, and click anywhere on the model. Everything facing the camera will be filled.  Also, when i do a pattern fill then merge down, it only fills the areas your camera is facing. If you're merging a layer from outside the model onto the model, then it will act like a projection. Only what's facing the camera will be affected. If you merge layers within a texture material file, then the whole texture will be affected. _____________________
.
Land now available for rent in Indigo. Low rates. Quiet, low-lag mainland sim with good neighbors. IM me in-world if you're interested. |
|
CherryBerry Lane
Registered User
Join date: 28 Jul 2007
Posts: 11
|
03-24-2009 19:44
If you're merging a layer from outside the model onto the model, then it will act like a projection. Only what's facing the camera will be affected. This is what I was trying to get at. lol Alas I must lack skills to get my point across. lol Is there any way to get around this? I am having trouble matching "tattoo" (for lack of better term) across multiple seams. (front, side and leg) Maybe what I'm trying to say is: how the heck do I match seams!? there has got to be a better way than flipping back and forth between the 3D image and the UV, moving it little this way, little that way, but never quite matching up. Smudge doesn't work on material with a pattern on it. =0) forgot to add that I do use a seam matching guide. |
|
Chosen Few
Alpha Channel Slave
Join date: 16 Jan 2004
Posts: 7,496
|
03-25-2009 08:35
how the heck do I match seams!? there has got to be a better way than flipping back and forth between the 3D image and the UV, moving it little this way, little that way, but never quite matching up. Here's one way to do it. Put your tattoo on a layer outside the model, and above the model, so it's in front of the model on screen. Duplicate the layer so you'll still have a copy after you merge it down. Rotate the model into position so the tattoo will project onto it as well as possible. Merge down. Now grab your other copy of the tattoo, and repeat the procedure. Rotate the model a little bit so you'll now get the tattoo to project onto the parts of the surface that were obscured before. Mask off parts of the tattoo if you need to, in order to keep from overlapping where it wouldn't be desirable. When you've got it lined up, merge down again. Keep repeating that procedure until you've got the tattoo wrapped around the surface how you want it. Lowering the opacity on the tattoo layer can be helpful for alignment, so you can see the model through it. Just remember to raise it again before you merge. It will take some practice to master this technique. But sooner or later it will click, and you won't believe you couldn't make it work before. Smudge doesn't work on material with a pattern on it. =0) Put the tattoo on a separate layer from the pattern, and then you can smudge it all you want, without affecting the pattern at all. To do that, put a new empty layer on each body part before you merge the tattoo down. _____________________
.
Land now available for rent in Indigo. Low rates. Quiet, low-lag mainland sim with good neighbors. IM me in-world if you're interested. |
|
Robin Sojourner
Registered User
Join date: 16 Sep 2004
Posts: 1,080
|
03-25-2009 12:56
Hi CherryBerry!
If I understand you, you want to know if there's a way to paint things you can't see in the viewport, so you could just fill the whole model with a seamless texture with a single click. No, there's not. I have worked with a program that did allow you to paint on the portion that was hidden, and it's not a pretty sight. I'll try to explain why, and why the way that PS does it is actually superior. Picture a projection screen, and a person standing in front of it. That's essentially what we have when we're painting on the model in PS. The paint is projected onto the model from our camera, which is like the lens in the projector. Now, think of what the projected image looks like from the side, if you were standing next to the person in front of the screen. See how it gets all blurred and streaked, as the image travels along the body, as opposed to hitting it straight on? That's what happens, if you can paint on areas you cannot see. The texture turns into a long streak, and has to be erased. It makes it quite difficult to paint on irregular areas, because all the streaks keep ruining the good paint that was there. (You have to use a different layer for every camera angle, so you can remove the bad parts.) And then, of course, the texture is reversed on the back of the model. What you really want is something that will project all the way around your model, in a seamless cylinder, so that the projection is right along the normal of each poly. Which would be wonderful, but doesn't yet exist, to the best of my knowledge. However, all it would take to do that is some fairly complex math, so I wouldn't be at all surprised if it comes along sometime in the future. Until then, we rotate and stamp. Or, in the case of clothes, we make seams where seams really are, in real garments. After all, patterns on real clothing aren't seamless, either.  Hope this helps! _____________________
Robin (Sojourner) Wood
www.robinwood.com "Second Life ... is an Internet-based virtual world ... and a libertarian anarchy..." Wikipedia |
|
CherryBerry Lane
Registered User
Join date: 28 Jul 2007
Posts: 11
|
03-25-2009 14:46
Thanks Chosen! I had a feeling you were going to say that. lol Well, you know what they say...practice practice practice lol
What you really want is something that will project all the way around your model, in a seamless cylinder Yes, exactly. Like "new shape from layer" then being able to choose a custom shape Until then, we rotate and stamp. Or, in the case of clothes, we make seams where seams really are, in real garments. After all, patterns on real clothing aren't seamless, either. I said the same thing only last week in a blog post. Side and arm seams don't bother me. I was more looking for a way to combat the seams on a jacket layer, and a better way to lay a tattoo across a seam. thanks guys |
|
LaNebia Stransky
Registered User
Join date: 2 Oct 2007
Posts: 5
|
03-29-2009 08:05
First of all : BIG THANK YOU Robin, Chosen, Chip and others for all the great job you guys do on this forum.
What you really want is something that will project all the way around your model, in a seamless cylinder, so that the projection is right along the normal of each poly. Which would be wonderful, but doesn't yet exist, to the best of my knowledge. However, all it would take to do that is some fairly complex math, so I wouldn't be at all surprised if it comes along sometime in the future. I must say, that the words "cylinder" and "projection" light up my fuse in miliseconds ! I was trying to find the way to be able to use something like "cylindrical projection" of textures since I've played with PS CS4 Extended for the first time, and I've found out, that the layer merged onto the 3D object doesn't "wrap up" - the process works exactly as Robin (beautifully !) described. So... I've tried BodyPaint 3D and here are the screenshots of what I've done untill now : BodyPaint 3D - Image 1 BodyPaint 3D - Image 2 This is the end of my knowledge : I just can't figure out how to obtain this tattoo picture "cylindrically projected" on the UV template. I might be totally wrong and mismatching everything (like texture, material, UV mesh etc.) because I'm just at the very beginning of 2D and 3D graphics adventure, but even an explanation of what I've messed up will help. Thnx guys ! |
|
LaNebia Stransky
Registered User
Join date: 2 Oct 2007
Posts: 5
|
04-10-2009 02:54
Anyone ?
|
|
Sirix Finesmith
Registered User
Join date: 23 May 2008
Posts: 29
|
04-10-2009 05:15
I was wondering about this myself.
Couldn't you also use a tool something akin the healing brush? Zbrush has some tool, I used to use it a lot and I forgot what it's called but you used it the same way in that you defined a source and pulled color data from it. If someone scripted a new brush that would maybe stay put where the last part of the tattoo was copied from (so you can rotate the camera and keep applying ) wouldn't this be at least a half way decent solution? Would anyone be willing to make tutorials with pictures about the above methods? Thank you. |
|
Chosen Few
Alpha Channel Slave
Join date: 16 Jan 2004
Posts: 7,496
|
04-10-2009 09:51
LaNebia, it looks like your pics have been deleted from Photobucket. Sorry I didn't notice your post while they were still there.
3D painters always seem to be lacking in SOMETHING. The latest Photoshop is wonderful because it allows you to use all of PS's painting tools, but as has been pointed out in this thread, it's very limited in its projection abilities. It can only do a planar projection, and that's it. Other programs that can do other kinds of projections tend to have very underpowered painting tools. Maya, for example, can project six ways from Sunday, but it's only got a small handful of paintbrushes. I haven't looked at BodyPaint in a while, but the last time I tried the demo, it was somewhere in between. It has an OK, but not great, set of brushes, and a pretty nifty, but still underpowered, projection system. Unfortunately, there's really no one-stop-shop for 3D painting that can do it all. If you want a "complete" set of tools, you need more than one program. And that's often more trouble than it's worth. Here's a thought. Rather than projecting, you might want to try cloning from a 2D source onto the 3D surface. Photoshop, Mudbox, and Zbrush are three programs I know have good tools for doing that. I'm not sure about BodyPaint. Cloning takes more time than projecting, obviously, but it works. One thing to consider is that even cylindrical projections aren't always going to give you desirable results on things as odd-shaped as body parts. There's always going to be some distortion when the "screen" isn't the same shape as the "projector". That always has to be corrected by hand. There's no way to automate it. _____________________
.
Land now available for rent in Indigo. Low rates. Quiet, low-lag mainland sim with good neighbors. IM me in-world if you're interested. |
|
LaNebia Stransky
Registered User
Join date: 2 Oct 2007
Posts: 5
|
04-29-2009 11:05
LaNebia, it looks like your pics have been deleted from Photobucket. Sorry I didn't notice your post while they were still there. Sorry Chosen Few ! It was my mistype error. Try this time : http://i588.photobucket.com/albums/ss326/LaNebia/secondlife/screenshot1.jpg http://i588.photobucket.com/albums/ss326/LaNebia/secondlife/screenshot2.jpg I haven't looked at BodyPaint in a while, but the last time I tried the demo, it was somewhere in between. It has an OK, but not great, set of brushes, and a pretty nifty, but still underpowered, projection system. In the above pictures (if you will only be able of viewing them ") ) I wasn't using build in BodyPaint "Projection Painting" feature. BTW it has only - same as CS4 - planar projection ability. Of course I agree, that there is no way to "automate" whole painting process by some sort of projection onto the model only : it requires a lot of fine tunning after. But the idea of the projection of the images is very tempting, for example because of its "no-problem-with-seams-matching" issue. ) I wasn't using build in BodyPaint "Projection Painting" feature. BTW it has only - same as CS4 - planar projection ability. Of course I agree, that there is no way to "automate" whole painting process by some sort of projection onto the model only : it requires a lot of fine tunning after. But the idea of the projection of the images is very tempting, for example because of its "no-problem-with-seams-matching" issue.Anyway, after finally getting my hands on the new Wacom tablet, I will for sure spend more time with both - BodyPaint and PS CS4 - programs. I will also try to use cloning as you've suggested. But I would like to know your opinion on what I did before (pictures !) I already said, that I'm not experienced at all with 3D painting programs. Thank you in advance ! |
|
Chosen Few
Alpha Channel Slave
Join date: 16 Jan 2004
Posts: 7,496
|
04-29-2009 12:22
From your pics, it looks like BodyPaint's cylindrical projection work's quite well. It sure would be nice if Photoshop would incorporate something similar. That's really a glaring omission, considering how well every other aspect of PS's 3D paint engine works.
What were you asking for, in terms of my opinion? If you want to know if I think the tattoo looks good, sure. With the possible exception of some want of anti-aliasing, the lines look nice and clean. Nothing looks noticeably stretched or distorted. But then, I don't know what you wanted it to look like. If it looks how you envisioned it, then it's good. If not, then it's not. I can't really answer that for you. If you're asking do I see anything technically amiss, there is one thing that's bugging me. Both arms share the same UV space, so whatever you do to one should also happen to the other. I notice, however, that the tattoo is only appearing on the arm the projection is surrounding. Is this a quirk of BodyPaint, or did you remap the UV's? If you did remap it, the results won't be applicable to SL, since there's no way to also remap the in-wold model. _____________________
.
Land now available for rent in Indigo. Low rates. Quiet, low-lag mainland sim with good neighbors. IM me in-world if you're interested. |
|
LaNebia Stransky
Registered User
Join date: 2 Oct 2007
Posts: 5
|
05-06-2009 03:58
I'm sorry for neglecting this thread for a while : I was AFK for a couple of days. Now I'm back in bussiness.
If you're asking do I see anything technically amiss, there is one thing that's bugging me. Both arms share the same UV space, so whatever you do to one should also happen to the other. I notice, however, that the tattoo is only appearing on the arm the projection is surrounding. Is this a quirk of BodyPaint, or did you remap the UV's? If you did remap it, the results won't be applicable to SL, since there's no way to also remap the in-wold model. That's the whole point : I'm not very sure about what to do next with this. Technically speaking, I didn't use the BodyPaint's projection feature : it allows only flat projection of images, as I wrote before. The model you see was taken from Robin's website, especially prepared to use with BP. Then I've added one more material and - using the material's "Texture" tag - I've set the projection to "Cylinder" and I've played a little with positioning, offset and other. So technically, this tattoo isn't a texture applied on one of the "own" model's materials (i.e. Head, Upper Body, Lower Body) : it is a texture of the new material. And that's it : this is the end of my knowledge. I don't know what to do, to merge (?) the new material with texture on the old one (Upper Body Material in this particular case). Or is it possible at all ? |
|
Clarissa Lowell
Gone. G'bye.

Join date: 10 Apr 2006
Posts: 3,020
|
06-02-2009 00:33
I just got CS4 upgrade, would someone point me to a good tutorial (hopefully video) for painting onto 3d, for SL?
Also, are there any downloadable 3d forms for SL, like clothes or avatars (to make skins)? Thanks. _____________________
|
|
Robin Sojourner
Registered User
Join date: 16 Sep 2004
Posts: 1,080
|
06-02-2009 08:07
Hi Clarissa!
You can get avatar models to paint on from my site at http://www.robinwood.com/Catalog/Technical/SL-Tuts/SLDownloads/Exported_CS3_Avatars.zip With any luck, I'll get a video tutorial done sometime in the next day or so. (I'll post here when it's ready.) But really, all you need to do is: 1. Double click on the texture name, for instance Material_Top, to open the associated .psb file. 2. Change the image size. (I made them 512x512, so they would be small for upload, but you probably don't want to work on them that size.) 3. Add a new, blank layer for painting on. 4. Save the .psb file, and close it. 5. Repeat for any other materials you want to paint on. 6. Get your brushes, make sure the Layer with the model is selected (it'll be Layer 1, if you haven't changed it,) and start to paint! Anything you paint will appear on the model. Yep, it really is that simple. Of course, there are other things about lighting and the model, and moving it around. But you can find all of that in the Help files, really. Just click on Help > How to work with 3D Images, and then choose anything there you are interested in. There are tons of video tutorials at http://tv.adobe.com/ You can use the Search function to look at Photoshop CS4 3d, and find quite a few dealing with using 3D in PS CS4. Hope this helps! _____________________
Robin (Sojourner) Wood
www.robinwood.com "Second Life ... is an Internet-based virtual world ... and a libertarian anarchy..." Wikipedia |
|
Clarissa Lowell
Gone. G'bye.
Join date: 10 Apr 2006
Posts: 3,020
|
06-02-2009 16:52
Thank you, SO much.
This is awesome! I'm brand new to all this so please, anyone has any tips/info feel free to IM me here or in world. =) _____________________
|
|
Robin Sojourner
Registered User
Join date: 16 Sep 2004
Posts: 1,080
|
06-05-2009 02:57
Just an update. Making the promised tutorial is taking longer than I expected, between RL stuff (I'm buying a house, for the first time ever) and other things.
It turns out that this is going to need 4 videos. One about opening the .obj file, one about lighting, one about moving things around on the 3D layer, and the final one about painting. The first three are done, and the script and audio for the last one are done (I hope) but I still have to do the video, and then I have to put them all on a web page. It really looks like this isn't going to be finished until Tuesday, what with Backhoe Time this weekend (we've been in this house 10 years. You can only imagine... )Sorry it's taking so long. Hopefully, it'll be worth the wait! _____________________
Robin (Sojourner) Wood
www.robinwood.com "Second Life ... is an Internet-based virtual world ... and a libertarian anarchy..." Wikipedia |
|
Robin Sojourner
Registered User
Join date: 16 Sep 2004
Posts: 1,080
|
06-15-2009 00:49
Okay, the tuts are done. I'm starting another thread for them, though, because I think I'm afraid that some people who might need them will miss them here.
So look for that one! _____________________
Robin (Sojourner) Wood
www.robinwood.com "Second Life ... is an Internet-based virtual world ... and a libertarian anarchy..." Wikipedia |