I'll be happy to help you, but I won't be contacting you inworld. Anything that needs to be said can be said here, where the information will benefit not just you alone, but many other people as well.
Instead of offering to res a prim to demonstrate your problem, how about taking a snapshot of it, and posting it right here? That way everyone else who's having the same problem will quickly see that they're not alone, and that this is the place to get the answer.
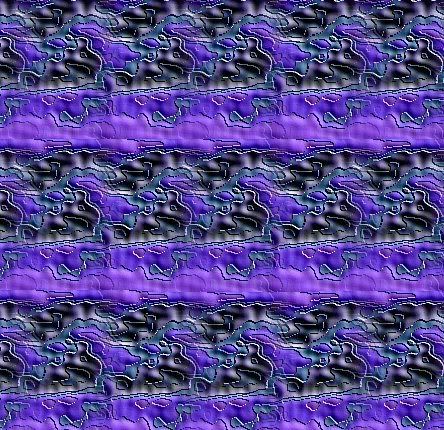
I'm not sure exactly what you mean by "white lines". Do you mean you're seeing a white halo around the opaque parts of your transparent textures, or that you're seeing seams where your textures should tile? By your description, I'd guess it's the latter. If it is the former though, there's a ton of information about how to fix that in the Transparency Guide at the top of this forum.
Assuming it is the latter, your problem is you haven't prepared your textures for tiling. I can tell you exactly how to do it in Photoshop, but not so precisely in PSP (and especially not in version 7, which is many years old now) or GIMP. The methodology will be the same in all thee, but things like specific menu locations will vary. I'll lay out the Photoshop method here, and hopefully you'll be able to figure out how to do the same thing in your program of choice.
Making an image seamless for tiling is a pretty simple process. It consists of two basic steps. First, you offset the image to bring the edges to the middle where you can work on them, and then use a blending tool such as the Healing Brush, the Spot Healing Brush, or the Clone Stamp to paint over the seams. The result will be a texture that can repeat across a surface indefinitely without showing any lines between where one repeat ends and the next one starts.
Which blending tool to use will depend on the type of texture you're working with. For something fairly organic or flowing, like a patch of skin or cloudy sky, I'd recommend the Spot Healing Brush. For something more textured with a lot of variance in shadows and highlights, like a close-up on rock surface, I'd probably go with the Healing Brush. For something with a regular pattern to it, like a brick wall or a swatch of fabric, I'd likely choose the Clone Stamp. There's no hard and fast rule though. As you gain experience, you'll develop an instinct for which tool works best in which situation.
I'm not sure if PSP or GIMP even have a Healing Brush or Spot Healing Brush, by the way. If they don't, that makes your decision a little easier, I guess. I know they both do have a Clone Stamp.
For this tutorial, I'll assume your texture is fairly uniform, so it warrants using the Clone Stamp. Should you decide to use the Healing Brush, the technique will be exactly the same. With the Spot Healing Brush, it would be almost the same, except you'd eliminate the sampling step, as the Spot Healing Brush automatically samples its immediate surroundings.
Here's the how to:
- Go Filter -> Other -> Offset, and in the dialog that pops up, set the offsets to half the canvas size in both directions. For example, if your canvas size is 256x256, make the offsets 128 x 128. You should now see the seam that had been framing the image previously is no longer at the edges, but running through the middle, forming a cross-cross.
- Select the Clone Stamp tool from the toolbox and set its brush size to somewhere around 40 pixels or so. Make sure opacity and flow are both at 100%. I'd suggest using a brush with a low hardness setting to help the cloning blend into the existing pixels.
- To eliminate the vertical line, alt-click at the top of the canvas, in a spot either to the left or the right of the line, a pretty good distance away. Alt-clicking is how you tell the clone stamp where to begin its sampling. Now click at the top of the line, and drag to the bottom. You should see that the line is being painted over with a copy of another part of the image.
- Repeat the process to eliminate the horizontal line. Start on one side and alt-click to set your sample point somewhere above or below the line. Click at one end of the line and drag to the other end to paint over it completely.
That's all there is to it. Your texture should now be seamless for tiling.


")