 anyone who can help me on this i would appreciate it alot.
Welcome to the Second Life Forums Archive
These forums are CLOSED. Please visit the new forums HERE
really confused noob question |
|
|
CeCe Demonia
Registered User
Join date: 2 Feb 2008
Posts: 16
|
02-22-2008 13:29
ok first i did read the info on alpha maps.. and i might have missed something ( the link to the video tutorial isnt working for some reason) but i'm still getting a nasty looking halo around my item. i have put a black layer underneath the layerer.. but its still coming out bad looking.
anyone who can help me on this i would appreciate it alot. |
|
Chip Midnight
ate my baby!

Join date: 1 May 2003
Posts: 10,231
|
02-22-2008 13:33
what paint program (and version) are you using?
_____________________
 My other hobby: www.live365.com/stations/chip_midnight |
|
Sylvia Trilling
Flying Tribe

Join date: 2 Oct 2006
Posts: 1,117
|
02-22-2008 13:49
Go here an do the tutorial called white halo.
http://robinwood.com/Catalog/Technical/SL-Tuts/SLTutSet.html _____________________
http://www.throughlinedesign.com/
 |
|
Rolig Loon
Not as dumb as I look
Join date: 22 Mar 2007
Posts: 2,482
|
02-22-2008 13:55
What does your fabric layer look like?
If you were making clothes in RL, you would make a tissue pattern and use it to cut out fabric pieces. You might think, intutively, that you ought to do the same thing with Photoshop, but that's not a good idea. The "pattern" in Photoshop is whatever you loaded into your alpha channel. By identifying opaque and transparent areas there, you have already given SL the instructions for "cutting out" your fabric pieces. You don't need to do it again by making the same shapes on your fabric layer (i.e., using the white areas in your alpha channel as a mask and clearing around them). In fact, if you do that, you can create the white halo effect. I'm not sure whether it's technically true (Chosen or somebody else will correct me if it's not), but if your alpha image intersects a transparent area on your fabric layer, the "cut" edge is interpreted as white. The way to beat this is to let your fabric extend well beyond the edges of your final work and let the alpha "pattern" do the "cutting" for you. |
|
CeCe Demonia
Registered User
Join date: 2 Feb 2008
Posts: 16
|
02-22-2008 15:35
i'm using photoshop cs1
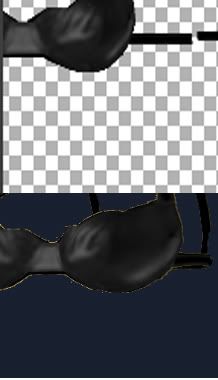
Go here an do the tutorial called white halo. http://robinwood.com/Catalog/Technical/SL-Tuts/SLTutSet.html 404 error... Rolig Loon-the link above has the images of the image as its loaded into sl and then one with it wrapped into a shirt shows the yellow halo. i'm confused on why its yellow for one. i can post a picture of it in photoshop to show you more of what i mean. There is no real gap in the bra and the background. but i might be wrong are you suggesting i flatten my bra with the black background to avoid the problem? ( the bra is black leather and around the edges it wont matter much since i made it pretty much black) dont get me wrong i'm a noob here, but i do understand photshop and opacity maps pretty well since i do such things in other sites ( even though in a different way) link to file as seen by me in photoshop ---------->  |
|
Rolig Loon
Not as dumb as I look
Join date: 22 Mar 2007
Posts: 2,482
|
02-22-2008 16:23
No, I wasn't suggesting flattening anything, although that might work. It simply occurred to me that you might have been using a mask to cut out the shape of the bra on your fabric layer, which is an unnecessary step. If I were making that bra, my fabric layer would not have any transparent areas on it at all. It would just be a layer of the black leather texture that fills the entire canvas. I would do all of my shading on a separate layer set to Overlay, and I would create a mask for the bra and use it to produce my alpha channel.
My point was that the shape of the bra is determined solely by whatever you have filled with white in the alpha channel, so it is unnecessary to cut out the same shape on your fabric layer. Not only is it unnecessary, it creates a problem for you because the pixels right around the image you cut out in the fabric layer may look white in your final, uploaded file. The effect of doing it this way should be the same as if you had followed the usual advice of putting a dark layer under everything. In the end, as I understand it, the white halo arises where the edges of the white area in your alpha mask cut across areas where you have no pixels on any layer. By letting your fabric layer fill the entire canvas, you guarantee that there are no unfilled areas that might lead to a halo. I will admit up front that I may have misinterpreted the actual mechanism that creates a white halo. There are wiser people in this forum who can explain it properly. All I know is that I have never had a halo in any design where I have followed this practice. |
|
Chip Midnight
ate my baby!
Join date: 1 May 2003
Posts: 10,231
|
02-22-2008 18:56
Try using Flaming Pear's free Solidify plugin. It's part of the free plugins pack and it's incredibly useful for doing avatar textures with alpha. (you can find it here: http://www.flamingpear.com/download.html)
When you're done with your texture and ready to create your alpha, save your document as a PSD (in case you need to go back to the layered version later). Then turn off all the layers you don't need and do a "merge visible layers." Do a "load selection" on the transparency of your merged layer and save it to create the alpha channel (make sure you don't have any other saved selections). Then run Flaming Pear's Solidify A filter on the layer. That will fill in all the transparent areas with colors pulled out from the pixels bordering the transparent areas and it'll make obvious any stray pixels of the wrong color. If you have some, undo the solidify and fix the bad pixels and then try again (repeat til there aren't any). Get rid of any remaining layers (if you didn't do "delete hidding layers when you did the merge) and save as 32bit TGA. You shouldn't get any halo, and if you do it shouldn't show at all because it'll have the correct colors. _____________________
My other hobby: www.live365.com/stations/chip_midnight |
|
Siddean Munro
Artist!

Join date: 21 Apr 2007
Posts: 113
|
02-22-2008 23:06
The second pic you posted looks like you have taken it from the previewer that you get before you actually upload. I find that that previewer makes the edges look worse than the item in world. How does it look once you have uploaded it?
_____________________
My Second Life Blog. New releases, fashion news and musings and more- http://slink.mmoportraits.com/
|
|
CeCe Demonia
Registered User
Join date: 2 Feb 2008
Posts: 16
|
02-23-2008 06:05
the lower picture is when you tell it to show it as a female top. I dont know what it looks like when uploaded because i canceled.
chip i'll try those steps and see if it helps i did try using flaming pear but not like you listed EDIT: ok well i kinda gave up and just uploaded it, and it seems to be perfectly fine now... odd but its good that i know now that the yellow doesnt come out. Thank you everyone for trying to help ") |