Heyas ^_^
I'm trying to work on texturing sculpties.. and working on more and more complex things for texturing, started with a snowman, then football, and now an oreo.
I can get the general colours fine, but when it comes to the design.. how the heck can I do it!?
Essentially, I'm trying to make a round pattern (Including words) into a round texture.. and I don't know how to do that.. is there any kind of plugin or special technique to help with this?
btw I use Adobe Photoshop elements..if thats useful information...
I'll attach a couple pics in a few..to show more what I mean.
Welcome to the Second Life Forums Archive
These forums are CLOSED. Please visit the new forums HERE
Round on a square? |
|
|
Okiphia Rayna
DemonEye Benefactor

Join date: 22 Sep 2007
Posts: 2,103
|
12-15-2007 13:47
_____________________
Owner of DemonEye Designs Custom Building and Landscaping
Owner and Blogger, Okiphia's Life http://okiphiablog.blogspot.com/  |
|
Chosen Few
Alpha Channel Slave
Join date: 16 Jan 2004
Posts: 7,496
|
12-15-2007 15:15
Looks like you're off to a good start already, Okiphia. You managed to get the notches around the rim of the cookie into mostly the right place, for example. On a real oreao, the notches extend onto the top of the cookie, while on yours they're just on the edge, but I think you know you just need to make them a little taller, and they'll wrap around the corner like they're supposed to. For the top cookie, I'd probably extend the notches to about the middle of that dark purple row of numbers on the top on the template.
I'd also recommend having the white band in the middle of the texture be a bit narrower, so that it only covers the cream, and doesn't extend onto any of the cookie the way it does now. From the picture, it looks like you don't want the white to go any further the the bottom of the lime green row on the template. As for the rest of the cookie pattern, let first me link a picture of a real Oreo so we can all see what we're talking about. 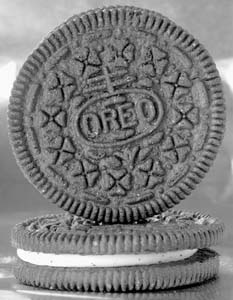 The next thing to add after adjusting the notches and the cream would be the dashed circular line, or maybe we should call it a dashed ring, that is just to the inside of the ring of notches. That's pretty easy. Each long dash is roughly 4-5 notches long, and each short dash (or dot) is about one notch long. The ring seems to be positioned at or near the top of the dark purple row of squares on the template. Obviously, since the ring runs latitudinally, it will unwrap into a horizontal line on the flat canvas. So draw a dashed horizontal line on your canvas, at or near the top of where the dark purple squares are. The clovers are also arranged in a ring. They're going to be a bit harder to draw though. On the real cookie, each clover is pretty much square. You can see though that all the existing actual squares on the template get wider as they approach the edge of the cookie, and narrower as they approach the center. You'll want your clovers to be skewed in exactly the opposite way, so they straighten out as they get squished. On the top cookie, you want the tops of the clovers to be wider than the bottoms, and on the bottom cookie, you want the bottoms wider than the tops. It might take a little experimentation to get it right. The logo is going to be the hardest part. It may be a bit of a brain teaser to understand how to draw it unwrapped, and stretched across the top of the canvas, so that when it wraps it will look like itself. Think of it kind of like how Antarctica is drawn on a world map. The "bottom" part of it will span one half of the canvas (horizontally), and the "top" part will go upside down across the other half. What I'd suggest is that you start by taking a screenshot, looking down at the top of the cookie, with the template on it. Then draw the logo over the top, and note which parts of it corrsepond with which square on the template. Then draw it on the unwrapped canvas with each part aligned with exactly the same square. You'll probably screw it up a few times, especially where shadows are concerned since layer beveling effects won't really work for this, but eventually you'll get it. It will take some patience. Of course, you could avoid almost all of the above simply by projecting a normal looking picture of an Oreo onto the surface in a 3D modeling/texturing program. I don't know what software you're using, but if it's Maya, that's pretty easy to do. I'd imagine it's similarly easy in Max, Blender, Zbrush, or any other program with sufficient texturing tools. If you have such a program, that would be the thing to do. I only explained the paint-by-hand method first because A. I don't know what you've got, and B. it's important to understand the wrapping/unwrapping process anyway. EDIT: I just want to add that as an exercise, I think this Oreo thing is a fine idea. Practically speaking though, for SL purposes, I don't know that it's worth it to invest a sculpty into something as simple as a cookie. 2048 polygons for each one is kind of a lot, when making the same thing out of three cylinders would be about 1/4 that amount, at just 576. Not to mention, the cylinders would be significantly easier to texture. You could also probably make a convincing Oreo out of a profile-cut tube, which would be (I think) 768 polys. If it were me, I'd probably just use a single well-textured single cylinder. The cookie part won't actually be wider than the cream part that way, but it can still look pretty good if it's well painted. At just 192 polys, it's a bargain. You could have 11 of them on screen for the same performance hit as one sculpty. _____________________
.
Land now available for rent in Indigo. Low rates. Quiet, low-lag mainland sim with good neighbors. IM me in-world if you're interested. |
|
Okiphia Rayna
DemonEye Benefactor
Join date: 22 Sep 2007
Posts: 2,103
|
12-15-2007 15:39
Looks like you're off to a good start already, Okiphia. You managed to get the notches around the rim of the cookie into mostly the right place, for example. On a real oreao, the notches extend onto the top of the cookie, while on yours they're just on the edge, but I think you know you just need to make them a little taller, and they'll wrap around the corner like they're supposed to. For the top cookie, I'd probably extend the notches to about the middle of that dark purple row of numbers on the top on the template. I'd also recommend having the white band in the middle of the texture be a bit narrower, so that it only covers the cream, and doesn't extend onto any of the cookie the way it does now. From the picture, it looks like you don't want the white to go any further the the bottom of the lime green row on the template. As for the rest of the cookie pattern, let first me link a picture of a real Oreo so we can all see what we're talking about. The next thing to add after adjusting the notches and the cream would be the dashed circular line, or maybe we should call it a dashed ring, that is just to the inside of the ring of notches. That's pretty easy. Each long dash is roughly 4-5 notches long, and each short dash (or dot) is about one notch long. The ring seems to be positioned at or near the top of the dark purple row of squares on the template. Obviously, since the ring runs latitudinally, it will unwrap into a horizontal line on the flat canvas. So draw a dashed horizontal line on your canvas, at or near the top of where the dark purple squares are. The clovers are also arranged in a ring. They're going to be a bit harder to draw though. On the real cookie, each clover is pretty much square. You can see though that all the existing actual squares on the template get wider as they approach the edge of the cookie, and narrower as they approach the center. You'll want your clovers to be skewed in exactly the opposite way, so they straighten out as they get squished. On the top cookie, you want the tops of the clovers to be wider than the bottoms, and on the bottom cookie, you want the bottoms wider than the tops. It might take a little experimentation to get it right. The logo is going to be the hardest part. It may be a bit of a brain teaser to understand how to draw it unwrapped, and stretched across the top of the canvas, so that when it wraps it will look like itself. Think of it kind of like how Antarctica is drawn on a world map. The "bottom" part of it will span one half of the canvas (horizontally), and the "top" part will go upside down across the other half. What I'd suggest is that you start by taking a screenshot, looking down at the top of the cookie, with the template on it. Then draw the logo over the top, and note which parts of it corrsepond with which square on the template. Then draw it on the unwrapped canvas with each part aligned with exactly the same square. You'll probably screw it up a few times, especially where shadows are concerned since layer beveling effects won't really work for this, but eventually you'll get it. It will take some patience. Of course, you could avoid almost all of the above simply by projecting a normal looking picture of an Oreo onto the surface in a 3D modeling/texturing program. I don't know what software you're using, but if it's Maya, that's pretty easy to do. I'd imagine it's similarly easy in Max, Blender, Zbrush, or any other program with sufficient texturing tools. If you have such a program, that would be the thing to do. I only explained the paint-by-hand method first because A. I don't know what you've got, and B. it's important to understand the wrapping/unwrapping process anyway. EDIT: I just want to add that as an exercise, I think this Oreo thing is a fine idea. Practically speaking though, for SL purposes, I don't know that it's worth it to invest a sculpty into something as simple as a cookie. 2048 polygons for each one is kind of a lot, when making the same thing out of three cylinders would be about 1/4 that amount, at just 576. Not to mention, the cylinders would be significantly easier to texture. You could also probably make a convincing Oreo out of a profile-cut tube, which would be (I think) 768 polys. If it were me, I'd probably just use a single well-textured single cylinder. The cookie part won't actually be wider than the cream part that way, but it can still look pretty good if it's well painted. At just 192 polys, it's a bargain. You could have 11 of them on screen for the same performance hit as one sculpty. I do have blender so I guess I can attempt that ") No idea how though.. for now Ill try how you said, and thanks a TON!!!! You're my hero yet again _____________________
Owner of DemonEye Designs Custom Building and Landscaping
Owner and Blogger, Okiphia's Life http://okiphiablog.blogspot.com/ |
|
Abu Nasu
Code Monkey
Join date: 17 Jun 2006
Posts: 476
|
12-15-2007 17:34
Polar Coordinate filter if Elements has it.
1. Make the top of the cookie as if you are looking down at it. 2. Polar Coordinates. 3. Transform it into place over your texture template. |
|
Chosen Few
Alpha Channel Slave
Join date: 16 Jan 2004
Posts: 7,496
|
12-15-2007 17:35
I would not recommend the polar coordinates filter. It removes portions of your image.
_____________________
.
Land now available for rent in Indigo. Low rates. Quiet, low-lag mainland sim with good neighbors. IM me in-world if you're interested. |
|
Okiphia Rayna
DemonEye Benefactor
Join date: 22 Sep 2007
Posts: 2,103
|
12-15-2007 17:59
I would not recommend the polar coordinates filter. It removes portions of your image. What if I used it for the top of the cookie in a different file and tried it? WOuld that help? And then just copy it.. also, is there a tutorial anywhere on using blender to put an image onto it, like you said earlier? I suck at blender so far lol _____________________
Owner of DemonEye Designs Custom Building and Landscaping
Owner and Blogger, Okiphia's Life http://okiphiablog.blogspot.com/ |
|
Aki Shichiroji
pixel pusher

Join date: 22 Jul 2006
Posts: 246
|
12-16-2007 00:47
if i recall correctly, instead of setting up your three blended materials for RGB, you just make one material for your modelled element, and change the material type to 'image'. this opens up a dialogue just to the right which will let you browse and choose the graphic you want.
_____________________
|
|
Abu Nasu
Code Monkey
Join date: 17 Jun 2006
Posts: 476
|
12-16-2007 03:06
Mapping the Sphere
See attachment. - I deleted the poles out of habit. By the time I realized that I deleted them and should have left them in, I was too far into the example to want to start over. - The texture shouldn't be square. Rather, twice as wide as high. However, I have done some square textures on spherical rocks that look just fine in SL. |
|
Okiphia Rayna
DemonEye Benefactor
Join date: 22 Sep 2007
Posts: 2,103
|
12-16-2007 12:46
OK, finished version one, still working on the hand drawn one... this is not perfect!
Polar coordinates, most of it looks pretty much correct..the image was the exact one that Chosen has linked above, but I only used the part from the clovers inward. I hand drew the rest, though you can't really see the dash/dot line, and the ridges still don't extend quite far enough. The pattern looks pretty darn good, only real complaint is how much of it got destroyed (Most of 'oreo' Also, the polar coordinates image was stretched quite a bit to fit into my hand-drawn bit, so the quality isn't perfect either, but still not bad. THanks all ^_^ ANd also still trying to figure out blender lol... I want to be able to use every method available to me ^_^ _____________________
Owner of DemonEye Designs Custom Building and Landscaping
Owner and Blogger, Okiphia's Life http://okiphiablog.blogspot.com/ |

