Sculpties and Photoshop?
|
|
Piggie Paule
Registered User
Join date: 22 Jul 2008
Posts: 675
|
09-09-2009 05:37
Before I say anything, let me say I'm a VERY sculptie noob I've used the in world scuplt studio (well just experiment rather than made anyhting) and last night I had a VERY quick play with Wings3D and managed to make a slighty deformed mushroom ") So, I have some basis to work from. Texturing though, I don';t want to start off on the wrong foot and use a dam hard method if a more practical (easier) "SENSIBLE" method is out there. I'm happy using Photoshop for all my graphics needs and I think I read that (somehow) you can import? a Sculptie shape that you have created into Photoshop, rotate it in 3D and actually paint on the model. Which, lets face it, is the logical and practical way to do it. Are there any simple to understand tutorials kicking around that might talk me thru this (if it's possible) Perhaps I have misunderstood something and what I'm thinking is not right? Thanks |
|
Chosen Few
Alpha Channel Slave
Join date: 16 Jan 2004
Posts: 7,496
|
09-09-2009 06:53
If your sculpty source model is polygonal, then you can import it into Photoshop CS4 Extended (OBJ format), and paint directly on the surface. If it's NURBS, then you'll have to convert it to polys first. Depending on how the conversion is done, you may or may not need to adjust the UV mapping by hand after the conversion. Instructions for that will vary, depending on what modeling program you're using.
Note, only CS4 Extended has the paint-on-mesh feature. The unextended version won't do it. That's one of the the things covered by the $400 difference in price between the two.
Photoshop CS3 will allow you to import a polygonal model, but it won't allow you to paint directly on it. You can only paint on the flat texture canvas, and then you'll see the updates on the model every time you save.
No version prior to CS3 has any 3D support.
Another option you should explore as well is baking textures directly in your 3D modeling program. If you're using a full-featured platform like Maya, Max, or Blender, there are all kinds of tools built in for this purpose, and third party plugins and addons abound. If you're using something more singularly tasked, like Wings or something, then this won't be an option.
_____________________
.
Land now available for rent in Indigo. Low rates. Quiet, low-lag mainland sim with good neighbors. IM me in-world if you're interested.
|
|
Piggie Paule
Registered User
Join date: 22 Jul 2008
Posts: 675
|
09-09-2009 07:08
Thanks. Well (right now) I'd be using Wings3D with a 64x63 sphere (and pulling it about) And I have the CS4 Photoshop. I just need to instructions to actually do it. |
|
Morgaine Alter
dreamer

Join date: 10 Jan 2008
Posts: 1,204
|
09-09-2009 07:21
me too I had something saved looking for it now A Robin tutorial just couldn't find it either.... did find this thou http://rezzable.com/blog/rykerbeck/tutorial-painting-avatar-mesh-using-photoshop-cs4-extendedI swear I saw a easier one to understand w/Robins, that dealt with a sculpty map directly on texturing it... I have been wanting to and now I am able to time wise get into this. I assume that's how they texture such nice things like the shoes for example. At least easier for me 
_____________________
https://www.xstreetsl.com/modules.php?name=Marketplace&MerchantID=125705 From: Phil Deakins My zip gun stays right where it belongs - in my pants!
|
|
Piggie Paule
Registered User
Join date: 22 Jul 2008
Posts: 675
|
09-09-2009 09:31
From: Morgaine Alter me too I had something saved looking for it now A Robin tutorial just couldn't find it either.... did find this thou http://rezzable.com/blog/rykerbeck/tutorial-painting-avatar-mesh-using-photoshop-cs4-extendedI swear I saw a easier one to understand w/Robins, that dealt with a sculpty map directly on texturing it... I have been wanting to and now I am able to time wise get into this. I assume that's how they texture such nice things like the shoes for example. At least easier for me Thanks for that. I took a bit of a gulp when I saw it would takr a hour (persumably for someone who knew their stuff) to follow this, but I'll give it a bash if this is the only thing we had to work onl. I must admit, I was kinda hoping for: Make the model in Wings3D and export it as whatever type needed. Load that file into photoshop and see the model and paint on it. Save the file out of photoshop as a bitmap and job done. Methinks this aint gonna be this simple  |
|
Robin Sojourner
Registered User
Join date: 16 Sep 2004
Posts: 1,080
|
09-09-2009 11:16
Hi! Are these the tutorials you're looking for?  http://www.robinwood.com/Catalog/Technical/PhotoshopTuts/PhotoTutPages/CS4-3D-1_Open.htmlhttp://www.robinwood.com/Catalog/Technical/PhotoshopTuts/PhotoTutPages/CS4-3D-2_Lights.htmlhttp://www.robinwood.com/Catalog/Technical/PhotoshopTuts/PhotoTutPages/CS4-3D-3_Move.htmlhttp://www.robinwood.com/Catalog/Technical/PhotoshopTuts/PhotoTutPages/CS4-3D-4_Paint.html http://www.robinwood.com/Catalog/Technical/PhotoshopTuts/PhotoTutPages/CS4-3D-1_Open.htmlhttp://www.robinwood.com/Catalog/Technical/PhotoshopTuts/PhotoTutPages/CS4-3D-2_Lights.htmlhttp://www.robinwood.com/Catalog/Technical/PhotoshopTuts/PhotoTutPages/CS4-3D-3_Move.htmlhttp://www.robinwood.com/Catalog/Technical/PhotoshopTuts/PhotoTutPages/CS4-3D-4_Paint.htmlIf you have PS CS4 Extended, it basically is as simple as you were hoping, Piggie. The format you need is .obj. However, if you have regular PS CS4 (not the Extended version) then I'm afraid that you can't paint on the model in PS at all. However, you *can* paint directly on the model in Blender, which, of course, is free. You can also open any sculpt .tga that you happen to have in Blender, which makes it into a mesh which you can then export as an .obj to paint on in PS CS4 Extended, if that's the CS4 you have. (Thanks, Domino, for making the scripts that let Blender read sculpts.) I'm hoping to get a tut up about how to do that soon; but I have a bunch of other stuff to get done first. Burning Life is coming up, you know! Hope this helps, and let me know if you need that tut; I might be able to push it up a bit in the queue.
_____________________
Robin (Sojourner) Wood www.robinwood.com"Second Life ... is an Internet-based virtual world ... and a libertarian anarchy..." Wikipedia
|
|
Piggie Paule
Registered User
Join date: 22 Jul 2008
Posts: 675
|
09-09-2009 12:00
Thanks Robin, that's given me something to do now.
I did look at Blender but then I also looked into Nuclear Physics and Brain Surgery and they looked a lot easier to learn !! LOL
It's not something I don't think I "Could" do, but some progs just don't lend themselves very well to the click, fiddle and see what happens style of learning.
If I had someone in RL to sit next to me and teach me that basics I'd jump at it.
My ideal approach (poss wrong but what I do) is I like ot make SOMETHING that works, just anything.
(like I made a mushroom in Wings3D last night)
That gave me confidence as I know I can do it, and now I can go back in and experiment more.
Some progs you have to get ever single setting right or nothing happens.
|
|
Piggie Paule
Registered User
Join date: 22 Jul 2008
Posts: 675
|
09-09-2009 12:41
ok, well I'm 90% of the way there.
Made anothr mushroom shape
Exported as OBJ file.
Amazingly (to me anyway) loaded into Photoshop as a 3D model which I can move about and paint.
Last step (and I can't guess this one) is how to I save this PAINTED layer out to a texture (TGA file?) that will wrap around it in SL
I did the obviousm just saved as a tga, but I just got a pic of the mushroom
Obviously I need to unwrap the graphics into a flat file for the tga file saving.
anyone give me a quick hint to help me with thei last bit?
|
|
Piggie Paule
Registered User
Join date: 22 Jul 2008
Posts: 675
|
09-09-2009 13:03
Ah, well,
read that page and found that just double clicking on the pic (lower right hand area) created a texture file so was looking good.
saved it and loaded into SL (with fingers crossed)
but somethings not right as texture is not wrapping correctly round the shape.
Tried the normal texture tools, but it's just not laying correctly & can't think what's wrong.
|
|
Piggie Paule
Registered User
Join date: 22 Jul 2008
Posts: 675
|
09-09-2009 13:32
Downloaded the video and re read instructions and can't see the problem
Best way I can describe it (and hopefuly this will gove someone a clue.........
I upload the sculptie (made with Wings3D) into SL (that works fine)
I edit the OBJ file in photoshop and save the texture out as a TGA fle.
I apply this TGA file onto the sculptie.
But rather than "wrapping itself" around the scupltie as it should, it kinda looks like it's just painted onto one side of the sculptie (if that makes sense)
And if I fiddle with the normal texture (number of faces and offset) I'm just increasing or moving this tecture over the surface.. It's not actually WRAPPING itself to the sculptie shape.
Not sure if that's explained well enough?
Guess it's something simple I'm doing wrong, but can't seem to work out what myself.
|
|
Abu Nasu
Code Monkey
Join date: 17 Jun 2006
Posts: 476
|
09-09-2009 14:44
Sounds like you need to rotate the texture in-world by some multiple of 90 degrees. Might have to flip it horz or vert.
One of the things about working with different 3d progs is dealing with different implmentations of XYZ. In some progs Z is up, while in other Y is up. This can lead to all sorts of craziness. Just the other day I ran into this problem in spades. Not only did I swap YZ, but I flipped Y as well. That was a lot of fun to sort. Then, once I got in-world, I had to play Guess the Up Vector.
I vaguely recall seeing a Wings3D tutorial. A yellow blimp with blue fins. The texture in that tutorial had to be rotated. Something like that.
|
|
Piggie Paule
Registered User
Join date: 22 Jul 2008
Posts: 675
|
09-09-2009 15:05
From: Abu Nasu Sounds like you need to rotate the texture in-world by some multiple of 90 degrees. Might have to flip it horz or vert.
One of the things about working with different 3d progs is dealing with different implmentations of XYZ. In some progs Z is up, while in other Y is up. This can lead to all sorts of craziness. Just the other day I ran into this problem in spades. Not only did I swap YZ, but I flipped Y as well. That was a lot of fun to sort. Then, once I got in-world, I had to play Guess the Up Vector.
I vaguely recall seeing a Wings3D tutorial. A yellow blimp with blue fins. The texture in that tutorial had to be rotated. Something like that. Yeh, I saw that. I tried making an even simpler shape (in case my 1st attempt was a 1off) An acorn just a stretched sphere with a step half way up, painted the top half brown and the bottom half green. thought can't get much more simple than that. did all the importing and exporting, but get the same result and I;m not sure if it's right or wrong. The texture just looks like it's painted on one side of the sculptie shape rather that actually wrapped around. Perhaps I need to fiddle more or perhaps I'm making a mistake somewhere? not sure yet. |
|
Piggie Paule
Registered User
Join date: 22 Jul 2008
Posts: 675
|
09-09-2009 15:18
Just had a look at that blimp video again.
No, there's deff something funny going on.
He just uploaded the texture, rotated it by 90 and did an offset and it was perfect.
I've fiddled and fiddles with all sorts of rotations and offsets and even flip x and y and it's never even close.
It's like I have a line around the middle and the texture is only moving on one side and in some other way on the other side.
I must be doing something wrong.
just not sure what !
|
|
Robin Sojourner
Registered User
Join date: 16 Sep 2004
Posts: 1,080
|
09-09-2009 18:33
Hi Piggie!
When you were in PS, did you rotate the acorn, and make sure that the texture was painted all the way around it?
(Rotate the model, not the texture. The texture might need to be flipped, if the sculpt was inside out, but that's it.)
Because PS only paints on what you can see in the window, when you're looking at it. That way, you don't have the problem of paint going where you don't expect it, or don't want it. (Not all paint on 3D programs work this way, but PS does.)
If all you want to do is paint the top one color, and the bottom another, what I suggest that you do is open the .psb file (the one the model is using) by double clicking on it. Then, when it's open, go to 3D > Create UV Overlays > Wireframe.
That will give you a new layer, with your UVs on it. It'll look like a big square, filled with smaller squares, or perhaps triangles. The important thing is to look at where the lines are.
If you haven't painted all the way around your model, you'll find that you have the two colors you're using at one place on the Texture, and the rest will be empty. Draw a marquee on the layer you've been painting on, or on a new layer, so that the color for the top goes from where you painted it, and fills all the rows of the model, as high as your painting goes. Fill it, and the color will wrap around your model. Then do the same thing for the bottom, with the bottom color.
That will give you the base colors. Then, following the video, rotate the model, and paint in any variations in the textures.
I find this is the easiest way to get things where I need them on sculpts. It's far easier, for me, than trying to fill in all the little bits with a brush.
There is one caveat; depending on your system, you might find that the .psb has become disassociated from the model. You'll be able to tell, because when you Save it, the model won't change. If that happens, don't panic or worry.
*Leave the disassociated file open.*
Then double click to open the .psb again, and drag the layers you were working on from the disassociated image to the one that's still attached. Save, and you should see your model update. Then (and only then) close both .psb files. Don't bother to save the one that's no longer attached, you don't need it. But this way, you won't lose any of your work.
You're almost there!
Hope this helps!
_____________________
Robin (Sojourner) Wood www.robinwood.com"Second Life ... is an Internet-based virtual world ... and a libertarian anarchy..." Wikipedia
|
|
Piggie Paule
Registered User
Join date: 22 Jul 2008
Posts: 675
|
09-09-2009 23:21
From: Robin Sojourner Hi Piggie!
When you were in PS, did you rotate the acorn, and make sure that the texture was painted all the way around it?
(Rotate the model, not the texture. The texture might need to be flipped, if the sculpt was inside out, but that's it.)
Because PS only paints on what you can see in the window, when you're looking at it. That way, you don't have the problem of paint going where you don't expect it, or don't want it. (Not all paint on 3D programs work this way, but PS does.)
If all you want to do is paint the top one color, and the bottom another, what I suggest that you do is open the .psb file (the one the model is using) by double clicking on it. Then, when it's open, go to 3D > Create UV Overlays > Wireframe.
That will give you a new layer, with your UVs on it. It'll look like a big square, filled with smaller squares, or perhaps triangles. The important thing is to look at where the lines are.
If you haven't painted all the way around your model, you'll find that you have the two colors you're using at one place on the Texture, and the rest will be empty. Draw a marquee on the layer you've been painting on, or on a new layer, so that the color for the top goes from where you painted it, and fills all the rows of the model, as high as your painting goes. Fill it, and the color will wrap around your model. Then do the same thing for the bottom, with the bottom color.
That will give you the base colors. Then, following the video, rotate the model, and paint in any variations in the textures.
I find this is the easiest way to get things where I need them on sculpts. It's far easier, for me, than trying to fill in all the little bits with a brush.
There is one caveat; depending on your system, you might find that the .psb has become disassociated from the model. You'll be able to tell, because when you Save it, the model won't change. If that happens, don't panic or worry.
*Leave the disassociated file open.*
Then double click to open the .psb again, and drag the layers you were working on from the disassociated image to the one that's still attached. Save, and you should see your model update. Then (and only then) close both .psb files. Don't bother to save the one that's no longer attached, you don't need it. But this way, you won't lose any of your work.
You're almost there!
Hope this helps! Thanks a lot for your help Yea, I did paint al round the items I tried. Kept spinning them around and painting all over them (Red mushroom with some white dots on the top) I did not do the 2D (easier) part as you suggested, but will try that later tonight also (though I don't think that's got anything to do with the prob I'm having) What I might do it to post up here linke to the images of both the sculpt map and the texture map and see if perhaps anyone else can load them (in world) and see if they line up. Perhaps it's something simple and obvious. It MIGHT be just the (in world) texure alignment, but (as with my Acorn) I tried to make it as simple as possible and still did not work right. |
|
Piggie Paule
Registered User
Join date: 22 Jul 2008
Posts: 675
|
09-10-2009 13:16
Ok, here we are............. 3d attempt and still no luck so I must be doing something wrong. Here are the pics The 1st is a snapshot of Photshop & how it SHOULD approx look in world. The second is the sculptie file (this should just work fine when imported into SL) The 3rd is a jpeg of the DIFFUSE layer from Photoshop. I would use TGA but TGA can't upload to this picture website and for this test top quality does not matter If anyone can upload these two files (the sculptie and the texture) and manage to get them wrapped correcty then I'll be impressed! I think I must be making some fundamental obvious error somewhere. Photoshop screen grab: 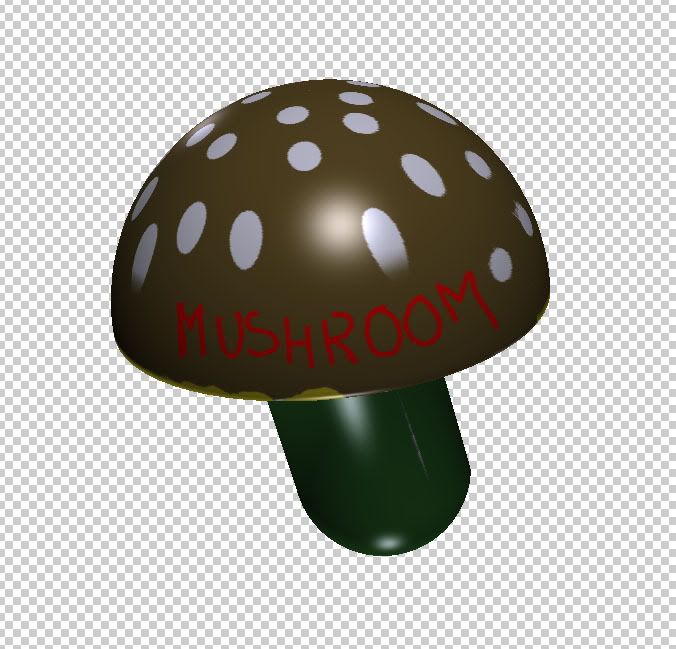 Sculptie file:  Texture file:  |
|
Piggie Paule
Registered User
Join date: 22 Jul 2008
Posts: 675
|
09-10-2009 13:43
Here is a screen shot of the very best I can get it to look (wrapped) in world 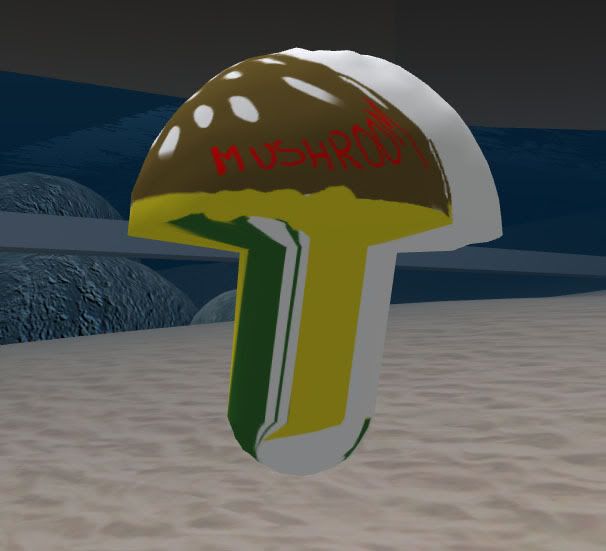 |
|
Robin Sojourner
Registered User
Join date: 16 Sep 2004
Posts: 1,080
|
09-10-2009 15:18
Did you, by any chance, go to 3D > Reparameterize? Because it looks like you're using a different UV Map for the mushroom. There can be only one in SL, and the one that you're obviously painting on isn't it. To get a mushroom that looks like this in PS  Your image should look like this when you double click on it.  When you have the image open, and go to 3D > Create UV Overlays > Wireframe (which only works when the image is open) you should get this  If you do all of that, then when you take it inworld, it'll look like this  You need to have that UV Map, though. If you're still not getting it, can you please post an image of the Wireframe UV Overlay on yours? And please tell us, step by step, exactly what you do from getting ready to export the .obj in Wingz on. Hope this helps!
_____________________
Robin (Sojourner) Wood www.robinwood.com"Second Life ... is an Internet-based virtual world ... and a libertarian anarchy..." Wikipedia
|
|
Piggie Paule
Registered User
Join date: 22 Jul 2008
Posts: 675
|
09-10-2009 15:31
Thanks.
No, I never even knew anything about that command, and did not read in the tutorials about it.
they just said, load up the OBJ file and get painting, which is what I did.
Just when do I issue that command? Right after I load in the OBJ file?
Had a little experiment, and can't quite seem to get anything that looks like your sample texture in Photoshop.
This is hard, as I'm getting the feeling there's a touch of (we know what we're talking about and assuming somethings) going on in some tutorials.
Once I know the procedue I'm fine, but just guessing when you don't know the EXACT step by step order to make something work I find almost impossible.
|
|
Robin Sojourner
Registered User
Join date: 16 Sep 2004
Posts: 1,080
|
09-10-2009 19:35
You're not supposed to use the Reparameterize command at all. I was afraid that you had, since it really looks like you somehow got different UV Maps on there.
What is does is make new UV Maps according to an internal algorithm, so they will no longer be what you need in SL.
If you could, please, post the image that shows the map you have to paint on, I might be able to figure out what happened, and where.
Because you should be able to just export the sculpt as an .obj, and start to paint.
That's exactly what I did, except that I used Blender, not Wings. Blender has a *very* non-standard interface; but thanks to Domino you can easily open the multicolored .tag in Blender, export the .obj, take it into PS, and just start to paint.
All you really need to do in Blender itself is put Domino's scripts where Blender can find them, and then use the Blender non-standard browser to find your file, and to save the .obj. You don't have to do anything else in the program.
But do please post the UVs you have, by following the 3D > Create UV Overlays > Wireframe command. It will be very helpful.
_____________________
Robin (Sojourner) Wood www.robinwood.com"Second Life ... is an Internet-based virtual world ... and a libertarian anarchy..." Wikipedia
|
|
Piggie Paule
Registered User
Join date: 22 Jul 2008
Posts: 675
|
09-11-2009 00:17
Thanks for your help
Yes, well, this seems lie here is where to problem is.
I'll will get some other bits up here for you later (just got to work UK time)
The problem is indeed that when painting in Photoshop (and creating the flat texture map) it's not the right "kind" of map.
Perhaps someone else here in the mean time might suggest the step I'm not doing correctly?
I'm making the shape in Wings3D
Exporting as a OBJ file.
Loading the OBJ file into Photoshop, then paintng on it.
I'm obviously missing a step out here as Photoshop is not creating the "Right Kind" of texture map from my painting.
It's not the totally flat (unwrapped one) that I need, but rather (as you can see in the pic above) some other type.
I'm guessing it's just a simple step I'm not doing (telling photoshop about)
thanks.
|
|
Robin Sojourner
Registered User
Join date: 16 Sep 2004
Posts: 1,080
|
09-11-2009 01:14
It's not happening in PS, if you're not Reparameterizing. It's something that's happening in Wings, I think. But I don't use it, so I'm not sure how you're getting two UV Maps there; one that's being made for the sculpt, and another that's attached to the .obj file. It does look like that's what's happening, though. Can you possibly send me the .obj file that you're using? You can just attach it to an e-mail if you'd like. My addy is [email]robin@robinwood.com[/email]. We will get this figured out.
_____________________
Robin (Sojourner) Wood www.robinwood.com"Second Life ... is an Internet-based virtual world ... and a libertarian anarchy..." Wikipedia
|
|
Piggie Paule
Registered User
Join date: 22 Jul 2008
Posts: 675
|
09-11-2009 02:08
From: Robin Sojourner It's not happening in PS, if you're not Reparameterizing. It's something that's happening in Wings, I think. But I don't use it, so I'm not sure how you're getting two UV Maps there; one that's being made for the sculpt, and another that's attached to the .obj file. It does look like that's what's happening, though. Can you possibly send me the .obj file that you're using? You can just attach it to an e-mail if you'd like. My addy is [email]robin@robinwood.com[/email]. We will get this figured out. Fantastic, yes, sure, will do that later. Honestly, all I'm doing is loading Wings, creating a Sphere (64x63) and moving it about. Exporting as a SL sculptie BMP file Exporting as a OBJ file Loading the scupltie file into SL Loading the OBJ file into Photoshop (to paint the texture) There's nothing else (no other options/parameters) I'm selecting. As you say, perhaps it's some "change some kind of format" option I need to do in Wings before I export the OBJ. I really appreciate your help on this, as you can appreciate, for a beginner, if things don't work you are just lost !!! Thanks. As I said, am at RL work now (have to pay for SL somehow) and will send you the file later tonight (well, in about 7 hours time!) |
|
Robin Sojourner
Registered User
Join date: 16 Sep 2004
Posts: 1,080
|
09-11-2009 11:53
Hi Piggie! You are most welcome. Thanks for sending me all the files. They really helped me see what was going on. So, what's happening is that Wings doesn't make the UV Map for the obj. The Sculpt exporter must make one, but it looks like it doesn't tell Wings what it is, so it's just not there. There's no UV Map on the .obj exported from Wings at all. This means when you import the .obj into PS, it makes a map so that you can have something to paint on. It just doesn't make the right one. (I didn't think that PS would just automatically make a map like that, but it seems that it does! Which is great, really, but not what is needed here.) All of this means you have several choices. 1. You can use the UV Mapped spheres that Hypatia and Thunderclap kindly provided, and make your sculpts by pushing and pulling vertices around. You'll find the spheres in this thread. /8/5f/188429/1.html2. You can learn to UV Map things, either in Wings or in UV Mapper Classic, so that you have a UV Map to draw on in PS. 3. You can model the way you're learning to in Wings, then import the sculpt .tga into Blender, and have it spit out a perfect UV Mapped .obj for you. Which you want to do really depends on how you're making the sculpts in the first place. If you're already pushing and pulling vertices, and you are comfortable continuing to use that method, then I'd recommend choice number 1. That should solve your problem. If you're not modeling that way, then I'd recommend choice 3. Yeah, Blender has that interface that's really hard to approach; but I can give you step by steps, and a .blend file that has all the things you need to do listed right in it, so it's really just very minor setup the first time, and after that it's a two click operation to get the .obj with UVs. You won't have to actually work in Blender at all, I promise. Let me know if you want that. Hope this helps!
_____________________
Robin (Sojourner) Wood www.robinwood.com"Second Life ... is an Internet-based virtual world ... and a libertarian anarchy..." Wikipedia
|
|
Piggie Paule
Registered User
Join date: 22 Jul 2008
Posts: 675
|
09-11-2009 13:16
Many thanks for finding the problem.
Makes you wonder how others are doing this, as the guides I saw did not mention this issue.
I did download blender and installed it, then ran away and hid behind the sofa for a while! LOL
I know it's what I SHOULD use, it's just that (at this moment in time, perhaps Wings might be a more safe starting point.
I'd be interested in your Blender addons (so to speek) but at this second in time, is "learning to make a UV map in Wings" going to be the simple sollution?
I'm not sure I'm LEARNING much in Wings, more than just pull and push a mesh around.
I have a 3D Space Navigator and it would be lovely if this could be put into use with one of these programs.
Can you use Wings to make the correct UV map ?
|