Hello guys
Wanted to make another top (corsett) but problem i always had with it was not round on the top (showing you the picture than describing in many words)
http://img515.imageshack.us/img515/8613/picccrt7.jpg
( the red colour i draw)
It looks so round while still straight as you can see at this place.
I was always either using Polygonal Lasso or Airbrush tool and it was either too angular
(with the lasso) or not proper painted ( with airbrush) since i dont have borders or lines where i can draw on.
plz help me out
ty
Welcome to the Second Life Forums Archive
These forums are CLOSED. Please visit the new forums HERE
Recommended tool to draw round (clean) stuff? |
|
|
Nicky1 McMillan
Registered User
Join date: 18 May 2007
Posts: 17
|
06-02-2007 05:02
|
|
Chosen Few
Alpha Channel Slave
Join date: 16 Jan 2004
Posts: 7,496
|
06-02-2007 12:15
First, let me say that that corset looks great as is, but you're obviously a perfectionist, and I can respect that. Here's what I'd recommend. Take a snapshot of your avatar wearing a UV suit (i.e. turn Chip's or Robin's templates into an outfit and wear them). Now, on the snapshot, draw the shape that you're trying to achieve. This will show you where your outline on the actual texture needs to cross the UV lines in order to form the shape you want. Be prepared that what looks like a circle on the 3D model will most likely not look like a circle on the 2D texture.
Now, to answer your question about what tool to use, I'd recommend using the pen tools (vector tools). The marquee tools that you've been using are pixel-dependant, so they'll always give you imprecision and jags, depending entirely on the resolution of your image. The vector tools are, by definition, resolution independent. Draw a vector curve, and the curve will always remain true, regardless of the pixels in intersects. The imprecision of the pixels vs. the slope of the curve will be camouflaged by anti-aliasing, and you'll get much cleaner looking results. That's assuming you're using a program that has vector tools, by the way, like Photoshop. You didn't specify which software you have. If you're using something like Photoshop Elements, then you may not have any vector tools at your disposal. If that's the case, then the best you can do is use the marquee tools, and then carefully paint out the jags. _____________________
.
Land now available for rent in Indigo. Low rates. Quiet, low-lag mainland sim with good neighbors. IM me in-world if you're interested. |
|
Nicky1 McMillan
Registered User
Join date: 18 May 2007
Posts: 17
|
06-04-2007 10:03
looks not bad.
Thanks a lot so far. _____________________
doing stuff, holding into money, salsa dancing
(*English isn' t my primary language*) |
|
Sylvia Trilling
Flying Tribe

Join date: 2 Oct 2006
Posts: 1,117
|
06-04-2007 19:36
I've been getting pretty good results with using the round marquee tool. I will certainl try the pen tool after reading Chosen Few's post.
If you have photoshop, it will help to feather your selection for your alpha and then use a Solidify filter by Flaming Pear (these are in a package of free filters offered by Flaming Pear on their website). You have really nice fabric texturing and I think using the solidify for the edge is going to give your work a more pleasing finish. Here is a tutorial for using Solidify. http://www.robinwood.com/Catalog/Technical/SL-Tuts/SLPages/WhiteHalo1.html |
|
Nicky1 McMillan
Registered User
Join date: 18 May 2007
Posts: 17
|
07-30-2007 05:18
hi
tx for the quick responses. @Chosen Few I 've tried the pen tool. And on photoshop (cs3) it even looked really well. But after sized it to 512 x 512 and added it in game it didnt appear that clean. While airbrush still somehow did look better. Althought its also not that clean as i would like to to be. I know you cant make it 100% but if go and buy clothers for example from "last call" somehow they make their clothing really clean painted. @Sylvia Trilling round marquee tool? are you sure? it was not clean at all after i tried that. ps: i ve downloaded the plugins and added them to ps gonna try it soon here is a pic http://img49.imageshack.us/img49/9058/presentationdv0.jpg Blue top made with (pen tool) black in the middle (airbrush) black on the right (downstairs) pen tool the white on the right top was from that store and thats how i would like it to make. _____________________
doing stuff, holding into money, salsa dancing
(*English isn' t my primary language*) |
|
Chosen Few
Alpha Channel Slave
Join date: 16 Jan 2004
Posts: 7,496
|
07-30-2007 07:32
Nicky, in your picture, the blue top on the left looks very clean along the neck line, but not so much along the bottom. It seems to have some haloing around it, but that's a separate issue. The one labeled "Airbrush" appears pixelated and a little blurry to me a long all the edges. The store-bought one looks good, but not any better than your blue one. I agree with you that your black one on the right looks sloppy.
I'd encourage you to keep practicing with the vector path tools. There absolutely is no way to get a cleaner selection than with vector paths. That's why Photoshop has them. _____________________
.
Land now available for rent in Indigo. Low rates. Quiet, low-lag mainland sim with good neighbors. IM me in-world if you're interested. |
|
Nicky1 McMillan
Registered User
Join date: 18 May 2007
Posts: 17
|
07-31-2007 07:37
Nicky, in your picture, the blue top on the left looks very clean along the neck line, but not so much along the bottom. It seems to have some haloing around it, but that's a separate issue. The one labeled "Airbrush" appears pixelated and a little blurry to me a long all the edges. The store-bought one looks good, but not any better than your blue one. I agree with you that your black one on the right looks sloppy. I'd encourage you to keep practicing with the vector path tools. There absolutely is no way to get a cleaner selection than with vector paths. That's why Photoshop has them. i ve made another part with pen tool. that are these 2 black lines crossing each other. sized image to 512 and that s what it became. http://img123.imageshack.us/img123/3299/adbq2.jpg the pen tool doesnt work proper. it doesnt appear well on certain body parts. and i guess since it is that clean it shows every rough part on the "body" while airbrush since its so soft ignores that all. correct me if i m wrong. i really dunno how i should continue. PS: on the left site the back upper part was made with airbrush. while the lines with pentool. _____________________
doing stuff, holding into money, salsa dancing
(*English isn' t my primary language*) |
|
Chosen Few
Alpha Channel Slave
Join date: 16 Jan 2004
Posts: 7,496
|
07-31-2007 15:19
When you use the pen tool, do you have it set to draw paths or pixels? If it's the latter, then that explains your problem. Unless you're drawing paths, then you're not getting the resolution-independent smoothing I was talking about.
With the pen (or any of the shape tools) selected, take a look at the tool settings bar at the top of the screen. At the upper left you'll see mode settings for paths, pixels, and shape layers. Make sure it's set to paths. The procedure you want to follow is to use the pen to draw Bezier curves, which will show up on the Paths palette, the same way layers and channels show up on their resepective palettes. Once a path has been drawn, you can use the white arrow tool to select individual anchor points. Then you can move the points around to fine tune the shape of the path. When you have a shape you like, ctrl-click the path's thumbnail on the palette to form a selection from the path. Fill the selection, and the results will be smooth. _____________________
.
Land now available for rent in Indigo. Low rates. Quiet, low-lag mainland sim with good neighbors. IM me in-world if you're interested. |
|
Nicky1 McMillan
Registered User
Join date: 18 May 2007
Posts: 17
|
08-01-2007 12:08
When you use the pen tool, do you have it set to draw paths or pixels? If it's the latter, then that explains your problem. Unless you're drawing paths, then you're not getting the resolution-independent smoothing I was talking about. With the pen (or any of the shape tools) selected, take a look at the tool settings bar at the top of the screen. At the upper left you'll see mode settings for paths, pixels, and shape layers. Make sure it's set to paths. The procedure you want to follow is to use the pen to draw Bezier curves, which will show up on the Paths palette, the same way layers and channels show up on their resepective palettes. Once a path has been drawn, you can use the white arrow tool to select individual anchor points. Then you can move the points around to fine tune the shape of the path. When you have a shape you like, ctrl-click the path's thumbnail on the palette to form a selection from the path. Fill the selection, and the results will be smooth. Hi Chosen Did it exactly the way you described it was set to paths while was drawing this shape. http://img167.imageshack.us/img167/4208/ada1xir2.jpg On the picture you see how it was looking after drew on the alpha. And on the left how it turned in game after added it. PS: Would you mind to draw something like that in your Photoshop and showing me a picture (in photoshop and in game) as i had it. To see if i m doing something wrong etc... ty a lot _____________________
doing stuff, holding into money, salsa dancing
(*English isn' t my primary language*) |
|
Betty Doyle
Ingenue

Join date: 15 Aug 2006
Posts: 336
|
08-01-2007 18:13
I work in exactly the way Chosen had described (and I'm avoiding doing something else right now) so, I did a quick one for you. Please ignore the curve... it's not the best ever as I did it very quickly.
") http://www.flickr.com/photo_zoom.gne?id=980200212&size=o _____________________
Ingenue :: Fashion with a Past ::
http://ingenuevintage.wordpress.com http://slurl.com/secondlife/Lo%20Lo/201/99/21/ |
|
Nicky1 McMillan
Registered User
Join date: 18 May 2007
Posts: 17
|
08-01-2007 20:36
I work in exactly the way Chosen had described (and I'm avoiding doing something else right now) so, I did a quick one for you. Please ignore the curve... it's not the best ever as I did it very quickly. http://www.flickr.com/photo_zoom.gne?id=980200212&size=o this looks clean. but i did the same way as you again i think. and still the same. after i draw the shape i want with the pen tool (paths selected) i choose the path with the arrow, ctrl click the path in the channel ,after its marked, right click the path (in the path channel) -> fill path colour black, blending normal, opacity 100% ,anti alias on after its filled -> Layer -> Flattern Image Image -> Image size width 512 height 512 -> scale , constrain ,resample all on Bicubic (best for smooth gradients) than save it as TGA and upload. _____________________
doing stuff, holding into money, salsa dancing
(*English isn' t my primary language*) |
|
Betty Doyle
Ingenue
Join date: 15 Aug 2006
Posts: 336
|
08-01-2007 21:19
this looks clean. but i did the same way as you again i think. and still the same. after i draw the shape i want with the pen tool (paths selected) i choose the path with the arrow, ctrl click the path in the channel ,after its marked, right click the path (in the path channel) -> fill path colour black, blending normal, opacity 100% ,anti alias on after its filled -> Layer -> Flattern Image Image -> Image size width 512 height 512 -> scale , constrain ,resample all on Bicubic (best for smooth gradients) than save it as TGA and upload. Ah ha! I think I see what it is! Don't fill your path. After you create your path, right click and "make selection", save your selection (this creates your alpha channel) and then fill the selection with the colour you want. _____________________
Ingenue :: Fashion with a Past ::
http://ingenuevintage.wordpress.com http://slurl.com/secondlife/Lo%20Lo/201/99/21/ |
|
Nicky1 McMillan
Registered User
Join date: 18 May 2007
Posts: 17
|
08-02-2007 05:17
Ah ha! I think I see what it is! Don't fill your path. After you create your path, right click and "make selection", save your selection (this creates your alpha channel) and then fill the selection with the colour you want. hi ok after shape was drawn with pen, in the path channel right clicked it "make selection" after it was marked , Paint bucket tool filled the marked alpha, than filled the still marked laryer and thats how it became in game http://img179.imageshack.us/img179/7406/1df6xxdb6.jpg _____________________
doing stuff, holding into money, salsa dancing
(*English isn' t my primary language*) |
|
Betty Doyle
Ingenue
Join date: 15 Aug 2006
Posts: 336
|
08-02-2007 14:12
Hi Nicky, Well...I'm kinda stumped. The only difference I could see between the way you did your last one and the way I did mine, is that I use Select --> Save Selection to create the alpha channel instead of the paint bucket tool, but that shouldn't make any difference. I did a test doing it with the paint bucket and making the top of the bodice cut more across the bosom like yours, and it still came out clean. My only other thought is that perhaps it is affected by bust size, so I tried increasing mine, and it did affect the cleanness of the line a bit. However, since I assume you are still the one wearing the bustier in the shop picture, that kinda throws that theory out. You might however try decreasing your bust size just as a test and see if that makes your lines look cleaner. (my bust is rather small for SL at 35) Hopefully, Chosen will have some more ideas.
_____________________
Ingenue :: Fashion with a Past ::
http://ingenuevintage.wordpress.com http://slurl.com/secondlife/Lo%20Lo/201/99/21/ |
|
Siddean Munro
Artist!

Join date: 21 Apr 2007
Posts: 113
|
08-02-2007 19:25
I was going to suggest decreasing the bust size as well, as those sliders can really make a difference to the pixels around the edge of your bustier.
If you resize your image to 512x512, then zoom right in on the image while you are comparing tho how it looks in SL, you will see that the pixels are exactly matching around the edge. It has something to do with the size of the image and the pixels therein. I don't know how 512x512 can ever show a very clear, clean unpixellated edge, unless you are working with perfectly straight horizontal or vertical lines, and even then while it looks clean on the page, on the avatar when you squish and stretch the poly's, it will change somewhat. I'll do some experimenting as well and see if I can get better results. .... Ok I created a simple bra with the pen tool, made the path into a selection, and then filled the selection as described above and these are the results of my uploading both a 1024 texture size (I never use this size, only for the purpose of illustrating this) and a 512 texture size. 512 texture size 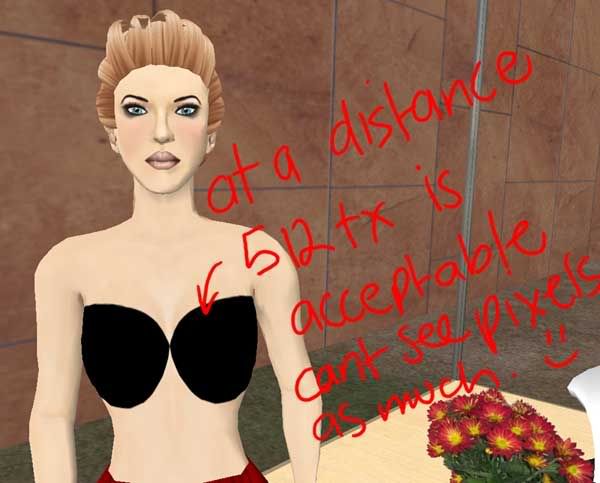 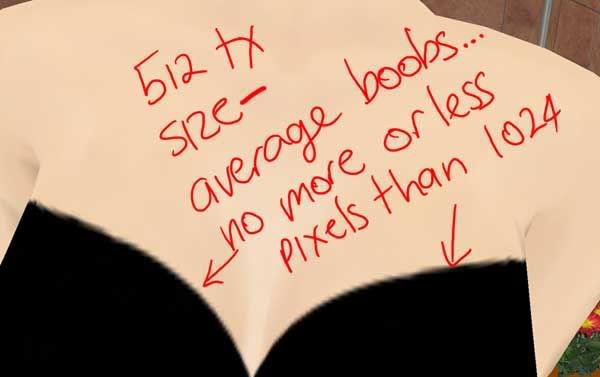 1024 texture 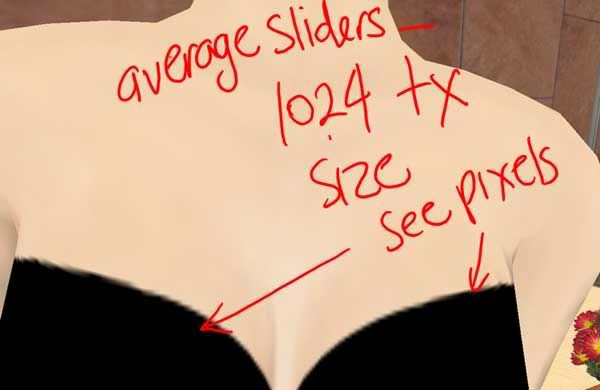 with slider distortion 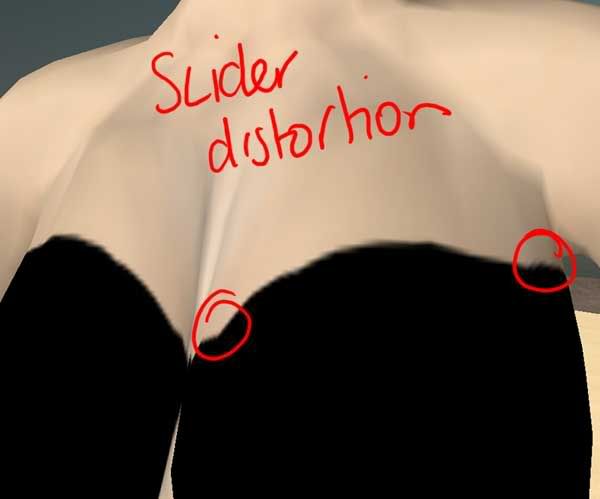 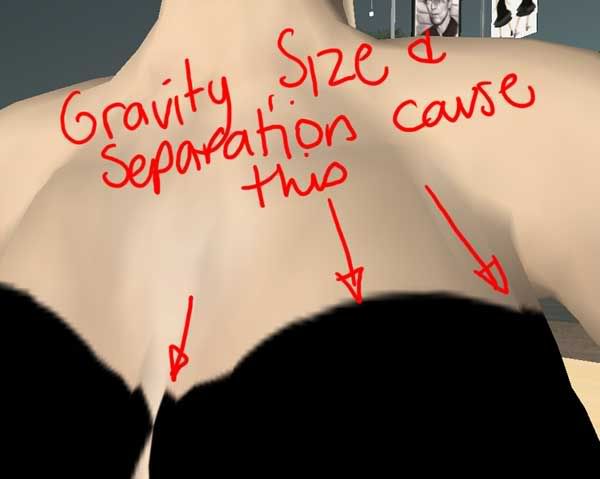 Boo to the image restriction!! _____________________
My Second Life Blog. New releases, fashion news and musings and more- http://slink.mmoportraits.com/
|
|
Thunderclap Morgridge
The sound heard by all

Join date: 30 Sep 2006
Posts: 517
|
08-02-2007 22:24
Also, incase no one mentioned this: very few people look at it close up. I actually reduce resolution to 256 or smaller to make sure my logos can be seen. So 95% of anyone won't ever see your pixelation.
_____________________
Gimp:
n : disability of walking due to crippling of the legs or feet ie. lameness, limping, gameness, claudication secondlife://Amaro/77/130/39 Come to Thunderclap: the gospel chapel and Thunderburst: Mens clothes and more. |