Heya, I asked this question in my last Maya thread @_@ I didn't wanna bump the whole thing for one question, so I was wondering if someone could help me.
Whenever I upload the Av object into Maya, I get this error message:
"Your OBJ file contains faces shared by multiple groups. Maya cannot create multiple objects for this file. A single mesh object will be created instead. The OBJ group information wlll be captured in Maya sets."
So when I try baking textures, instead of getting just the top or bottom etc, I get all three together like this:
http://img.photobucket.com/albums/v38/neko-vamp/Material_Upperbody-polySurface11.jpg
anyone can help? I also got the Turtle render extension, I haven't played with it too much since I've been a little hiatus from Maya for a bit, but I'd like to get to know it better instead of diving straight into Mental Ray? Suggestions?
Welcome to the Second Life Forums Archive
These forums are CLOSED. Please visit the new forums HERE
Maya 08 - Av Obj meshing together? |
|
|
duLuna Bosatsu
OMnomnom nom.
Join date: 4 Nov 2007
Posts: 102
|
05-18-2009 00:35
|
|
Chosen Few
Alpha Channel Slave
Join date: 16 Jan 2004
Posts: 7,496
|
05-19-2009 01:43
Don't worry about the message. It's not an error, just a warning. The OBJ files you're importing are meant for Poser, not Maya, so not everything in them is Maya compatible. The important thing is that you've got the geometry, the materials, and the UV's, which you do.
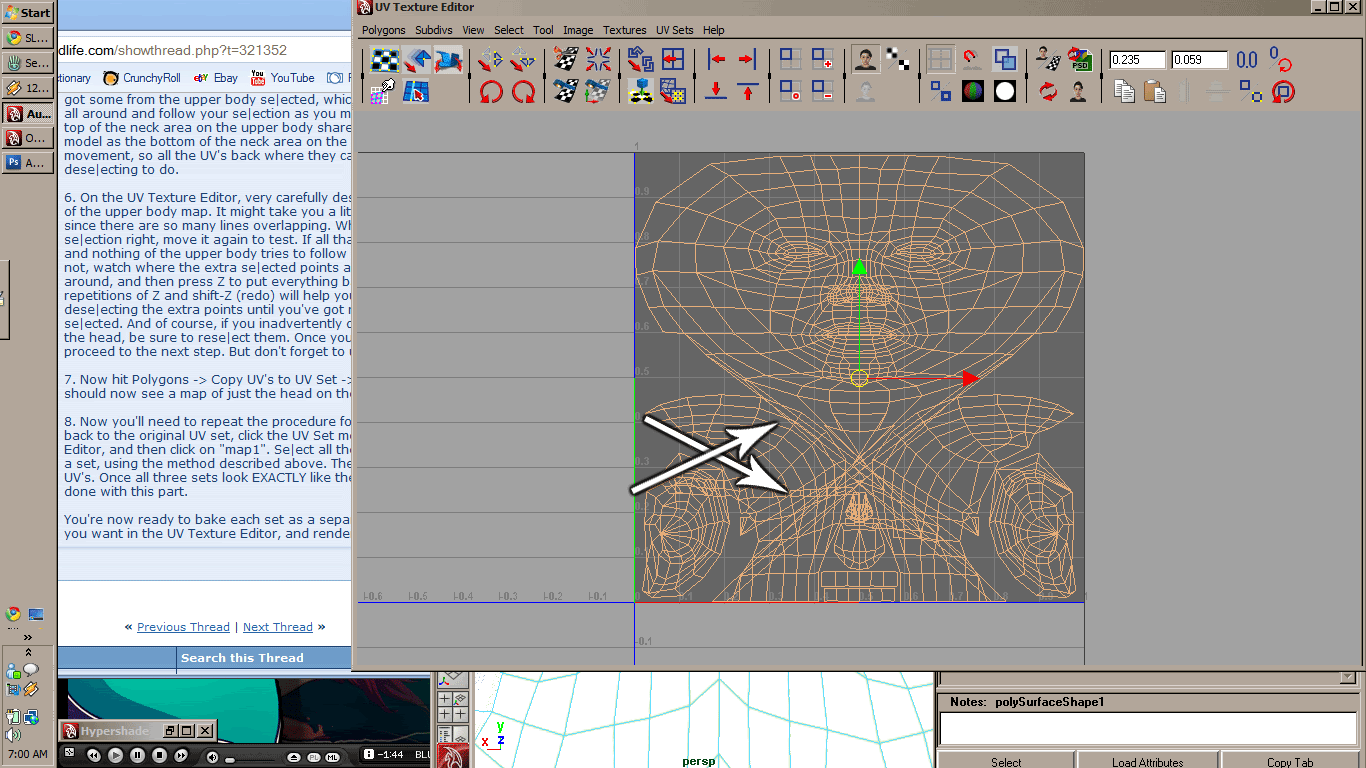
To bake the three body sections separately, you've got many options. The one I'd recommend is to split the body parts into three UV sets, and then bake a texture for each set. Alternatively, you could do a single bake of all three onto a larger canvas, but there would be considerable margin for error that way, since you'd need to chop it up in post. I'll give you basic instructions for how to create the three UV sets. I'm sure you'll be able to figure out what to do with them from there, but if you need further help afterwards, come on back and ask. 1. Import the OBJ file, and let it do its thing. 2. Open the UV Texture Editor, and park it somewhere on screen where you can see both it and the model at the same time. Multiple monitors help immensely for this, if you've got them. If you've only got one monitor, just do the best you can with the space you have. 3. Right-click and hold in the UV Texture Editor, and then pick UV from the marking menu. 4. On the model se|ect all the UV points on the avatar's head. You'll find this will be easiest in a front orthographic view, initially, but don't forget also to go around in perspective view, to make sure you've got everything. 5. Go back to the UV Texture Editor, and hit W, to bring up the Move tool. You'll now be able to move the se|ected UV's of the head all around the canvas. Move the whole se|ection around a little, just so you can see what happens. No doubt you're noticing a problem. In addition to the UV points on the head, you've also got some from the upper body se|ected, which is causing a few lines to stretch all around and follow your se|ection as you move it around. This is because the top of the neck area on the upper body shares the same coordinates on the model as the bottom of the neck area on the head. Press Z to undo the movement, so all the UV's back where they came from. We've got some dese|ecting to do. 6. On the UV Texture Editor, very carefully dese|ect all the points that are part of the upper body map. It might take you a little while to figure out what's what, since there are so many lines overlapping. When you think you've got the se|ection right, move it again to test. If all that gets moved is the head map, and nothing of the upper body tries to follow you, you're done with this step. If not, watch where the extra se|ected points are as you move the se|ection around, and then press Z to put everything back where it came from. A few repetitions of Z and shift-Z (redo) will help you pinpoint the trouble spots. Keep dese|ecting the extra points until you've got nothing but the head map se|ected. And of course, if you inadvertently dese|ect any of the UV points from the head, be sure to rese|ect them. Once you've got the se|ection right, proceed to the next step. But don't forget to undo any movement. 7. Now hit Polygons -> Copy UV's to UV Set -> Copy Into New UV Set. You should now see a map of just the head on the UV Texture Editor's canvas. 8. Now you'll need to repeat the procedure for the other two body parts. To get back to the original UV set, click the UV Set menu at the top of the UV Texture Editor, and then click on "map1". Se|ect all the upper body UV's, and copy the to a set, using the method described above. Then do the same for the lower body UV's. Once all three sets look EXACTLY like the clothing/skin templates, you're done with this part. You're now ready to bake each set as a separate texture. Just display the set you want in the UV Texture Editor, and render away. _____________________
.
Land now available for rent in Indigo. Low rates. Quiet, low-lag mainland sim with good neighbors. IM me in-world if you're interested. |
|
duLuna Bosatsu
OMnomnom nom.
Join date: 4 Nov 2007
Posts: 102
|
05-24-2009 04:08
asghaksfgj auuughhh you rock <3 thanks again for all your help! Sorry for the late response, I forgot to subscribe and didn't see a reply <333 ff thankyouthankyou
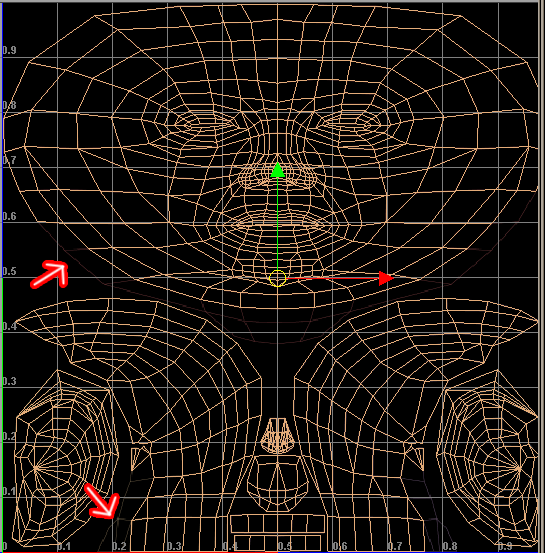
I know what to do now, was a little confusing differentiating it (still thinking highly 2-D here), but I got it down pat, I think. I noticed the only obscure vertices were at the top of the head in the UV Editor coordinate map thing, so I slapped on the UV image defining were all the lines were, making it easier to cut. Alas, all the lines were as you said, right around the ring where the body meets the neck in the texture. However, I noticed that when I pulled the Head UVs away from the original upper-right block, there were still things attached. Do all lines attached mean it's hooked to the body? I noticed they were coming from the mouth area... so I went ahead and copied into a new UV set anyway and this is what it looks like: http://img.photobucket.com/albums/v38/neko-vamp/crisscross.gif is that right? @_@ should it criss cross? |
|
Chosen Few
Alpha Channel Slave
Join date: 16 Jan 2004
Posts: 7,496
|
05-25-2009 06:07
Those crisscrossed lines shouldn't be there. The map should look exactly like the head template. You must have included some points from one of the other body part maps in your copying.
Redo it, and make sure that only points from one map at a time are selected. It might take you a little while to get it right, but you will get it. _____________________
.
Land now available for rent in Indigo. Low rates. Quiet, low-lag mainland sim with good neighbors. IM me in-world if you're interested. |
|
duLuna Bosatsu
OMnomnom nom.
Join date: 4 Nov 2007
Posts: 102
|
05-25-2009 15:21
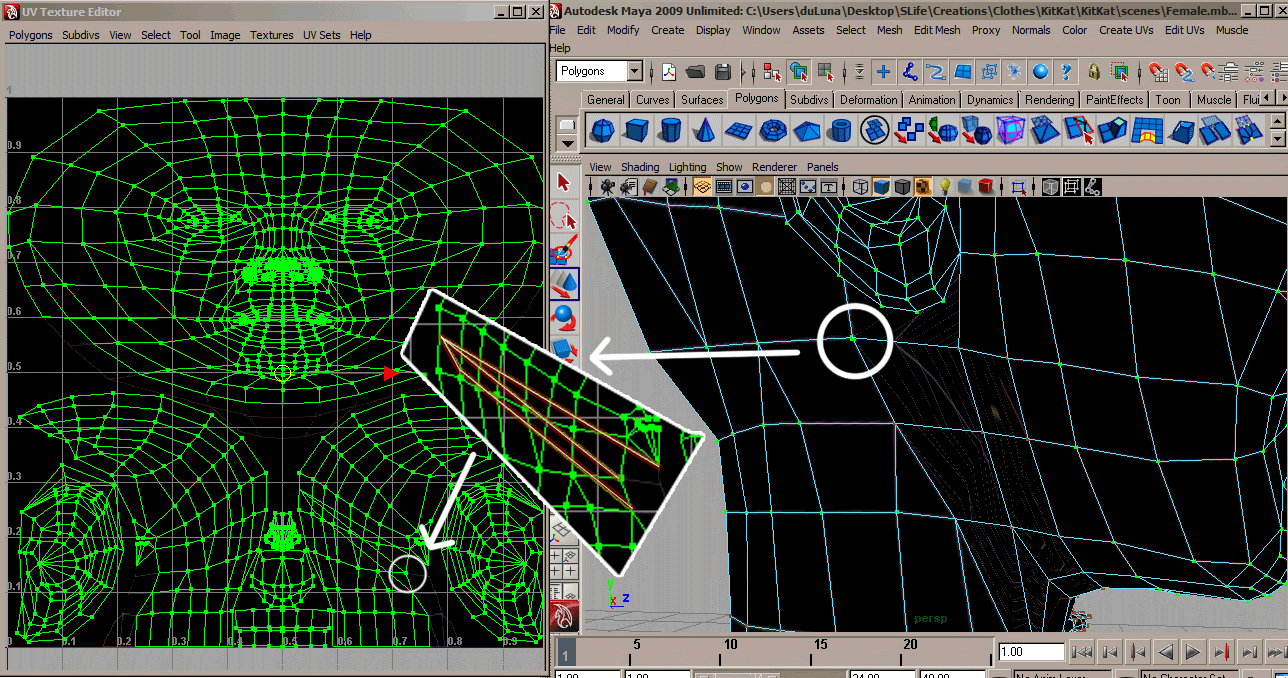
eeee, so it took inverting colors and exploring the "View Connected Faces" option to see what I was doing and be more efficient with this.. and VOILA!
http://img.photobucket.com/albums/v38/neko-vamp/UVeeeee.gif so now my next question is, does it look ok? XD The image underneath is the UV image I laid over the obj so I knew a little better what it's supposed to look like (connect the dots! <3 ) but the greyed out bit, where the dots don't connect to avoid the crisscrossing, is that alright? :^ I ask 'cause I'm picturing it as if I'm cutting the bits out like puzzle pieces, so when I lay over a clothing design and I render out the sheen on 'em, will the bits I deselected to keep from criss crossing be blank patches? (to an experienced Maya-er I'm sure that probably sounds illogical XD; but I just wanna check) |
|
Chosen Few
Alpha Channel Slave
Join date: 16 Jan 2004
Posts: 7,496
|
05-26-2009 06:54
You deselected too much. The only points you should have deselected were those from other body parts. All points from the head need to be there, or you'll end up with holes in your texture.
_____________________
.
Land now available for rent in Indigo. Low rates. Quiet, low-lag mainland sim with good neighbors. IM me in-world if you're interested. |
|
duLuna Bosatsu
OMnomnom nom.
Join date: 4 Nov 2007
Posts: 102
|
05-26-2009 21:11
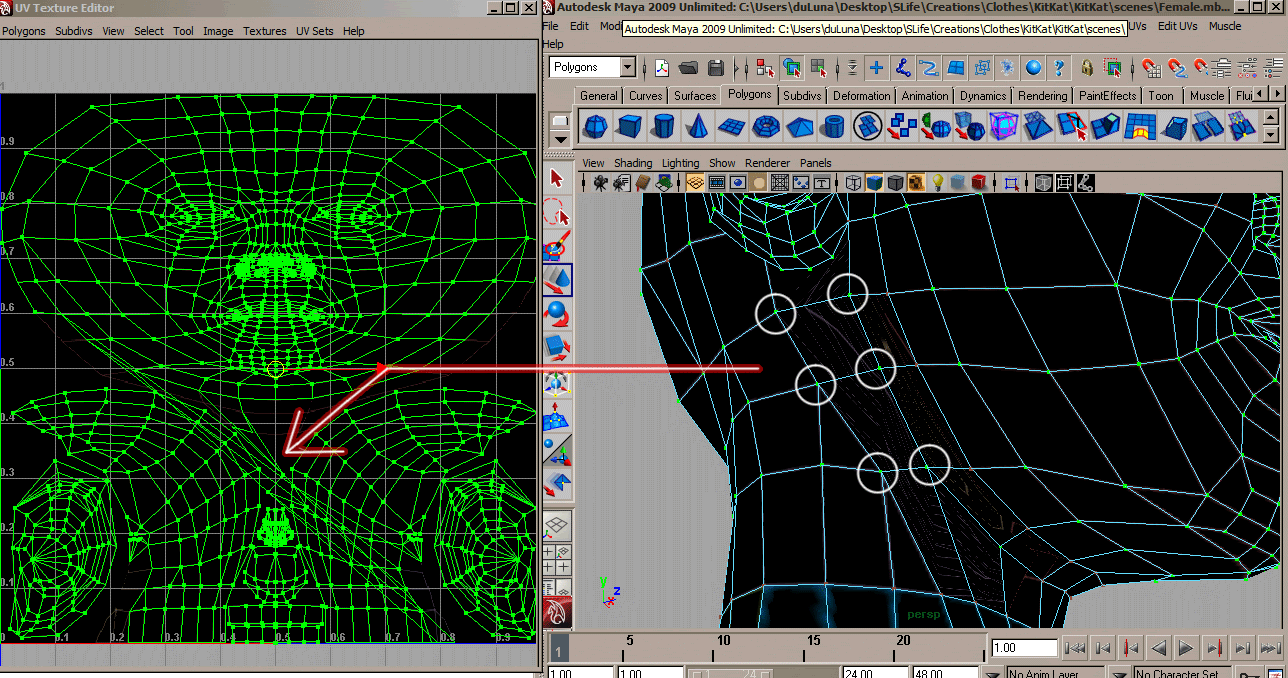
mmm, weird, I had to deselect those parts of the neck to get the criss crossing to go away... so I reselected them, and they came back :\
http://img.photobucket.com/albums/v38/neko-vamp/UVlinez.gif http://img.photobucket.com/albums/v38/neko-vamp/UVlinez2.gif looks like it's trying to connect the sides of the face to the back of the head/neck @_@ |
|
Chosen Few
Alpha Channel Slave
Join date: 16 Jan 2004
Posts: 7,496
|
05-26-2009 21:19
The only thing I can figure is you inadvertently moved some of the UV points around on the canvas. I can't think of any other reason it would be doing what it's doing.
I would suggest you start over, and this time, keep your trigger finger on Z, so in case you do move anything, you can undo it immediately. Be EXCEEDINGLY careful not to misplace anything. _____________________
.
Land now available for rent in Indigo. Low rates. Quiet, low-lag mainland sim with good neighbors. IM me in-world if you're interested. |
|
duLuna Bosatsu
OMnomnom nom.
Join date: 4 Nov 2007
Posts: 102
|
05-26-2009 22:08
Ctrl Z & Alt Ctrl Z are my bffs XD use them incessantly in everything, too bad they don't work outside of the computer >>;;
Anymoo, before the only thing I had done was resize the object, easier to zoom in without looking through it to get a closer look at the dots (bad vision necessity on my end T_T; ). So I reloaded the obj in without enlarging it, and selected the head as last time.. and the criss crossing connections are there still @_@ |
|
Chosen Few
Alpha Channel Slave
Join date: 16 Jan 2004
Posts: 7,496
|
05-27-2009 06:26
If you're positive you haven't moved anything, then I'm not sure what to tell you. It sure looks like that's what's going on in your pic.
You should be able to make it look like this, quite easily: I just did it now, from scratch, just to make sure I hadn't left anything out of my previous instructions. I hope this makes you feel better, not worse, but it took me all of about 90 seconds or so. That's really all there should be to this. I'm not sure what you might be missing, sorry. _____________________
.
Land now available for rent in Indigo. Low rates. Quiet, low-lag mainland sim with good neighbors. IM me in-world if you're interested. |
|
duLuna Bosatsu
OMnomnom nom.
Join date: 4 Nov 2007
Posts: 102
|
05-27-2009 17:58
yeah, that was weird @_@ I figured maybe in the past I had done something unknowingly to the obj when I was experimenting with Maya... don't remember saving over anything, but I went and downloaded a fresh set and it worked like yours... very strange indeed... =__=!
An' nu, it wouldn't make me feel bad XD knowing it's something on my end means it's fixable, and of which it is fixed, huzzah! Mission accomplished! alright, now to play with rendering tools... -swan dives into Turtle- |
|
duLuna Bosatsu
OMnomnom nom.
Join date: 4 Nov 2007
Posts: 102
|
05-29-2009 00:51
/crawls back defeated.
So despite having seperated the UVs and using the tutorial you gave me in the other thread (http://fromthehill.nl/tutorials/bake/index.html) I can't seem to wrap my head around selecting only the UpperBody(or whichever portion it is I'm trying to select). I watched a dozen videos on rendering with Mental Ray and Maya's Software...which helps understanding setting up my lights and getting the rigging right, but still confused T_T how do I render out just the UVs/materials I put on them? Going the way with the tutorial also is hazey on how I output UVs with Turtle... aughh @_@ 3-Deeee |
|
Chosen Few
Alpha Channel Slave
Join date: 16 Jan 2004
Posts: 7,496
|
05-29-2009 06:24
how do I render out just the UVs/materials I put on them? Whichever UV set is currently displayed in the UV Texture Editor is the one that will render. That's what happens with Turtle, anyway. If it's different with Mental Ray or Maya Software, I'm not sure what to tell you. It's been years since I've used either of those renderers in earnest. Going the way with the tutorial also is hazey on how I output UVs with Turtle I'm not quite sure what you mean by "output UV's". In any case, to learn how to use Turtle, go through the tutorials at illuminatelab.com, and read the manual. _____________________
.
Land now available for rent in Indigo. Low rates. Quiet, low-lag mainland sim with good neighbors. IM me in-world if you're interested. |
|
duLuna Bosatsu
OMnomnom nom.
Join date: 4 Nov 2007
Posts: 102
|
05-29-2009 13:55
I thought that's how it might be... but I can't find the option to do it @_@ Here's what my screen looks like:
http://img.photobucket.com/albums/v38/neko-vamp/rawr.gif So I have the UV Editor open, the top is selected... but the only render view is the persp one, other then the generic front/side/top ones T_T; |
|
Chosen Few
Alpha Channel Slave
Join date: 16 Jan 2004
Posts: 7,496
|
05-29-2009 16:28
You really need to read the Turtle manual. You don't want to change the render view in Maya. You want to change Turtle's render type from rendering to baking. View and type are two very different things.
In the Render Settings window, click on the Turtle tab. The very first item at the top of the tab will be a pull down menu for Render Type. By default, it will be set to Rendering. Simply change it to Baking, and you're ready to bake. It's that simple. Make sure to read the rest of the manual, so you know what all the other options and settings are for. Also, you'll find the tutorials at illuminatelabs.com are extremely helpful. Remember, you made a significant investment in deciding to purchase Turtle. Part of what you paid for was the documentation. Use it. _____________________
.
Land now available for rent in Indigo. Low rates. Quiet, low-lag mainland sim with good neighbors. IM me in-world if you're interested. |
|
duLuna Bosatsu
OMnomnom nom.
Join date: 4 Nov 2007
Posts: 102
|
05-29-2009 21:44
I'm sorry Chosen ~__~ I thought it'd be the same drop down feature like in the other two. I was looking for something like what Lightwave has, but I'll go through and bury my nose in the manuals, thanks much~~~ <33
|