|
Cipriano Miami
Registered User
Join date: 5 Dec 2008
Posts: 3
|
12-31-2008 10:19
Hi all! I'm not 100% sure that this is in the right forum, but here goes:
I made a sculpted object in Maya, and exported it successfully with the exporter script. However, after that I went back and made some modifications to the sculpt, but when I tried to export it again, I got an error saying that I used an invalid type that cannot be used in a scaling operation, after which a miniature copy of the object was made, and no sculpt exported. This is really annoying, any help would be appreciated.
|
|
Cipriano Miami
Registered User
Join date: 5 Dec 2008
Posts: 3
|
01-01-2009 17:18
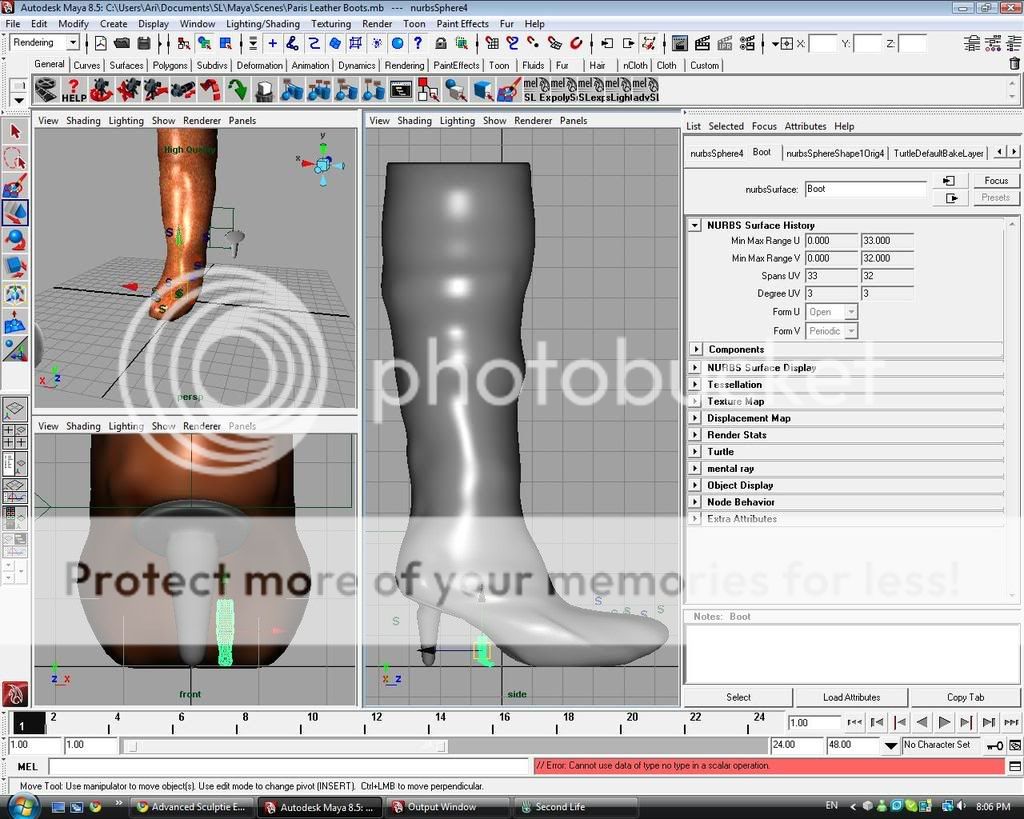
Ok, so I have a screen shot of what is happening. http://i430.photobucket.com/albums/qq22/ciprianomiami/maya-save-errors.jpgWhen I export the sculpty using Qarl Lindens advanced exporter, the object is exported successfully, but looks very, very deformed in-world. When I exported this sculpt earlier with the regular exporter, it worked fine. The little mini-boot you see selected is what appears after I have attempted to run the export script. I have tried clearing history, but I still get the same error. |
|
Chosen Few
Alpha Channel Slave
Join date: 16 Jan 2004
Posts: 7,496
|
01-02-2009 08:08
I've got good news and bad news for you. I'll cover the bad news first. I' have no idea why trying to export a sculpt map would cause a miniature duplicate of the model to appear. That's downright weird.
My best guess is something is corrupted somewhere, either in your scene file, your implementation of the script, or within Maya itself. Or it could possibly be a result of the fact that your model is HUGE. If I'm counting right, it's almost 17 units tall. No single sculpty should ever be more than 10 units in any dimension. Remember, one unit in Maya translates to one meter in SL, regardless of whether your Maya units happen to be called meters or not. A unit is a unit. The names are arbitrary. And SL can't create any single object larger than 10x10x10 units.
I notice the duplicate appears to be exactly one unit tall. It could be coincidence, of course, but it suggests maybe the script is trying to compensate for the fact that your model is not sculpty-compatible, due to its size, so it's creating a new version of it that is. If so, that's actually pretty impressive. I had no idea the script was that intelligent, if indeed it is. I've never tried to make a sculpty that big before.
Even if it could work at that size, though, you certainly wouldn't want it to. It's a boot, right? That style of boot, is usually what, 1/5 the height of its human wearer? Unless you've somehow got an 85-meter tall avatar, or you're trying to build a scene out of "The Old Woman Who Lived In The Shoe", a 17-meter high boot isn't exactly practical.
Shrink it down to a more SL-friendly size.
OK, now for the good news. I can probably help you solve the in-world deformation problem. There are a few possible causes for that, some Maya-related, some SL-related. Here they are, in no particular order:
1. Your sculpt map just might not have fully loaded yet in your SL viewer. Sometimes it can be a little stubborn about that. Make sure your object detail slider in your graphics preferences is turned all the way up. Then clear your cache, and relog.
2. It could be that the sculpt map isn't yet fully available from the asset server. When you upload an image to SL, 4 versions of it are created, in progressive levels of detail. Ordinarily, all 4 are created instantly, but sometimes the process seems to get delayed, for God only knows why. It can be as much as 24 hours or so before the full LOD trickles in. If a sculpty (or a texture) is being stubborn, sometimes the only thing to do is wait. Come back the next day, and things might look totally different.
3. You said you cleared history in Maya. Did you also freeze and reset transformations for all objects you're exporting? If not, then you can be almost certain that's the cause of the distortion you're seeing in SL. Transformation nodes interfere with the exporter's ability to get a clean sample of the surface. In order for the exporter to work properly, Maya has to think the state the object is in now is the state it's always been in. History and transformations both have to go.
4. Are you using groups and/or parentings? That's a big no-no for proper sculpty export. The exporter requires that all objects be on the first hierarchy tier. If you've got any groups or parentings in the scene, get rid of them. If you need a way to manage collections of objects, use layers instead of groups.
5. Make sure your sculpt maps are the correct size, and that you're uploading your sculpt maps losslessly. They should be 64x64px, no more, no less (unless you're doing oblong sculpts, which is a whole other can of worms). Make sure Use Lossless Upload is turned on in the SL upload previewer. Alternatively, you can use a third party uploader, called importprimscript.exe, for lossless upload, and auto-assembly of multi-sculpty models. See the sculpty wiki for more details on that.
6. Is your source model NURBS or polygons? The Maya sculpty exporter is optimized for NURBS. It's not very accurate with polys. For best results, always use NURBS. If you're used to poly modeling, NURBS modeling will take some getting used to. It's common for poly modelers to get frustrated with NURBS at first. Don't worry. Once you get your head around it, it's really pretty easy. As with anything else, it's just a question of learning the proper techniques, and then practicing.
7. The small duplicate model is selected in your screenshot, so it's showing the wireframe. It's a little hard to count, since it's small, but it looks like you've got way too many isoparms (or edges, if it's a poly model). Remember, sculpties are limited to 32x32 quads in-world (again, unless you're doing oblong sculpts, which I'd rather not confuse the issue with right now). It's best not to use more than 16x16 sections and spans in your NURBS source model. Any more, and you won't always get an accurate sample of the surface upon export.
That's about all I can think of for now, to solve your problem. If none of that works, then I'm stumped for the time being.
_____________________
.
Land now available for rent in Indigo. Low rates. Quiet, low-lag mainland sim with good neighbors. IM me in-world if you're interested.
|
|
Cipriano Miami
Registered User
Join date: 5 Dec 2008
Posts: 3
|
01-03-2009 16:57
From: Chosen Few I've got good news and bad news for you. I'll cover the bad news first. I' have no idea why trying to export a sculpt map would cause a miniature duplicate of the model to appear. That's downright weird.
My best guess is something is corrupted somewhere, either in your scene file, your implementation of the script, or within Maya itself. Or it could possibly be a result of the fact that your model is HUGE. If I'm counting right, it's almost 17 units tall. No single sculpty should ever be more than 10 units in any dimension. Remember, one unit in Maya translates to one meter in SL, regardless of whether your Maya units happen to be called meters or not. A unit is a unit. The names are arbitrary. And SL can't create any single object larger than 10x10x10 units.
I notice the duplicate appears to be exactly one unit tall. It could be coincidence, of course, but it suggests maybe the script is trying to compensate for the fact that your model is not sculpty-compatible, due to its size, so it's creating a new version of it that is. If so, that's actually pretty impressive. I had no idea the script was that intelligent, if indeed it is. I've never tried to make a sculpty that big before.
Even if it could work at that size, though, you certainly wouldn't want it to. It's a boot, right? That style of boot, is usually what, 1/5 the height of its human wearer? Unless you've somehow got an 85-meter tall avatar, or you're trying to build a scene out of "The Old Woman Who Lived In The Shoe", a 17-meter high boot isn't exactly practical.
Shrink it down to a more SL-friendly size.
OK, now for the good news. I can probably help you solve the in-world deformation problem. There are a few possible causes for that, some Maya-related, some SL-related. Here they are, in no particular order:
1. Your sculpt map just might not have fully loaded yet in your SL viewer. Sometimes it can be a little stubborn about that. Make sure your object detail slider in your graphics preferences is turned all the way up. Then clear your cache, and relog.
2. It could be that the sculpt map isn't yet fully available from the asset server. When you upload an image to SL, 4 versions of it are created, in progressive levels of detail. Ordinarily, all 4 are created instantly, but sometimes the process seems to get delayed, for God only knows why. It can be as much as 24 hours or so before the full LOD trickles in. If a sculpty (or a texture) is being stubborn, sometimes the only thing to do is wait. Come back the next day, and things might look totally different.
3. You said you cleared history in Maya. Did you also freeze and reset transformations for all objects you're exporting? If not, then you can be almost certain that's the cause of the distortion you're seeing in SL. Transformation nodes interfere with the exporter's ability to get a clean sample of the surface. In order for the exporter to work properly, Maya has to think the state the object is in now is the state it's always been in. History and transformations both have to go.
4. Are you using groups and/or parentings? That's a big no-no for proper sculpty export. The exporter requires that all objects be on the first hierarchy tier. If you've got any groups or parentings in the scene, get rid of them. If you need a way to manage collections of objects, use layers instead of groups.
5. Make sure your sculpt maps are the correct size, and that you're uploading your sculpt maps losslessly. They should be 64x64px, no more, no less (unless you're doing oblong sculpts, which is a whole other can of worms). Make sure Use Lossless Upload is turned on in the SL upload previewer. Alternatively, you can use a third party uploader, called importprimscript.exe, for lossless upload, and auto-assembly of multi-sculpty models. See the sculpty wiki for more details on that.
6. Is your source model NURBS or polygons? The Maya sculpty exporter is optimized for NURBS. It's not very accurate with polys. For best results, always use NURBS. If you're used to poly modeling, NURBS modeling will take some getting used to. It's common for poly modelers to get frustrated with NURBS at first. Don't worry. Once you get your head around it, it's really pretty easy. As with anything else, it's just a question of learning the proper techniques, and then practicing.
7. The small duplicate model is selected in your screenshot, so it's showing the wireframe. It's a little hard to count, since it's small, but it looks like you've got way too many isoparms (or edges, if it's a poly model). Remember, sculpties are limited to 32x32 quads in-world (again, unless you're doing oblong sculpts, which I'd rather not confuse the issue with right now). It's best not to use more than 16x16 sections and spans in your NURBS source model. Any more, and you won't always get an accurate sample of the surface upon export.
That's about all I can think of for now, to solve your problem. If none of that works, then I'm stumped for the time being. I tried all of the above. I don't have any groups or parentings, sculpt maps are the correct size, and the boot is made of a 33x32 sphere, which has worked fine before for all of my sculpts. One interesting thing I observed is that whenever I try exporting with the Advanced Exporter, the sculpt exports correctly IF I do not check "Correct Orientation", if I do, I get the same error. This is very weird, but I think I can fix it by just manually correcting the orientation. Thanks for your help! |
|
Brookston Holiday
Registered User
Join date: 29 May 2005
Posts: 58
|
01-20-2009 17:53
I have had this happen too. I never figured it out, I ended up rebuilding the sculpty from scratch. The one thing that i was doing that might have messed it up is while adding it to a deformation set I might have added it to other sets too. This gives me an idea. Try ungrouping the prim and then seeing if it works, because I've read you should ungroup your scene before importing them.
|