I read somewhere that you can manually make a 1024 x1024 mesh cube to use in SL by simply starting with the default cube and subdividing it 5 times. I've tried this before in a new blender window to test out and it works find. So....now I've been working on a project and wanted to use the default cube and make it 1024. The problem is instead of the cube dividing into squares it divides into what look like spider webs. I have no idea what is going on. I opened a new blender window and tried it and it works fine. It only seems to be making the spiderweb subdivide in the cubes in my project window.
Has anyone come across this and have a fix?
Welcome to the Second Life Forums Archive
These forums are CLOSED. Please visit the new forums HERE
Blender Subdivide behaving strange |
|
|
Layla Honi
Registered User
Join date: 1 Nov 2007
Posts: 171
|
03-16-2009 15:12
|
|
Keira Wells
Blender Sculptor
Join date: 16 Mar 2008
Posts: 2,371
|
03-16-2009 15:18
Err... subdividing a cube 5 times creates a mesh with 6144 faces... I'm confused.
As to why it's creating a web, honestly no idea. Never heard of it happening, and after a few minutes of trying to reproduce it, I've come up with nothing. Actually, if you're using the SubSurf modifier, then it could be you're using edges without faces, or seperated faces in some manner, and it's causing this? I'm not really sure how to explain what I mean. _____________________
Tutorials for Sculpties using Blender!
Http://www.youtube.com/user/BlenderSL |
|
Layla Honi
Registered User
Join date: 1 Nov 2007
Posts: 171
|
03-16-2009 15:29
Oh maybe it was plane not a cube, I didn't even stop to think with it making the spiderweb subdivisions.
I am not using any modifiers at all. It happens in vertice, edge and face mode. I created new default cube, then clicked on subdivide. As I said it works fine in a new window, but is bahaving strange in my project window, which so far has 21 cylinder meshes from Domino's script. |
|
Gaia Clary
mesh weaver

Join date: 30 May 2007
Posts: 884
|
03-16-2009 16:58
I read somewhere that you can manually make a 1024 x1024 mesh cube to use in SL by simply starting with the default cube and subdividing it 5 times. I've tried this before in a new blender window to test out and it works find. So....now I've been working on a project and wanted to use the default cube and make it 1024. The problem is instead of the cube dividing into squares it divides into what look like spider webs. I have no idea what is going on. I opened a new blender window and tried it and it works fine. It only seems to be making the spiderweb subdivide in the cubes in my project window. Has anyone come across this and have a fix? Can it be that you meant this one ? http://blog.machinimatrix.org/2008/07/14/sculpted-prims-for-the-blender-purist/ That makes most sense to me when i read your question ") |
|
Keira Wells
Blender Sculptor
Join date: 16 Mar 2008
Posts: 2,371
|
03-16-2009 17:20
OH! I think I figured it out.. was something I never think about.
Next to the subdivide button in the "Tools" tab of the Editing buttons are two buttons, 'Beauty' and 'Short'. If you select both, and hit you get something slightly web-like, indeed, as shown in this image.(Note, a plane is not a cube! A bit confusing to call them the same thing) Unselect Beauty and Short and you'll get it back to normal, easy fix! (Left is Beauty subdividing, right is normal) 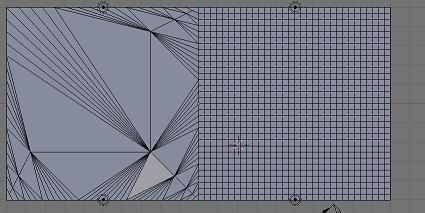 (Yours may look slightly different, as I actually only subdivided the outer edges after the first time) _____________________
Tutorials for Sculpties using Blender!
Http://www.youtube.com/user/BlenderSL |
|
Layla Honi
Registered User
Join date: 1 Nov 2007
Posts: 171
|
03-17-2009 14:20
Gaia,
Yes that is where I saw it, but I was thinking it was a cube. Keira, Yes! that was it. Thank you ") It's the Beauty button. I was playing with those buttons earlier, not realizing what they did because I didn't notice anything happening with my other sculpt and must have left them on. It's the Beauty button. I was playing with those buttons earlier, not realizing what they did because I didn't notice anything happening with my other sculpt and must have left them on.So what would be the purpose of using those buttons, specially the Beauty button? I know a plane is not a cube, but I was thinking the information I saw was for a cube. It's been a long time since I seen it. I see you can't have a 1024 vertice cube with subdivide. How would a cube turn out if you added or deleted vertices to arrive at 1024? Is there anything in Blender that tells you how many vertices you have or have selected? |
|
Gaia Clary
mesh weaver
Join date: 30 May 2007
Posts: 884
|
03-17-2009 14:51
Is there anything in Blender that tells you how many vertices you have or have selected?  |
|
Keira Wells
Blender Sculptor
Join date: 16 Mar 2008
Posts: 2,371
|
03-17-2009 20:35
Gaia, Yes that is where I saw it, but I was thinking it was a cube. Keira, Yes! that was it. Thank you It's the Beauty button. I was playing with those buttons earlier, not realizing what they did because I didn't notice anything happening with my other sculpt and must have left them on.So what would be the purpose of using those buttons, specially the Beauty button? From the Blender wiki: If the Beauty option is toggled selected faces are only subdivided along the longest 2 sides. If both Beauty and Short options are toggled, selected faces are only subdivided along the shortest 2 sides. I see you can't have a 1024 vertice cube with subdivide. How would a cube turn out if you added or deleted vertices to arrive at 1024? Depends on how you did it. If you worked at it, you could make a 'perfect' cube, with around 170 verts per face. If you worked at it (Again) you could even manage it in a manner that it could unwrap to bake a sculpty, I suppose. Except, you couldn't use a default cube (I don't think. I could be wrong here, but I believe this is true), because those are actually 6 surfaces, while a sculpt must be a single surface. So, essentially, you'd be editing a plane or similar to create a cube. Gaia's tutes have one that is making a geometrically perfect cube, and that's always useful. I have my own cube mesh I use for any furniture I'm doing, personally, though I used the 'bad' version of the method Gaia's tutes show. I never pay any attention to lower LODs, though I should, because I have the LOD changes in SL turned off. _____________________
Tutorials for Sculpties using Blender!
Http://www.youtube.com/user/BlenderSL |
|
Gaia Clary
mesh weaver
Join date: 30 May 2007
Posts: 884
|
03-18-2009 04:45
I have my own cube mesh I use for any furniture I'm doing, personally, though I used the 'bad' version of the method Gaia's tutes show. I never pay any attention to lower LODs, though I should, because I have the LOD changes in SL turned off. But you are not selling your furniture aren't you ? Recently i learned that it is a very wise idea to sometimes switch the SL-viewer back to its minimal settings just to learn, how badly distorted my work can get when people look at it with a less capable computer. I wouldn't want to sell something, that only looks good with an ultra high performance system... BTW i also learned that SL can be very fast on my computer when i turn of all the advanced features... whoooot ...well, erm... i must admit, that i got the settings back to max now. It just "feels" better |
|
Keira Wells
Blender Sculptor
Join date: 16 Mar 2008
Posts: 2,371
|
03-18-2009 11:00
ieeeekkkk But you are not selling your furniture aren't you ? Recently i learned that it is a very wise idea to sometimes switch the SL-viewer back to its minimal settings just to learn, how badly distorted my work can get when people look at it with a less capable computer. I wouldn't want to sell something, that only looks good with an ultra high performance system... BTW i also learned that SL can be very fast on my computer when i turn of all the advanced features... whoooot ...well, erm... i must admit, that i got the settings back to max now. It just "feels" better Nope, I don't sell anything... if anyone ever gets it, it's a gift, but if I ever did intend to sell things, I'd make sure they look relatively good in all LOD levels. At the moment I'm using a crappy laptop, so everything looks horrible XD _____________________
Tutorials for Sculpties using Blender!
Http://www.youtube.com/user/BlenderSL |
|
Layla Honi
Registered User
Join date: 1 Nov 2007
Posts: 171
|
03-19-2009 15:01
Gaia, Thanks again for the information
I recall the video about perfect cube, but I want quads on all sides or nearly all quads, to be able to properly scuplt all sides. This is the reason for trying to make a cube like this. After all, SL already has a perfect cube. You can't do it with a default cube, because you cannot end up with a total of an even 1024 vertices. I suppose you can wrap a plane to make a cube that has nearly all quad faces on all sides, but the sculpted plane mesh does not subdivide into a nice square plane. It has rounded corners and mis-aligned edges. It needs cleaning up. It's easiest to start with a default plane and subdivide it 5 times to arrive at 1024. This is what I did. I folded the sides to make an open end box...or square tube..(you could square a cylinder here too), then I selected edge rings on both open ends and scaled them .0 and each consecutive edge ring scaled .2 .3 .4 .5 .6 .7 .8 .9, to make even spacing to close the ends. Then I scale the ends to y axis to 0, then scaled the cube to make it square. ......So now when I went to bake the sculpt I am getting an error that says "Python error that says check the console". I don't know what this means. I've double checked that I removed the doubles for the seamed plane ends on the corner of the cube and it says I have 1024 mesh. I know this should be working, but it's not. Ok now for another problem was I'm having ealier. I thought I would play with both default and sculpted planes to see what I could do to make a cube. I created a scuplted plane and cleaned it up a little, then created a default plane and subdivided it 5 times to get my 1024 mesh. I noticed if I changed the default plane to edit or object mode or vertice, edge or face mode, it was changing the sculpted plane too. I tried to deselect them and select only the default plane, but the scuplted plane is also selecting and vice versa. I can't seem to find out why both planes are being selected while only selecting one. I am selecting them in object mode, then going into edit mode as I alway do. I deleted both planes before I started on the final mesh I made. |