Ok, so I can't stand the horrible rut left along the seam of my extruded surfaces once brought in world.
I've come across a solution on my own. Basically, I open the sculpt map in PhotoShop and manually copy and past the pixels going along one side of the "seam" to the other, if that makes sense. This forces the verticies along the seam of the resulting sculpted prim to share the same points in 3d space, thus getting rid of the "gap" in the seam.
I usually find myself working within scenes consisting of many multiple sculpted prims, and while I COULD manually fix all of my sculpt maps, this process is hardly efficient.
I like to think of myself as being fairly proficient w/ Maya, but I know next to nothing about MEL, aside from copying and pasting code snippets in the script editor.
My idea is to add an option to the Advanced Sculptie Exporter that would force the pixels associated with both sides of the prim's seam in the resulting sculpt map to be identical.
Any programers up to the task of helping the rest of us out?
Are there any other solutions to this problem that I'm not aware of?
I'll be pulling my MEL text book off the shelf and dusting it off in the mean time.
Thanks,
Reed
Welcome to the Second Life Forums Archive
These forums are CLOSED. Please visit the new forums HERE
Update to Qarl's Advanced Sculptie Exporter for Maya |
|
|
Reed Steamroller
Registered User
Join date: 19 Mar 2008
Posts: 13
|
03-08-2009 11:17
|
|
Chosen Few
Alpha Channel Slave
Join date: 16 Jan 2004
Posts: 7,496
|
03-08-2009 11:23
What "rut" are you talking about, and why are you using extrusions for sculpties? Please explain. Thanks.
In any case, if adding an option to the MEL script turns out to be a problem, it's pretty easy just to set up an action in Photoshop to copy one column of pixels from one edge of the canvas to the other: 1. In the Actions panel (or Actions palette, if you're using an older version of PS), create a new action. Name it whatever you want, and hit OK. By default, it should already be recording, but if it's not, press Record now, at the bottom of the palette. 2. Grab the Single Column Marquee, and use it to select one column of pixels on one edge of the canvas. Copy & paste the column to the opposite edge. 3. Save the file. 4. Press Stop in the Actions panel/palette. Now that your action has been created, you can run it on a batch of as many images as you want, at any time. Here's how: 1. File -> Auotmate -> Batch... 2. In the Batch dialog, select your action at the top, in the Play section. 3. In the Source section, you can select a folder full of images, any currently opened images, etc. Choose whatever you want. 4. In the Destination section, you can choose a new folder to save the processed images, or you can set it simply to save and close the images where they already are. You can also override the Save command in the action itself, to give it new rules for naming, file extensions, etc., if you want. When you've got it all set up how you want, hit OK, and all your designated images will be processed. This is obviously an extra step in your work flow, as opposed to building the option you want right into the MEL script, but it's an easy solution that you can implement right now, with almost no effort. That's how I'd do it if it were me. _____________________
.
Land now available for rent in Indigo. Low rates. Quiet, low-lag mainland sim with good neighbors. IM me in-world if you're interested. |
|
Reed Steamroller
Registered User
Join date: 19 Mar 2008
Posts: 13
|
03-08-2009 11:36
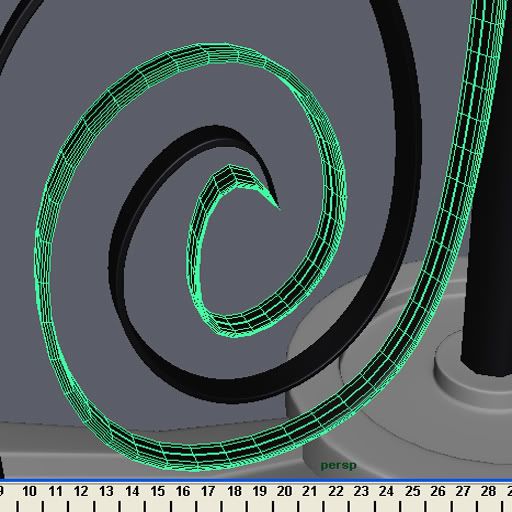
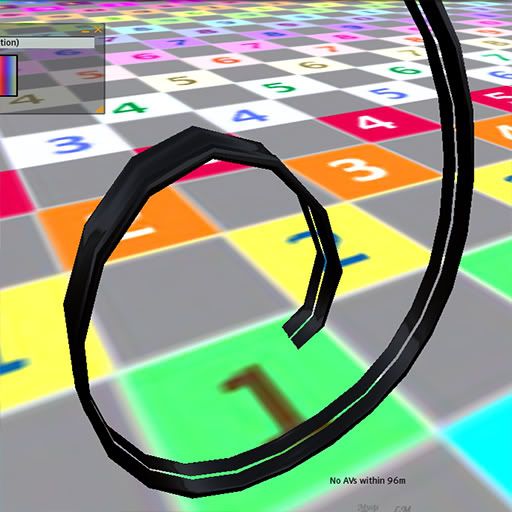
Here is the shape in Maya:
http://i49.photobucket.com/albums/f299/sealfoss/ShapeInMaya.jpg Here is the shape, with "rut" in world. http://i49.photobucket.com/albums/f299/sealfoss/ShapeInWorld.jpg Man, you were fast getting back to me, thanks for you help. -Reed |
|
Chosen Few
Alpha Channel Slave
Join date: 16 Jan 2004
Posts: 7,496
|
03-08-2009 11:53
Looks like you just need to rotate your sculpt map 90 degrees. Make sure Correct Orientation is checked in the exporter dialog. That's what it's for.
Also, maybe it's nothing, but the in-world version of the model look like it might be wavier than the Maya version. If it is, that's usually the result of forgetting to to remove history and transformations from the surface before export. Make sure to do that every time. If neither of those precautions prevents the problem, then my next guess would be something in your extrusion technique is interfering with the sculpty export process. So you know, you could make those same sorts of shapes very easily without ever extruding at all. In fact, it would likely be much faster if you didn't. A few (capless) cylinders or elongated spheres and some bend deformers would do the job nicely in a matter of minutes or seconds. P.S. It looks like you were replying while I was editing my last post. Read through it again for instructions on how to automate the Photoshop process you described, so you don't have to do it manually ever again. _____________________
.
Land now available for rent in Indigo. Low rates. Quiet, low-lag mainland sim with good neighbors. IM me in-world if you're interested. |
|
Reed Steamroller
Registered User
Join date: 19 Mar 2008
Posts: 13
|
03-08-2009 12:04
I tried rotating the map 90 degrees, no dice.
I make it a point every time to delete history and reset transformations on everything before I try to bring it in world. This is what I'm working on, I can't see doing the same thing w/ cylinders. I guess I could, but really, extruding the surfaces and manually fixing the sculpt maps (and/or geometry) really seems like the easiest route, when compared to rebuilding the same thing w/ spheres and deformers. http://s49.photobucket.com/albums/f299/sealfoss/?action=view¤t=Stairs3copy.jpg Maybe, if this particular work flow (extruded surfaces) does turn into a brick wall, I'll try that next time. Just seems like a bit of a waste :-\ BTW, Thanks again for your help! |
|
Chosen Few
Alpha Channel Slave
Join date: 16 Jan 2004
Posts: 7,496
|
03-08-2009 12:27
You've got a nice looking source model there. But I would strongly caution you against using that many polygons in SL. Performance for almost everyone will likely slow to a crawl.
Going by just the number of individual sculpts I can see in the picture for the ironwork alone, you're expending well over 100,000 polygons on all those little pieces. And I'm guessing the picture enveloped less than half of them, which means the actual count is more like 2-300,000, or possibly more. Get ready for some serious lag in that build. If I were building a scene like that, I'd sculpt the railing as just a few large pieces, and I'd use texturing to create the ironwork. Do a good job with the textures, and you can pretty easily create the illusion of depth. There's no need for 90% of the pieces you've got. In any case, if you were to increase your experience level with deformers, I'm sure you'd see that you could create those same pieces just as quickly, if not MORE quickly, than with your extrusions. It's just a question of learning a few techniques, and getting comfortable with employing them. It takes a bit of "backwards thinking" from the approach you're used to using is all. Scultpies can be a little weird that way. _____________________
.
Land now available for rent in Indigo. Low rates. Quiet, low-lag mainland sim with good neighbors. IM me in-world if you're interested. |
|
Reed Steamroller
Registered User
Join date: 19 Mar 2008
Posts: 13
|
03-08-2009 12:33
LOL, yeah, its a ton of prims too. What the client asked for, looks great on paper though.
I'll have to keep that in mind, got any suggestions on what techniques I should be using, other than the bend shape deformer? I really couldn't come up w/ anything quite as handy as extruded surfaces for creating shapes that need to be as precise as these are on all three axis. |
|
Chosen Few
Alpha Channel Slave
Join date: 16 Jan 2004
Posts: 7,496
|
03-08-2009 12:54
If I were to do it, I'd probably use a handful of bend deformers to create the initial spiral shape. Then I'd delete history to lock the shape in (the existing deformers would be removed). The shape would now be correct in two dimensions. After that, I'd use another bend deformer, rotated 90 degrees, or possibly a lattice deformer, to take care of the third dimension, so the piece would match the lateral curvature of the staircase. Delete history one more time, and it's good to go.
If any tweaks are necessary throughout the process, individual hulls can always be moved around by hand. But if you're careful with the deformers throughout, it's unlikely that that will be needed. It's not necessarily the most intuitive way to work if you're not used to it, of course. As I said, the thought process is sort of reversed, if you're used to the kind of "drawing more than sculpting" mentality that goes with extruding along control curves. But once you get your head around it, it's actually less complicated in terms of manual labor, even if not in terms of natural intuition. But either way, the important thing is it works perfectly for sculpties. _____________________
.
Land now available for rent in Indigo. Low rates. Quiet, low-lag mainland sim with good neighbors. IM me in-world if you're interested. |
|
Leknaat Timeless
Registered User
Join date: 4 Jan 2009
Posts: 6
|
03-22-2009 18:26
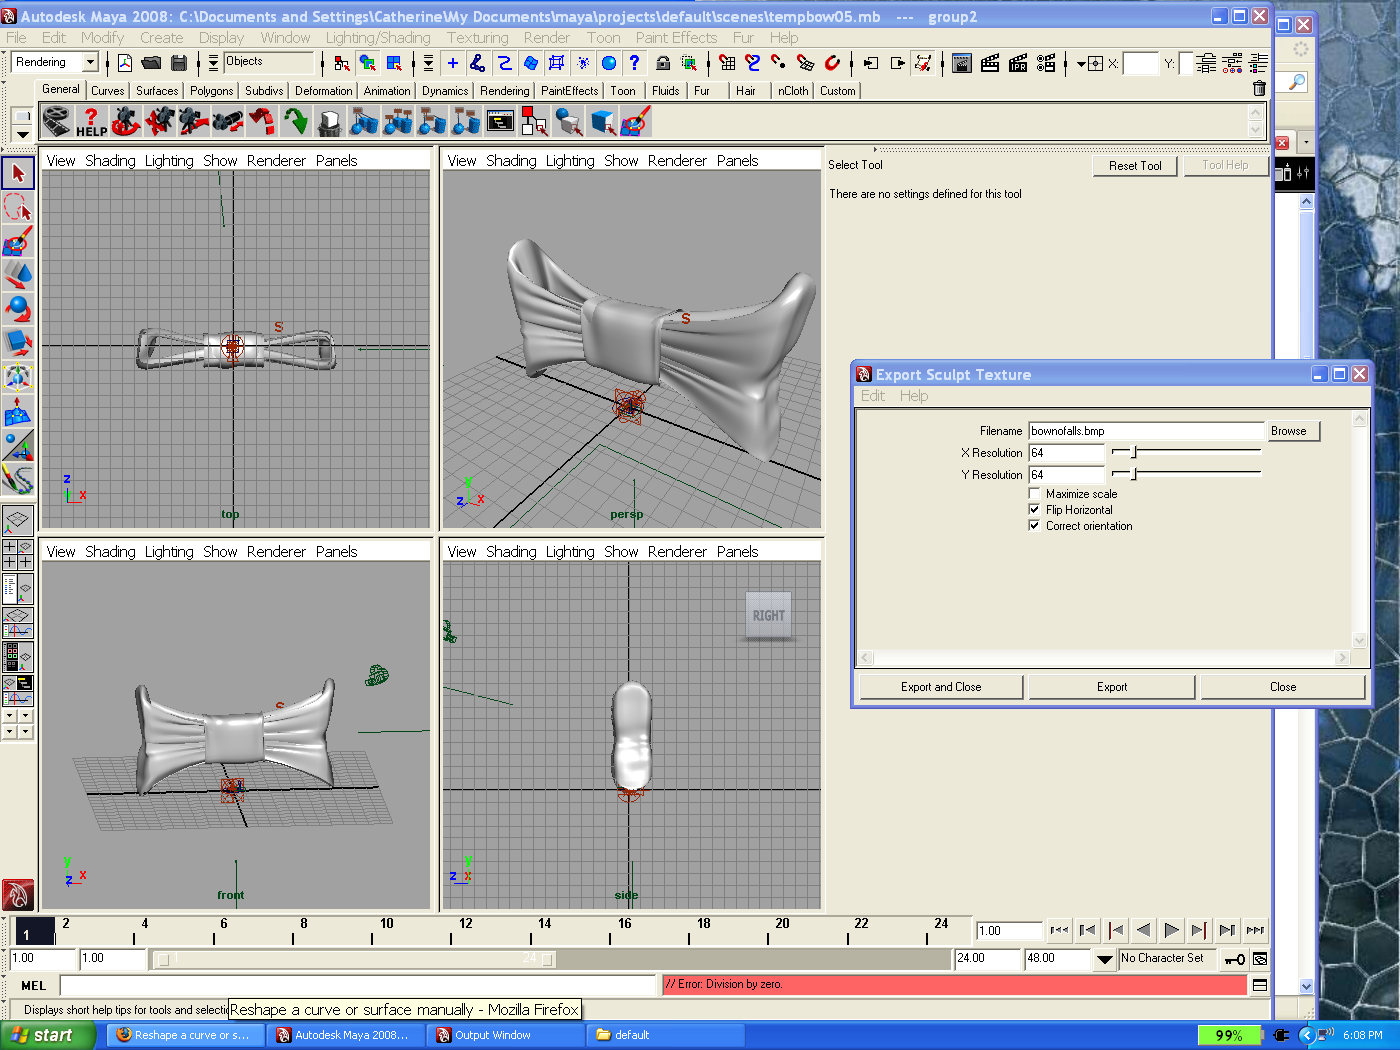
Help! I tried out the export script on a Maya sphere primitive, and it worked just fine. So I figured I was all set.
Then I went and created this (it's my first 3D model outside of SL itself, so be kind...) and when I tried to export it, I got a divide by zero error! Like this: http://i227.photobucket.com/albums/dd123/leknaat_star/wips/bowrender.png ...what am I missing? Why can't I export it? Thanks, |
|
Chosen Few
Alpha Channel Slave
Join date: 16 Jan 2004
Posts: 7,496
|
03-22-2009 21:23
I notice a couple of issues right away in your screenshot.
One is you've got a group in the scene. The title bar of the Maya window indicates you've got a node named group2 selected. The sculpty exporter doesn't understand heirarchy. Groupings and parentings will confuse it and cause it to malfunction. You must ungroup/unparent all surfaces you wish to export. Note, if you applied transforms to a group, the objects within the group may not have been individually transformed. Ungrouping could yield undesirable results in terms of object sizes, rotations, etc. Be prepared to do cleanup work, and remember to delete history and to freeze & reset transformations often. Another issue is that letter S that's floating in the scene. Is that a soft modification deformer? Prior to sculpt map export, deformers must be baked in and removed by deleting history from the surfaces they're affecting. Otherwise the sculpt maps will come out incorrect. History and transformation info MUST removed from all objects that are to be exported as sculpties, no exceptions. Those issues are probably not what's causing the division by zero error, though. That's a new one on me. My guess is it might have something to so with whatever that strange looking object is that you've got at the center of the grid. What is that thing, anyway? It's a bit hard to recognize in the picture. _____________________
.
Land now available for rent in Indigo. Low rates. Quiet, low-lag mainland sim with good neighbors. IM me in-world if you're interested. |
|
Gaia Clary
mesh weaver

Join date: 30 May 2007
Posts: 884
|
03-23-2009 01:01
Then I went and created this (it's my first 3D model outside of SL itself, so be kind...) and when I tried to export it, I got a divide by zero error! Like this: http://i227.photobucket.com/albums/dd123/leknaat_star/wips/bowrender.png ...what am I missing? Why can't I export it? this one is made in blender as a rough idea:  |
|
Chosen Few
Alpha Channel Slave
Join date: 16 Jan 2004
Posts: 7,496
|
03-23-2009 06:30
Good catch, Gaia. From looking at it, I thought it was three objects, not just one. If it is indeed just one, then the topology is by far the biggest problem. The stuff I listed is small change by comparison.
_____________________
.
Land now available for rent in Indigo. Low rates. Quiet, low-lag mainland sim with good neighbors. IM me in-world if you're interested. |
|
Leknaat Timeless
Registered User
Join date: 4 Jan 2009
Posts: 6
|
03-23-2009 20:59
Ok, thanks... (Since I've never tried Maya before, I don't know what the S is, or how I grouped these things or how to ungroup them, or how to remove history and transformation info... There are so many complications that keep happening in the program that I don't know how to react to.)
I tried importing them as two separate objects, but the longer (inner) part of the bow looked messed up in-world. Is this because I created it by rotating a curve instead of using a Maya primitive? Or is there some other reason for this to happen? |
|
Chosen Few
Alpha Channel Slave
Join date: 16 Jan 2004
Posts: 7,496
|
03-23-2009 22:23
Since I've never tried Maya before, I don't know what the S is, or how I grouped these things or how to ungroup them, or how to remove history and transformation info... There are so many complications that keep happening in the program that I don't know how to react to. That's your problem right there. You're trying to do things you're not yet ready for. So of course you're struggling. As I've said probably at least a hundred times on this forum, if you try to put the cart before the horse, all you'll experience will be frustration after frustration. What you've been through so far is a classic case of what happens whenever anyone tries to go out of order with the learning process. It just doesn't work that way. No one should ever approach a platform like Maya with "I just want to make ______" in mind, whether the blank be sculpties or anything else. The only way to be successful with it is to learn the platform itself first, without any preconceived notions of what you think you might want to do with it. Once you've done that, you'll find that you already know nearly everything you need to do in order to make any "_______" there is. I know this probably isn't what you want to hear, but the only solution to your current problem is to take a step back, and forget all about sculpties for the time being. Spend the next few weeks learning Maya itself. Go through all the tutorials in the Using Maya section of Help file, in order. Don't skip any, don't go out of order, and don't even try to think about whether any particular lesson might or might not be relevant to sculpties. The fact is it's ALL relevant, but you don't yet know enough to be able to recognize that. Trust me, 99% of what right now seem like these huge giant stumbling blocks you've been tripping over will feel like they've been magically removed after you've got a solid handle on how Maya works. Then you'll discover new questions you couldn't possibly even think of now. Once you've been through the tutorials, by all means come on back and ask whatever questions you still have. But for now, I'm sorry to have to say you just don't have the requisite knowledge yet for us to have any meaningful conversation about making sculpties. Please don't take that the wrong way. It's the only honest answer I've got for anyone at your current experience level. It's meant to encourage you to learn the program the right way, not to discourage you at all. I hope you'll take it to heart. Good luck. I look forward to talking again once you've got some more meaningful experience under your belt. _____________________
.
Land now available for rent in Indigo. Low rates. Quiet, low-lag mainland sim with good neighbors. IM me in-world if you're interested. |
|
Leknaat Timeless
Registered User
Join date: 4 Jan 2009
Posts: 6
|
03-24-2009 18:20
Well, I... don't really know how to learn a program without just going into it hands-on. I mean, how else would you learn? This isn't a case of me going "I just want to make xyz and dispense with the rest", but rather a case of me going "er, how can I learn if I don't just make something?"
Never mind; you seem uninterested in helping a beginner understand what's going on. Fine then. Forget it. |
|
Chosen Few
Alpha Channel Slave
Join date: 16 Jan 2004
Posts: 7,496
|
03-24-2009 18:36
Well, I... don't really know how to learn a program without just going into it hands-on. I mean, how else would you learn? This isn't a case of me going "I just want to make xyz and dispense with the rest", but rather a case of me going "er, how can I learn if I don't just make something?" I gave you the instructions for the best way to learn the program. I'll say it one more time, since you apparently didn't get it the first time around. Open up the Help file, and go through the tutorials in the Using Maya section. The tutorials will walk you through making all kinds of things. This is how every Maya student starts out. Why you're seemingly so opposed to even trying it the same way as everyone else, I can't imagine. Never mind; you seem uninterested in helping a beginner understand what's going on. Fine then. Forget it. Don't be so quick to give up. It's not that anyone's uninterested in helping you. Certainly, I'm interested, which is why I took the time to reply to you not just once, but three times already. It's just that this forum is not a proper venue for teaching the beginning basics. Even if anyone had the time to try to walk you through learning Maya from scratch here, which it's unlikely anyone would, it wouldn't be in your best interest to try. That's simply not a function that a forum like this can well provide. It's just not set up for that sort of thing. The topics we discuss here are extremely narrow in scope. The system works well for writing something like "Here's how to make a sculpted teapot in 10 easy steps", as long as the person reading the post already has some knowledge of how to use the software in question. But it's next to impossible to write much of anything here for the complete novice. There's just too much information to cover, and it's unlikely the information could even be properly conveyed in this rudimentary text-only format that we have to deal with here. One more time, the way to learn Maya is to use the Help file. That's why it's there. A good portion of the $2000 you spent on the program was for the documentation. Maya has the best included help of any program on this planet, hands down. You paid for it. Use it. If by some strange chance, that's not good enough for you, then buy some books or some training DVD's, or sign up at a local college to take a class. Once you've done the proper prerequisite learning, then you'll be able to "understand what's going on" when we discuss sculpties. Until you've done it, you'll continue to be lost. I'm sorry if that's not the answer you wanted, but it's the only truthful one there is. Don't shoot the messenger. _____________________
.
Land now available for rent in Indigo. Low rates. Quiet, low-lag mainland sim with good neighbors. IM me in-world if you're interested. |