So please help?

These forums are CLOSED. Please visit the new forums HERE
Photoshop CS4 and Maya help |
|
|
Echo Irvine
Dumb American

Join date: 13 Sep 2006
Posts: 35
|
01-27-2009 19:16
Hi, I just got Photoshop cs4 and was awed at the new features in Photoshop with 3D models. I made a shoe in Maya out of polygons and exported it as a .obj file because photoshop seems to accept that and also I was familiar with the extension type. And as most know, .obj only accepts polygons. Anyways, I opened the shoe .obj file on Photoshop and I painted and tweaked it texture-wise to my desire and saved it. I later opened the shoe .obj file back up on Maya (I needed the sculptie texture and the overall baked texture with the Maya sculptie exporter) and converted that from polygon>subdiv and subdiv>NURBS because that's the only way I could convert a Polygon to NURBS. The one polygon shoe somehow divided to 6 NURBS pieces and the overall baked texture was unlinked to the 6 objects leaving them to be that default lambert texture. I tried stitching the 6 NURBS pieces and I think someone on this forum suggested "Transfer Polygon Attributes" in a previous thread but neither of those trials worked.
So please help? |
|
Chosen Few
Alpha Channel Slave
Join date: 16 Jan 2004
Posts: 7,496
|
01-28-2009 06:00
There are two separate questions, if I'm reading you right. One is why didn't the texture you created in PS show up on the model in Maya. The other is why did your model split into pieces when you converted it from polygons to NURBS. Is that correct?
Let's take the texture first. But before I begin, let's clear up some terminology. You said "baked "texture". Unless I misread you, you didn't actually do any baking. You hand-painted a texture in Photoshop. Had you actually baked a texture, you would have done it with a rendering engine like Mental Ray or Turtle. Painted imagery certainly can be a component of a bake, but painting is not baking in and of itself. In any case, let's talk about why your PS texture isn't showing in Maya. The reason is pretty simple. You never told it to. All Maya was ever told is that there's a material on the surface, and that that material has default settings, including the default gray coloring. Until you tell it different, that's all it knows. The texture you created in Photoshop is just a component of a PSD file. To create it, you imported 3D geometry from an OBJ file into a 3D layer in said PSD. Then you created the texture imagery as a sub-component of the 3D layer, in PSB format. And then since you did nothing else with it, that's right where it stayed. Maya doesn't know or care what you did in Photoshop. If you want to apply the texture in Maya, the first thing you need to do is open it in PS, and export it to a format Maya can understand. I recommend TGA, but you can use any common 2D format you're comfortable with. Then, in Maya, assign the image to the color channel of a material, and apply the material to your model. To see the texture on the model in any Maya viewer panel, you'll need to have Hardware Texturing enabled in that panel. For best viewing, if you have a powerful graphics card, I'd recommend using High Quality Rendering in the panel as well, instead of Default Rendering. Note, the panel rendering settings are for real-time viewing only, and do not affect output rendering (Mental Ray, Turtle, etc.) in any way. As for why the model split into pieces (patches) when you converted it to NURBS, that's very common. When you convert anything to NURBS, Maya will do the best it can to find rectangular sections in the geometry, because NURBS, by definition, are rectangular. If the whole model can be described by a single rectangle, great. But if it can't, which is usually the case, it will end up in patches. Without knowing how you made the original poly model, I can't tell you what you could/should have done differently to get a clean conversion. If the original was an arbitrary mesh, then it's probably not possible. If it was built to be sculpty-compliant as a single rectangle (a deformed sphere, capless cylinder, torus, or plane), then chances are you did something wrong in the way you converted it to subdivs before finally converting it to NURBS. For the future, here's a better strategy: 1. Create your source model using NURBS, from start to finish. 2. If you want to be able to do texture paining in PS, Convert the NURBS model to polygons, with the type set to Quads, and the tessellation method to Standard Fit (you can use other methods, but Standard Fit will be easiest). Do not delete the original NURBS model. The poly version will be a copy, just so you've got something for PS to work with, not a replacement. Export the poly version of the model to OBJ, texture it in Photoshop, and then apply the texture to the NURBS model in Maya. Note, you may need to do some cleanup work on the 2D canvas in PS, along the top and bottom rows of faces, as those areas will be saw-toothed, if your source model was spherical. If you want to avoid that, start from a NURBS cylinder instead of a sphere. 3. If desired, do any additional baking in Maya, to finish the texture. 4. Export a sculpt map from the NURBS model, upload the sculpt map and the diffuse map (texture) to SL, and apply to a sculpty. I think that about covers everything you asked about. If I missed anything, let me know. Happy sculpting. _____________________
.
Land now available for rent in Indigo. Low rates. Quiet, low-lag mainland sim with good neighbors. IM me in-world if you're interested. |
|
Nyx Alsop
Registered User
Join date: 14 Dec 2008
Posts: 252
|
01-28-2009 08:27
You cannot really convert Polys to NURBS, doing it the way you did will always make it go crazy.
|
|
Chosen Few
Alpha Channel Slave
Join date: 16 Jan 2004
Posts: 7,496
|
01-28-2009 09:06
You cannot really convert Polys to NURBS, doing it the way you did will always make it go crazy. You can, as long as the geometry is clean enough. That's a big IF, though, of course. In most cases, it won't turn out well, but if you plan it carefully from the start, you can make it work. I'd rephrase your statement to say it will ALMOST always make it go crazy. _____________________
.
Land now available for rent in Indigo. Low rates. Quiet, low-lag mainland sim with good neighbors. IM me in-world if you're interested. |
|
Echo Irvine
Dumb American
Join date: 13 Sep 2006
Posts: 35
|
01-28-2009 13:19
Let's take the texture first. But before I begin, let's clear up some terminology. You said "baked "texture". Unless I misread you, you didn't actually do any baking. You hand-painted a texture in Photoshop. Had you actually baked a texture, you would have done it with a rendering engine like Mental Ray or Turtle. Painted imagery certainly can be a component of a bake, but painting is not baking in and of itself. Yeah I forgot to include that after I finished tweaking the texture of my shoe poly object in photoshop I opened the poly object back up on maya and texture baked the texture of the poly object using mental ray (ambient occlusion) and I wanted to retrieve that texture after I converted the poly object to NURBS with the Maya Sculptie Exporter but unfortunately that texture wasn't there when the poly object was converted to the 6 NURBS objects. __________________________________________________________ And also thanks for the advice....I will start out with NURBS next time.... |
|
Aaroniro Alter
Registered User
Join date: 9 Feb 2009
Posts: 7
|
02-09-2009 09:59
1. Create your source model using NURBS, from start to finish. 2. If you want to be able to do texture paining in PS, Convert the NURBS model to polygons, with the type set to Quads, and the tessellation method to Standard Fit (you can use other methods, but Standard Fit will be easiest). Do not delete the original NURBS model. The poly version will be a copy, just so you've got something for PS to work with, not a replacement. Export the poly version of the model to OBJ, texture it in Photoshop, and then apply the texture to the NURBS model in Maya. Note, you may need to do some cleanup work on the 2D canvas in PS, along the top and bottom rows of faces, as those areas will be saw-toothed, if your source model was spherical. If you want to avoid that, start from a NURBS cylinder instead of a sphere. 3. If desired, do any additional baking in Maya, to finish the texture. 4. Export a sculpt map from the NURBS model, upload the sculpt map and the diffuse map (texture) to SL, and apply to a sculpty. Hello thanks Chosen for those step ") . .i have photoshop cs2 but i can't open .OBJ file ,so is there a way to unfold a poly/nurbs for have the form for the texture? |
|
Chosen Few
Alpha Channel Slave
Join date: 16 Jan 2004
Posts: 7,496
|
02-09-2009 11:06
Hello thanks Echo for those step .You quoted me, but thanked Echo. Hehe, I guess that works, since I only posted the steps in response to Echo's question. So Echo would be ultimately responsible for their presence in this thread. That makes sense, right? i have photoshop cs2 but i can't open .OBJ file PS CS2 had no 3D capabilities. So no, you can't import OBJ or any other 3D file formats into it. That capability was added with CS3, and is much more fully implemented in CS4. so is there a way to unfold a poly/nurbs for have the form for the texture? If you're talking sculpties, there's really no need to do that. All sculpties have a perfect UV space. Were you to look at the unwrapped UV map, all you'd see would be a uniform grid. You'd be better off going the other direction. Apply a test pattern to the sculpty itself, so you can see what part of the canvas is where on the model. Feel free to use this one, if you want: /109/45/214824/1.html . Use it the same you use the clothing/skin templates on the avatar. Notice what ends up where, and then paint over the flat canvas to match. But to answer your question as asked, here's how to export a UV map from Maya: 1. Select the desired polygonal object. 2. Open the UV Texture Editor. (Window -> UV Texture Editor) 3. In the UV Texture Editor window, click File -> UV Snapshot. In the dialog that pops up, the options are pretty self-explanatory. Choose a file name, image format, etc., and export. For NURBS surfaces, you can't export a UV map, because NURBS don't actually have UV's. The isoparms themselves determine texture placement for normal texture mapping. To change how a normally mapped texture is placed on the surface, you can adjust settings in you the 2D texture placement node in the shader network. The other option is to use projection mapping, in which case the placement will be determined by the type of projection and the settings in the projection node. You cannot alter the placement of individual texture pixels on NURBS surfaces like you can with polygonal surfaces. NURBS surfaces are always rectangular. _____________________
.
Land now available for rent in Indigo. Low rates. Quiet, low-lag mainland sim with good neighbors. IM me in-world if you're interested. |
|
Aaroniro Alter
Registered User
Join date: 9 Feb 2009
Posts: 7
|
02-09-2009 12:40
You quoted me, but thanked Echo. Hehe, I guess that works, since I only posted the steps in response to Echo's question. So Echo would be ultimately responsible for their presence in this thread. That makes sense, right? ooops lol i edited it i made a lower pant with nurbs and i want texture it with some effect. so i followed your steps - i converted the lower pant NURBS to Polygone. -i selected the NURBS and open the uv texture editor. -uv snapshot ,256*256 and saved it as bmp but the UV looks strange i don't understand what i can do now? 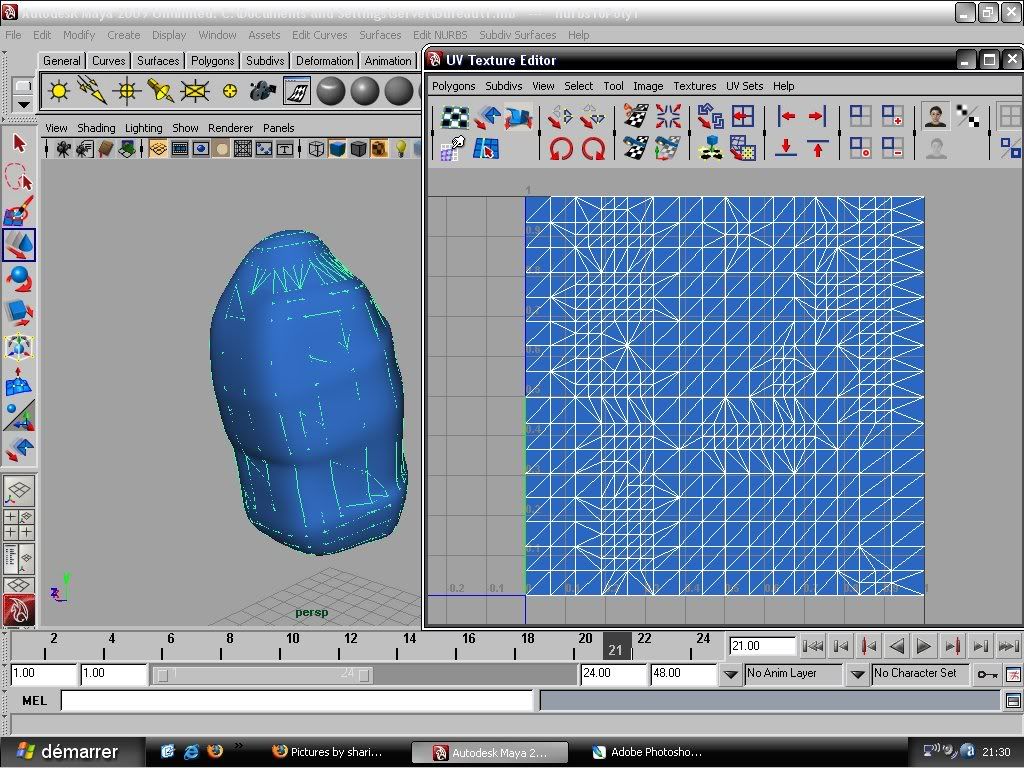 |
|
Chosen Few
Alpha Channel Slave
Join date: 16 Jan 2004
Posts: 7,496
|
02-09-2009 17:31
i followed your steps No you didn't. I never said to do any of that. I'm not sure why you converted to polygons. The mapping on the NURBS surface was already perfectly uniform, and perfectly rectangular. When you converted it, you changed that. It seems that in your desire for "steps", you missed my overall point. What I was trying to impress on you was that there's absolutely zero reason to export a UV map from a sculpty, ever. You shouldn't be wasting your time trying. The only reason ever to need a map is when a UV layout is NOT uniform, not perfect. But as I pointed out earlier, every sculpty's UV space is a perfectly uniform grid. Therefore, having map serves no purpose whatsoever. The map won't tell you anything you don't already know. Just apply a test pattern to the surface, so you can see what part of the canvas wraps around what part of the model, and then use that same pattern as your template to paint on. That's all you need to do. _____________________
.
Land now available for rent in Indigo. Low rates. Quiet, low-lag mainland sim with good neighbors. IM me in-world if you're interested. |
|
Aaroniro Alter
Registered User
Join date: 9 Feb 2009
Posts: 7
|
02-10-2009 09:14
Thanks for all your precious help Chosen
No you didn't. I never said to do any of that. I'm not sure why you converted to polygons. The mapping on the NURBS surface was already perfectly uniform, and perfectly rectangular. When you converted it, you changed that. sorry my english is not very good but i understand now . Just apply a test pattern to the surface, so you can see what part of the canvas wraps around what part of the model, and then use that same pattern as your template to paint on. That's all you need to do. i saved the test pantern and i apply it on NURBS (i hope i'm right for this) 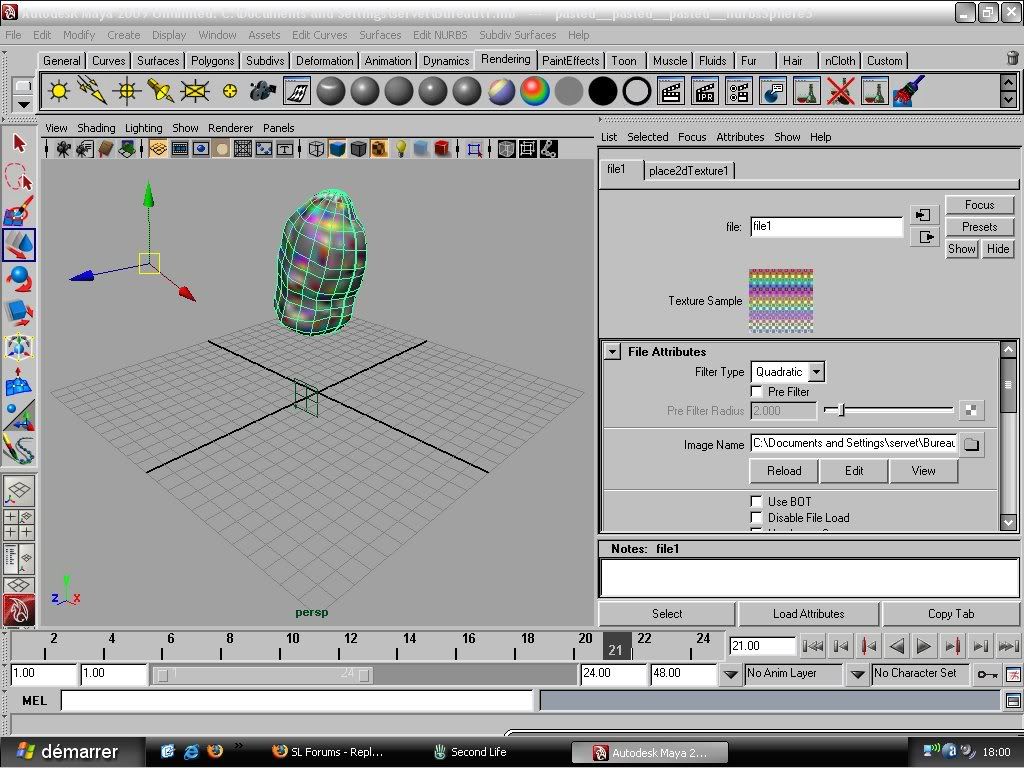 i guess i must use render view for see it better . How can i finally paint please? |
|
Chosen Few
Alpha Channel Slave
Join date: 16 Jan 2004
Posts: 7,496
|
02-10-2009 10:11
You should be able to see the the texture perfectly clearly in real time. Your objects should look like this:
 To clear it up, here are a few things to try: 1. Make sure your shader network is set up properly. It should look like this, with the image file's output connected directly to the material's color channel input: ]  2. Make sure the material's hardware texture display setting is at the highest resolution. Select the material, and then open the attribute editor (crtl-a). Click to expland the Hardware Texturing section. Experiment with the various options, to learn what they do. 3. You can also change your hardware texturing options globally by clicking the options box next to Hardware Texturing in the viewer pane's Shading menu. Again, play with the options to learn what they do. 4. Make sure your video card drivers are up to date. If none of that solves the problem, then my next guess would be perhaps your computer is to underpowered to run Maya properly. What are your system specs? As for the question of how to paint, the answer is simply load the test pattern in Photoshop, and use it as a template. In Maya you can see exactly where every part of the canvas ends up on the model (assuming you solve your display problem). If you want a certain detail of your texture to be in any certain spot, simply paint it in that same spot on the template. It's exactly the same way clothing and skins are made for the avatar. Another option is to paint directly on the model right inside Maya. I wouldn't recommend it, though. Maya's texture painting tools are nowhere near as powerful as what you're used to in Photoshop. _____________________
.
Land now available for rent in Indigo. Low rates. Quiet, low-lag mainland sim with good neighbors. IM me in-world if you're interested. |
|
Aaroniro Alter
Registered User
Join date: 9 Feb 2009
Posts: 7
|
02-10-2009 10:21
[QUOTE What are your system specs?[/QUOTE]
-Windows Xp Pro SP3 -AMD Athlon 64(x2)Dual Core Processor 5000+, 2.59 GHZ -2Go RAM -Nvidea 8800GT 256 Mo i update the driver i think it's the cause. |
|
Aaroniro Alter
Registered User
Join date: 9 Feb 2009
Posts: 7
|
02-10-2009 15:37
it was not the driver of my graphik card lol i updated it for nothing i searched what was the problem i finnaly found it.
in the "creat render node" i applyed the texture "as projection" but when i choose "normal" it's ok |
|
Chosen Few
Alpha Channel Slave
Join date: 16 Jan 2004
Posts: 7,496
|
02-10-2009 16:25
I'm glad you got it figured out.
So you know, that's exactly what I thought was going on, which is why "make sure your shader network is set up properly" was my first suggestion. Sorry if I didn't make it clear enough when I said your shader network should look like this: As I said, the file node's output should be connected directly to the material's color channel input, as is clearly shown in the first picture. That's what a "normal" file texture means. With a projection in place, you'd see this, which is completely different:  When you create a projection, the file node's output is connected to the projection node's .image input. The projection node controls how the image interacts with the surface, and a place3dTextrure node is employed to control the placement variables. It sounds like you're not used to using the Hypershade. I'd encourage you to make a project of learning what it does and how to use it. Aside from the basic modeling tools, the Hypershade is arguably the single most important tool Maya has in it. As I recently said in another post on a similar subject, the Hypershade is easily worth the price of Maya all by itself. You pad for it; use it. Have you been you using the Attribute Editor to create your shaders this far? If so, I'd highly recommend you stop doing that. It's not really what the AE is for. Use the Hypershade to create your shader networks graphically, and then use the AE just to edit each node's attributes after the fact. _____________________
.
Land now available for rent in Indigo. Low rates. Quiet, low-lag mainland sim with good neighbors. IM me in-world if you're interested. |
|
Aaroniro Alter
Registered User
Join date: 9 Feb 2009
Posts: 7
|
02-13-2009 08:50
Hello Chosen i started to texture with photoshop
thanks for you help .Have you been you using the Attribute Editor to create your shaders this far? If so, I'd highly recommend you stop doing that. It's not really what the AE is for. Use the Hypershade to create your shader networks graphically, and then use the AE just to edit each node's attributes after the fact. Yes i use Attribute Editor for apply the texture on Nurbs but i'm a bit confused because when i apply a texture on the selected nurbs (lowerpant) it even texture all nurbs around. 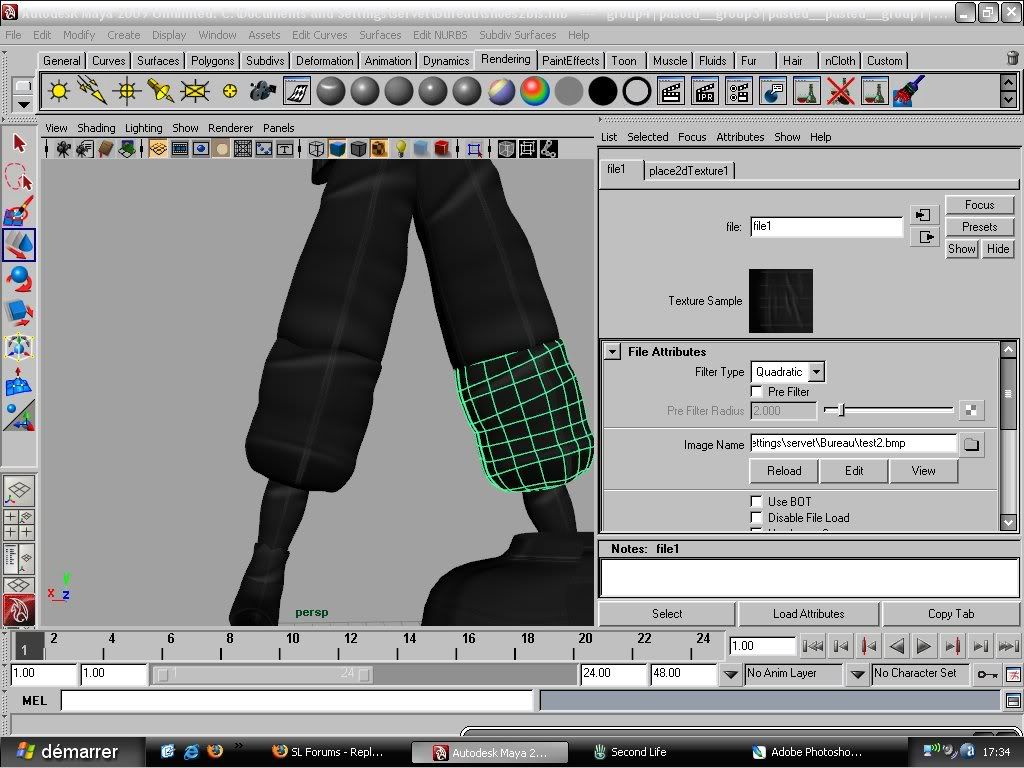 |
|
Chosen Few
Alpha Channel Slave
Join date: 16 Jan 2004
Posts: 7,496
|
02-13-2009 09:02
I'm not quite sure I understand your queation. It sounds like you're wondering why your texture is appearing on more than one surface, even though you thought you applied it only to one. Is that right?
If so, then here's the answer. All surfaces with the same material on them will receive the same texture. The texture is a property of the material, not of the surface. If you want each surface to have a unique texture, assign each one a unique material. Were you using the Hypershade, that would be immediately clear to you. The Attribute Editor does not make it obvious how things are connected. In the Hypershade, you'd see right away that the texture is a part of the material. If I misunderstood your question, please rephrase. _____________________
.
Land now available for rent in Indigo. Low rates. Quiet, low-lag mainland sim with good neighbors. IM me in-world if you're interested. |
|
Aaroniro Alter
Registered User
Join date: 9 Feb 2009
Posts: 7
|
02-13-2009 09:39
your explication is perfect
i apply new materiel for each surface and now it texture well i can see on hypershade and materiels on the detailled graph . Thank you  |
|
Echo Irvine
Dumb American
Join date: 13 Sep 2006
Posts: 35
|
03-30-2009 14:57
Hey thanks for your help Chosen but I still have a problem, whenever I import the correctly converted NURBS to polygon model into Photoshop CS4, I see cheese holes on the model which is strange. Help?
|
|
Chosen Few
Alpha Channel Slave
Join date: 16 Jan 2004
Posts: 7,496
|
03-30-2009 19:05
Can you post a screenshot, Echo?
_____________________
.
Land now available for rent in Indigo. Low rates. Quiet, low-lag mainland sim with good neighbors. IM me in-world if you're interested. |
|
Echo Irvine
Dumb American
Join date: 13 Sep 2006
Posts: 35
|
03-31-2009 11:27
here is an example of what I mean:
This is how the sample model looks like in Maya when it is converted from NURBS > Polygons:  ...and this is the same sample model saved as .obj and opened up in Photoshop:  |
|
Chosen Few
Alpha Channel Slave
Join date: 16 Jan 2004
Posts: 7,496
|
03-31-2009 12:56
I'm not quite sure what's causing that tearing in Photoshop. But I notice you've got a more immediate problem. Your converted polygonal surface is not a topological match for your NURBS surface. You've got non-uniform distribution of subdivisions in there. For best results, the whole thing should be a uniform grid. The way you've got it, the UV map may or may not be compatible.
_____________________
.
Land now available for rent in Indigo. Low rates. Quiet, low-lag mainland sim with good neighbors. IM me in-world if you're interested. |
|
Echo Irvine
Dumb American
Join date: 13 Sep 2006
Posts: 35
|
03-31-2009 13:27
so is there anything I can do? I mean I followed your instructions...
|
|
Chosen Few
Alpha Channel Slave
Join date: 16 Jan 2004
Posts: 7,496
|
03-31-2009 14:25
Experiment with some of the other tesselation methods. Different methods and different settings will work best for each model. There's no one-size-fit's-all. You'll want to check that the 3D shape and the UV map are both a match. Don't export to OBJ until you've got it right.
If the shape looks good, but the UV's are wonky, spend a little time in the UV Texture Editor, snapping UV's to the grid, so everything's nice and uniform. If you want 32x32 squares in your UV Texture Editor's grid, click View -> Grid -> Options Box and set the units to .03125. I just made a shape similar to yours, and had good results by using the Count method, and setting the count to 1024 quads. _____________________
.
Land now available for rent in Indigo. Low rates. Quiet, low-lag mainland sim with good neighbors. IM me in-world if you're interested. |
|
Echo Irvine
Dumb American
Join date: 13 Sep 2006
Posts: 35
|
03-31-2009 22:21
Awesome...the count method works better thanks a lot!
|